
Installation Guide, Seventh Edition - HP Integrity rx4640 Server


Installing Additional Components
Installing Internal Components
Chapter 3
39
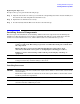
Replacing the Top Cover
To replace the top cover, perform the following steps:
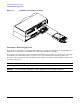
Step 1. Align the tabs at the rear of the top cover with the corresponding slots in the chassis and fully seat
the tabs into the slots and push forward until it seats.
Step 2. Tighten the two thumbscrews securely.
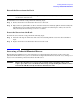
Step 3. If rack-mounted, slide the HP server into the rack until it stops.
Installing Internal Components
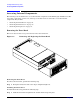
This section provides information about installing additional internal components into the HP Integrity
rx4640 server. This includes processors, memory and PCI-X cards. The processors and memory extender
boards are located under the front cover, and the PCI-X cards are located under the top cover.
WARNING Voltages are present at various locations within the server whenever an AC power
source is connected. This voltage is present even when the main power switch is in
the off position.
Ensure that the server is powered-down and all power sources have been
disconnected from the server prior to attempting the following procedures.
Failure to observe this warning could result in personal injury or damage to
equipment.
CAUTION Observe all ESD safety precautions before attempting this procedure. Failure to follow ESD
safety precautions may result in damage to the server.
Installing Processors
CAUTION Ensure that the cache size is identical for all processors. Failure to observe this caution results
in server failure.
Ensure that all processors are rated for use at the same speed. Failure to observe this caution
results in performance degradation.
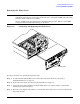
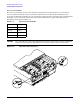
NOTE Additional processors come with a processor installation wrench shown in Figure 3-12. Use the
wrench to install an additional processor.