
Installation Guide, Seventh Edition - HP Integrity rx4640 Server


Installing Additional Components
Installing Internal Components
Chapter 3
41
Installing an Additional Processor on the Extender Board
To install a processor on the processor extender board, perform the following steps:
Prior to installing a processor into your server, read the following instructions carefully, and see Figure 3-12
for a complete understanding of this process.
Step 1. If rack-mounted, slide the HP server out from the rack until it stops. See “Accessing a
Rack-Mounted Server” on page 30.
Step 2. Remove the front bezel. See “Removing the Front Bezel” on page 36.
Step 3. Remove the front cover. See “Removing the Front Cover” on page 37.
Step 4. Press the latch on each extraction lever located on each side of the processor extender board.
Step 5. Pull out on the extraction levers to unplug the processor extender board from the socket located on
the midplane riser board.
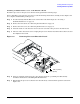
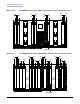
Figure 3-9 Removing Processor Extender Board
Step 6. Using an antistatic wrist strap, place the extender board on a grounding mat (Electrically
Conductive Field Service Grounding Kit-HP 9300-1155).
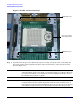
Step 7. Ensure that the processor socket lock is in the unlocked, counterclockwise position as shown in
Figure 3-10.
CPU 1
CPU 0
CPU 3 (under)
CPU 2 (under)