
Installation Guide, Seventh Edition - HP Integrity rx4640 Server


Chapter 5
Connecting Cables
AC Input Power
60
AC Input Power
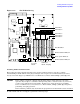
The server can receive AC input from two different AC power sources. If two separate power sources are
available, you can plug the server into the separate power sources, increasing server reliability should one
power source fail. The power receptacles are located at the rear of the chassis. They are labeled PWR 1 and
PWR 2.
CAUTION Do not route data and power cables together in the same cable management arm.
Do not route data and power cables in parallel paths in close proximity to each other. The
suggested minimum distance that the data and power cables should be apart is 7.62 cm (3
inches).
The power cord has current flowing through it, which creates a magnetic field. The potential to
induce electromagnetic interference in the data cables exists, thereby causing data corruption.
You can install a maximum of two power supply units (PSU) in the server. Installing two PSUs in the server
provides n+1 redundancy, meaning that if one PSU fails, there is another power supply to power the server.
You must promptly replace the failed PSU to restore n+1 functionality.
A minimum of one PSU is required to power the server. There is no n+1 capability in this case.
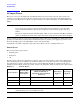
Power States
The server has three power states:
•Standby power
•Full power
•Off
Plug the power cord into the appropriate receptacle on the rear of the chassis to achieve the standby power
state; the front panel power button is not turned on. Full power occurs when the power cord is plugged into
the appropriate receptacle, and either the power is activated through the MP PC command, or the power
button is activated. In the off state, the power cords are not plugged in. Table 5-1 lists the server power states.
NOTE If the power restore feature is set to Always On through the MP PR command, the server may
automatically power on to the full power state.
Table 5-1 Power States
Power States
Power Cable
Plugged Into
Receptacle
Power Activated through the
MP PC Command; or
Front Panel Power Button
Activated
AC Voltage
Applied
DC Voltage
Applied
Standby power Yes No Yes No
Full power Yes Yes Yes Yes
Off No No No No