
Read Me First: Installing a Processor on the Extender Board

2
Installing a Processor on the Extender Board
To install a processor on the extender board, perform the following steps:
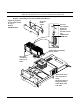
Prior to installing a processor into your system, read the following instructions carefully and refer to Figure 3,
Installing Processor on Extender Board, for a complete understanding of this process.
Step 1. Ensure that the cam on the processor socket lock is in the unlocked, counterclockwise position.
Step 2. Carefully lower the processor, without the sequencer clamp, onto the processor socket. Align the
pins on the bottom of the heatsink to the slots in the retention frame on the extender board.
CAUTION Test the alignment of the assembly to the socket by gently moving the assembly back
and forth with the palm of your hand—you should feel little or no sideplay. However,
because the assembly is not yet tightened, it may tilt slightly towards the center of
the extender board—this is acceptable.
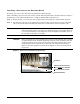
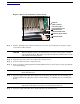
CAUTION Before locking the processor assembly into its socket, ensure that the power cable is
not pinched between the heatsink and sheetmetal frame of the extender board. Also,
ensure that the two power cable ends, attached to the CPU assembly, do not come
unplugged from their sockets when you place the cable under the heatsink. See
Figure 1, Processor Cable Placed Correctly, and Figure 2, “Processor Cable Placed
Incorrectly.”
Figure 1 Processor Cable Placed Correctly
Cable is placed correctly
and is under
the heatsink
Sheetmetal frame
Heatsink
Protective plastic sleeve