
User Service Guide, Third Edition - HP Integrity rx4640 Server


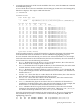
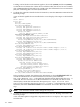
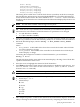


Table Of Contents
- HP Integrity rx4640 Server User Service Guide
- Table of Contents
- About This Document
- 1 Introduction
- 2 Controls, Ports, and LEDs
- 3 Powering Off and Powering On the Server
- 4 Removing and Replacing Components
- Safety Information
- Service Tools Required
- Accessing a Rack Mounted Server
- Accessing a Pedestal Mounted Server
- Removing and Replacing the Front Bezel
- Removing and Replacing the Front and Top Covers
- Removing and Replacing the Memory Extender Board
- Removing and Replacing Memory DIMMs
- Removing and Replacing the Processor Extender Board
- Removing and Replacing a Processor
- Removing and Replacing Hot-Swappable Chassis Fans
- Removing and Replacing the I/O Baseboard
- Removing and Replacing Hot-Pluggable PCI-X Cards
- Removing and Replacing OLX Dividers
- Removing and Replacing Core I/O Cards
- Removing and Replacing the Server Battery
- Removing and Replacing Hard Disk Drives
- Removing and Replacing the SCSI Backplane Board
- Removing and Replacing the Midplane Riser Board
- Removing and Replacing the Power Supplies
- Removing and Replacing the Power Distribution Board
- Removing and Replacing the DVD Drive
- Removing and Replacing the DVD I/O Board
- Removing and Replacing the Display Board
- Removing and Replacing the QuickFind Diagnostic Board
- 5 Troubleshooting
- Troubleshooting Tips
- Possible Problems
- Troubleshooting Using LED Indicators
- Diagnostics
- Recommended Cleaning Procedures
- Where to Get Help
- A Parts Information
- B Booting the Operating System
- Operating Systems Supported on HP Integrity Servers
- Configuring System Boot Options
- Booting and Shutting Down HP-UX
- Booting and Shutting Down HP OpenVMS
- Booting and Shutting Down Microsoft Windows
- Booting and Shutting Down Linux
- C Utilities
- Extensible Firmware Interface Boot Manager
- EFI/POSSE Commands
- Specifying SCSI Parameters
- Using the Boot Configuration Menu
- Index

For example:
Change boot order. Select an Operation
EFI Shell [Built-in]
Current OS
Save Settings to NVRAM
Help
Exit
VenHw(D65A6B8C-71E5-4DF0-A909-F0D2992B5AA9)
Boot0000
BootNext Configuration
To run the selected boot option immediately upon entering the main Boot Manager menu, use
the BootNext option. This option is useful for booting an option that only needs to be booted
once, without changing any other setting in the main Boot Manager menu. This is a one-time
operation and does not change the permanent system boot settings.
This option displays the file systems that are on your server and lets you browse these file systems
for applications or drivers that are executable. Executable files end with the .efi extension. You
can also select remote boot (LAN) options that have been configured on your network.
To restore the default boot next setting, select Reset BootNext Setting.
For example:
Manage BootNext setting. Select an Operation
EFI Shell [Built-in]
Current OS
Reset BootNext Setting
Save Settings to NVRAM
Help
Exit
VenHw(D65A6B8C-71E5-4DF0-A909-F0D2992B5AA9)
Boot0000
AutoBoot Configuration
To set the amount of time the server pauses before attempting to launch the first item in the Boot
Options list, use the AutoBoot option.
For example:
Set Auto Boot Timeout. Select an Option
Set Timeout Value
Delete/Disable Timeout
Help
Exit
Interrupting the timeout during the countdown stops the Boot Manager from loading any boot
options automatically. If there is no countdown, boot options must be selected manually.
• To set the auto boot timeout value, in seconds, select Set Timeout Value and enter the
desired value.
• To disable the timeout function, select Delete/Disable Timeout.
NOTE: When this option is selected, the server does not automatically boot. The server stops
at the EFI boot menu and waits for user input.
Driver Configuration
To define the devices that display output from the system console, use the option. This list
normally includes the VGA monitor and a serial port for directing output to a terminal emulation
package.
Using the Boot Configuration Menu 159