
User Service Guide, Third Edition - HP Integrity rx4640 Server
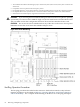

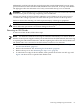
Table Of Contents
- HP Integrity rx4640 Server User Service Guide
- Table of Contents
- About This Document
- 1 Introduction
- 2 Controls, Ports, and LEDs
- 3 Powering Off and Powering On the Server
- 4 Removing and Replacing Components
- Safety Information
- Service Tools Required
- Accessing a Rack Mounted Server
- Accessing a Pedestal Mounted Server
- Removing and Replacing the Front Bezel
- Removing and Replacing the Front and Top Covers
- Removing and Replacing the Memory Extender Board
- Removing and Replacing Memory DIMMs
- Removing and Replacing the Processor Extender Board
- Removing and Replacing a Processor
- Removing and Replacing Hot-Swappable Chassis Fans
- Removing and Replacing the I/O Baseboard
- Removing and Replacing Hot-Pluggable PCI-X Cards
- Removing and Replacing OLX Dividers
- Removing and Replacing Core I/O Cards
- Removing and Replacing the Server Battery
- Removing and Replacing Hard Disk Drives
- Removing and Replacing the SCSI Backplane Board
- Removing and Replacing the Midplane Riser Board
- Removing and Replacing the Power Supplies
- Removing and Replacing the Power Distribution Board
- Removing and Replacing the DVD Drive
- Removing and Replacing the DVD I/O Board
- Removing and Replacing the Display Board
- Removing and Replacing the QuickFind Diagnostic Board
- 5 Troubleshooting
- Troubleshooting Tips
- Possible Problems
- Troubleshooting Using LED Indicators
- Diagnostics
- Recommended Cleaning Procedures
- Where to Get Help
- A Parts Information
- B Booting the Operating System
- Operating Systems Supported on HP Integrity Servers
- Configuring System Boot Options
- Booting and Shutting Down HP-UX
- Booting and Shutting Down HP OpenVMS
- Booting and Shutting Down Microsoft Windows
- Booting and Shutting Down Linux
- C Utilities
- Extensible Firmware Interface Boot Manager
- EFI/POSSE Commands
- Specifying SCSI Parameters
- Using the Boot Configuration Menu
- Index
1 The conditions described in this table apply only to shared slots (slots 3,4-bus 2 and 5,6-bus 3). Slots 7 and 8 are not
shared slots.
2 Compatible: card is accepted and runs at frequency shown.
3 Incompatible-Frequency: card is rejected. The new card will not initialized and powers off due to frequency mismatch.
4 Incompatible-Bus: Card is rejected. The new card will not initialize and powers off due to bus mode mismatch.
5 Maximum bus mode and frequency supported on shared slots is PCI-X 66 MHz.
CAUTION: If you are using the Linux Red Hat Enterprise Advanced Server 4 Update 3 operating
system and you want to install a 1000b-Sx GigE card, do not install it into a slot that shares a bus
with a 33 MHz card. In this configuration the Linux driver will not initialize the new card.
CAUTION: Do not use more than 3 RAID cards in any of the slots on the server. Server power
limitations restrict the use of more than 3 RAID cards per server.
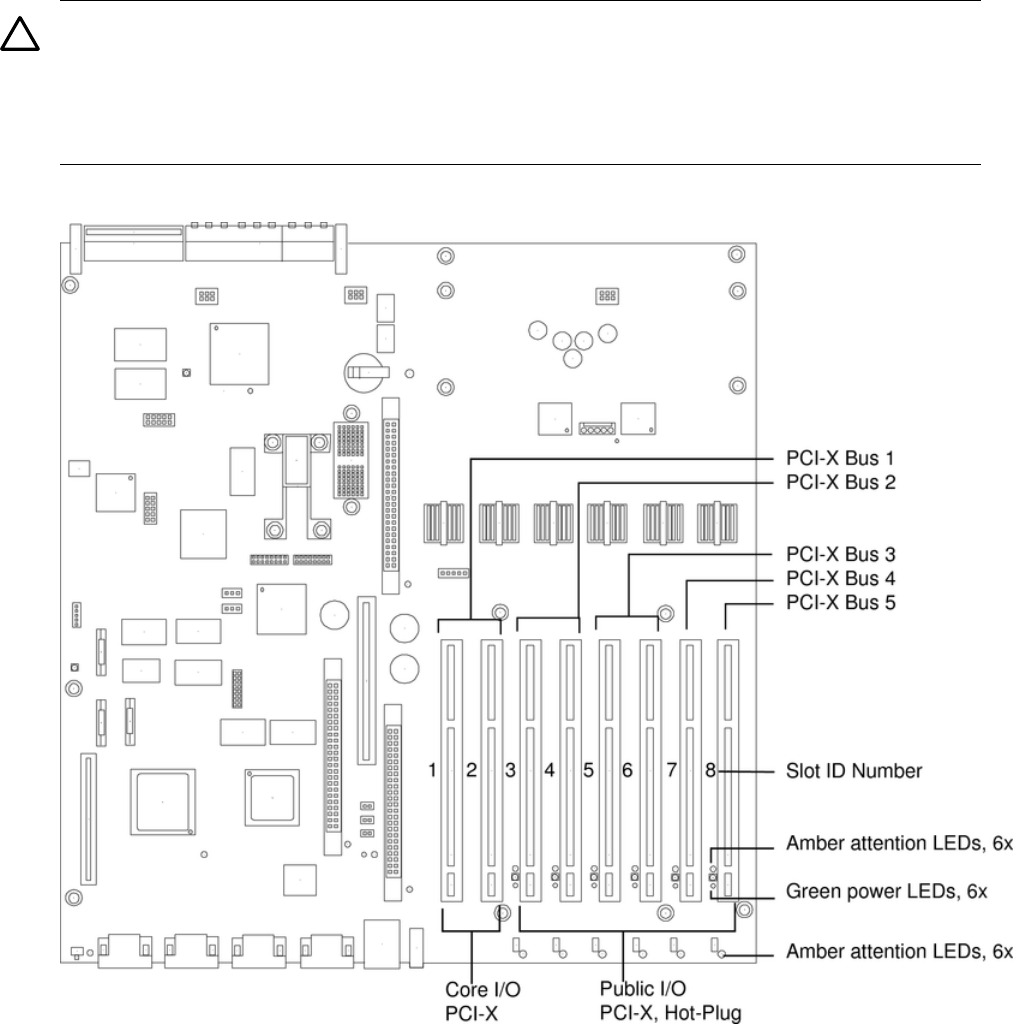
Figure 4-25 Slot ID Numbering
Hot-Plug Operation Procedures
The hot-plug procedures described in this section use the hardware interface only. Software
interface procedures are described in Table 4-7: “Hot-Plug Hardware and Software Interfaces
and OS Availability”. For a complete understanding of all HP-UX 11i v2 hot-plug techniques
64 Removing and Replacing Components