
HP Integrity rx7620 Server - User Service Guide, Sixth Edition


Removing and Replacing the PCI-X Voltage Regulator Modules
Removing the PCI-X VRM
CAUTION: Observe all ESD safety precautions before attempting this procedure. Failure to
follow ESD safety precautions can result in damage to the server.
To remove a PCI-X VRM, follow these steps:
1. Power off the server.
IMPORTANT: Power must be removed from the PCI-X card cage assembly to continue.
2. Remove right side cover.
3. Remove PCI side panel.
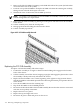
4. Identify the VRM to be replaced (1 through 4).
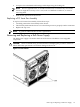
5. Unscrew the VRM from the bracket (two screws on non-component side).
6. Lift up and gently pull the VRM from the socket.
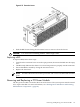
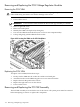
Figure 6-22 Locating the VRMs on the PCI-X Backplane
Replacing the PCI-X VRM
To replace a PCI-X VRM, follow these steps:
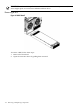
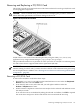
1. Firmly seat the VRM into the socket. Be careful not to bend pins.
2. Attach the bracket to the VRM using the two screws removed earlier.
3. Replace the PCI side panel on the chassis.
4. Replace the right side cover on the chassis.
5. Power on the server.
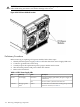
Removing and Replacing the PCI OLR Assembly
The PCI OLR assembly is located in the rear of the chassis. All system power must be removed
before attempting to remove or replace this component.
116 Removing and Replacing Components