
HP Integrity rx7620 Server - User Service Guide, Sixth Edition
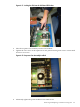

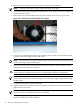
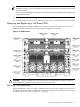

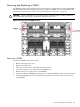

Figure 6-51 Locking the CPU Into the Cell Board ZIF Socket
6. Place the sequencer fan assembly over the CPU module.
7. Tighten the T15 screws on the sequencer in an X pattern turning each screw 2–3 turns until
all screws are secure.
Figure 6-52 Sequencer Fan Assembly Installed
8. Alternately tighten the power module screws until secure.
Removing and Replacing a Central Processing Unit 151