
HP Integrity rx7620 Server - User Service Guide, Sixth Edition
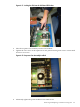

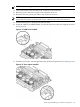
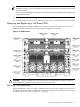

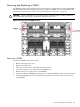
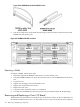

Figure 6-58 Cell Board Detail
NOTE: The cell board weighs 27.8 lb. Support both side edges while removing the cell board
from the chassis.
To remove a cell board VRM, follow these steps:
1. Power off the cell board using the MP command menu PE command.
2. Remove the right side cover.
3. Verify that the power LED located on the left side of the cell board is off before removing
the cell board. For more information, see “Removing a Cell Board VRM” (page 157).
4. Slide the cell board from the chassis.
5. Remove the DIMM cover.
a. Loosen the four captive screws that secure the DIMM cover.
b. Lift the DIMM cover away from the cell board.
6. Remove the CPU cover.
a. Loosen the captive screws on the CPU cover.
b. Lift the cover and set aside.
7. Locate the VRM to be removed.
8. Loosen the hold-down retaining screws that secure the VRM to the cell board.
9. Lift the VRM out of the socket.
Replacing a Cell Board VRM
To replace a cell board VRM, follow these steps:
1. Place the VRM into the socket.
2. Tighten the hold-down retaining screws to secure the VRM into the cell board. Do not over
tighten the screws.
3. Replace the CPU cover.
4. Replace the DIMM cover.
5. Insert the cell board into the chassis.
6. Replace the right side cover.
7. Power on the server.
8. Verify proper operation of the cell board.
158 Removing and Replacing Components