
HP Integrity rx7640 and HP 9000 rp7440 Servers User Service Guide

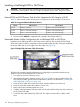
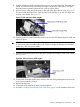
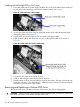
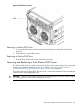
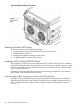
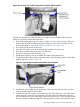
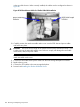
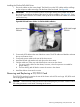


Figure 85 Data and Power Cable Configuration for Slimline DVD Installation
The following procedure provides information on configuring the removable media drive bay
cables for use with the slimline DVD+RW drives.
1. If the cable configuration appears as shown in figure Figure 85 with two power cables and
both the Top DVD/DAT and Bottom DVD data cables, proceed with the installation of the
drives as described in “Installing the Slimline DVD+RW Drives” (page 149).
2. Turn off power and remove the top cover.
3. Move the SCSI cables on top of the mass storage backplane out of the way.
4. Move the removable media data cables out of the way.
5. Remove the metal removable media bay cover.
6. Unfold bends marked in orange and flatten the cable marked Bottom DVD.
7. Fold the Bottom DVD cable at green stripe then nest the Top DVD/DAT and Bottom DVD cables
together and fold as shown in Figure 86.
Figure 86 Top DVD/DAT and Bottom DVD Cables Nested Together
8. Insert the two power cables into the media bay so they are on the left side of the drive bay
when viewed from the front of the system.
9. Carefully insert the SCSI cables into the media bay. The SCSI cables lay on top of the power
cables previously inserted into the media bay. The SCSI cables must extend out of the drive
bay so the black line on each cable aligns with the front of the chassis. The SCSI cables extend
from the drive bay at different lengths. The cable terminators remain ouside of the drive bay
Removing and Replacing a Dual Slimline DVD Carrier 147