
HP Integrity rx8620 Server User Service Guide


Preliminary Procedures
These procedures must be completed before removing the front smart fan assembly.
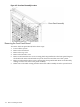
1. Identify the failed fan assembly. Table 6-1 defines the fan LED states.
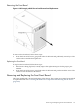
2. Remove the front bezel.
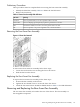
Table 6-1 Smart Fan Assembly LED definitions
MeaningLED State
Fan is at speed and in sync or not at speed less than 12 seconds.On Green
Fan is not keeping up with speed/sync pulse for greater than 12 seconds.Flash Yellow
Fan failed or stalled, has run slow, or fast for greater than 12 seconds.Red
Fan is not present, or no power is applied to fan, or the fan has failed.Off
Removing the Front Smart Fan Assembly
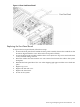
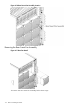
Figure 6-9 Front Fan Removal
To remove the front smart fan assembly, follow these steps:
1. Loosen the two thumb screws securing the fan to the chassis.
2. Slide the fan from the chassis.
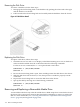
Replacing the Front Smart Fan Assembly
To replace the front smart fan assembly, follow these steps:
1. Position the fan assembly in the chassis.
2. Tighten the two thumb screws to secure the fan to the chassis.
3. Check the fan status LED. It should be GREEN. Refer to Table 6-1 for LED definitions.
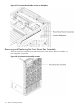
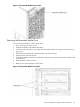
Removing and Replacing the Rear Smart Fan Assembly
The rear smart fan assembly is located in the rear of the chassis. The fan assembly is a
hot-swappable component.
Removing and Replacing the Rear Smart Fan Assembly 115