
HP Integrity rx8620 Server User Service Guide


9. Connect the sequencer fan cable to the connector on the cell board.
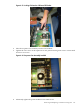
10. Connect the CPU power cables to the CPU power connector.
11. Ensure all cables are properly routed, secured and connected.
12. Repeat steps 1 through 10 for all remaining CPU modules.
13. Reinstall any VRMs that were removed.
14. Install the new processor cover and secure all screws.
15. Position the DIMM cover in place and tighten all captive screws.
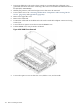
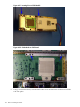
16. Install the cell board in the server.
17. Repeat steps 1 through 15 for all remaining cell boards to be upgraded.
18. Replace covers.
19. Power on the server.
20. To update firmware to the latest revision, use the Firmware Update Utility (FW) from the
MP Command Menu.
21. Upgrade the operating system if required.
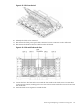
22. NOTE: Firmware must be updated to support the new dual-core processors. Below is an
example of the minimum firmware version.
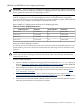
PROGRAMMABLE HARDWARE
1.002System Backplane GPM
1.002System Backplane FM
1.002System Backplane OSP
2.000PCI-X Backplane LPM
1.000PCI-X Backplane HS
2.008Core IO Master
2.008Core IO Slave
1.002Cell LPM
1.006Cell PDHC
FIRMWARE:
A.005.021Core IO Master
A.005.021Core IO Slave
A.003.014Cell PDHC
1.015Cell SFW
23. Power on the nPartition.
24. Use the info cpu command from the EFI Shell to verify proper operation of the cell board.
Installing Intel Itanium 2 CPUs (AB548A and AB439A)
There are additional components required when replacing a CPU with an Intel Itanium 2 CPU.
• Intel Itanium 2 CPUs (AB548A and AB439A)
• VRM Cover (AB388-00002)
• Door Opener (AB388-00003)
• Review IMPORTANT information regarding A1 vs. A2 stepping processors prior to
installation.
148 Removal and Replacement