
HP Integrity rx8620 Server User Service Guide

Removing the PCI Power Supply
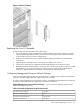
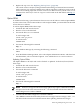
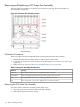
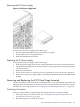
Figure 6-54 PCI Power Supply Detail
To remove the PCI power supply, follow these steps:
1. Securely grasp the handle on the front of the power supply.
2. Firmly depress the securing thumb latch.
3. Slide the module from the chassis.
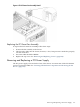
Replacing the PCI Power Supply
To replace the PCI power supply, follow these steps:
1. Slide the power supply in the chassis until the thumb latch clicks into the locked position.
2. The module easily slides into the chassis; however, a slow, firm pressure is needed to properly
seat the connection.
3. Release the thumb latch.
4. Power on the system. To confirm the server is powered on, use the PE and PS commands.
5. Note status of the power supply LEDs. Green LED should be ON and the fault LED should
be OFF.
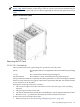
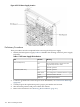
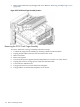
Removing and Replacing the PCI-X Card Cage Assembly
The PCI-X assembly comes with the PCI-X backplane and a card cage assembly mounted to the
backplane and is located in the rear of the server. The system power must be turned off to replace
this FRU. See “Powering Off Hardware Components and Powering On the Server” (page 106).
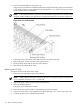
Preliminary Procedures
These procedures must be completed before removing the PCI-X card cage assembly.
1. Shut down and power off the system. See “Powering Off Hardware Components and
Powering On the Server” (page 106).
2. Disconnect all power cords from the server.
Removing and Replacing the PCI-X Card Cage Assembly 169