
HP Integrity rx8620 Server User Service Guide
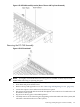
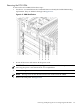
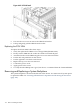

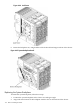
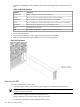

Figure 6-56 PCI-X Card Cage Assembly Detail
Replacing the PCI-X Card Cage Assembly
To replace the PCI-X card cage assembly, follow these steps:
1. Tilt the assembly toward the chassis. Position the assembly at an angle so that the retaining
standoff pins engage.
2. Using extractors, slide the board toward the system backplane until fully seated.
3. Reconnect the two cable bundles at the rear of the mass storage board and tighten the two
captive screws onboard the backplane near the extractor levers.
4. Replace all PCI cards into their proper slots.
5. Reconnect all PCI card cables.
6. Reconnect the PCI OLR ribbon cable to the PCI backplane.
7. Re-engage the PCI power supplies.
8. Remove the air baffle from the old PCI-X card cage assembly and install on the new PCI-X
assembly. For the location of the air baffle, see Figure 6-57.
The air baffle attaches to the PCI-X assembly by two captive thumbscrews. One thumbscrew
is located on each end of the air baffle.
Removing and Replacing the PCI-X Card Cage Assembly 171