
HP-UX 11i v3 Dynamic nPartitions - Features and Configuration Recommendations

12
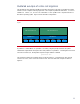
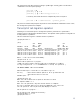
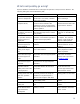
Figure 3.
nPartition 0 nPartition 1
cell 0
base cell
cell 1
float cell
cell 2
float cell
cell 3
float cell
cell 4
base cell
cell 5
base cell
cell 6
base cell
cell 7
base cell
HP-UX instance 0 HP-UX instance 1
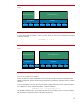
nPartition 0 nPartition 1
cell 0
base cell
cell 1
float cell
cell 2
float cell
cell 3
float cell
cell 4
base cell
cell 5
base cell
cell 6
base cell
cell 7
base cell
HP-UX instance 0 HP-UX instance 1
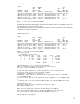
Cell 2 is still assigned to partition 0, but it is inactive. Now, the cell can be unassigned from partition
0 with the command
parmodify –p 0 -d 2
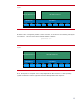
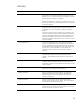
Figure 4.
nPartition 0
nPartition 1
cell 0
base cell
cell 1
float cell
cell 2
unassigned
cell 3
float cell
cell 4
base cell
cell 5
base cell
cell 6
base cell
cell 7
base cell
HP-UX instance 0 HP-UX instance 1
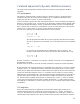
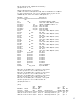
nPartition 0
nPartition 1
cell 0
base cell
cell 1
float cell
cell 2
unassigned
cell 3
float cell
cell 4
base cell
cell 5
base cell
cell 6
base cell
cell 7
base cell
HP-UX instance 0 HP-UX instance 1
Cell 2 is not assigned to any partition.
For this example, the system administrator does not use the remote management capabilities of the
nPartition commands. Instead, the following commands are entered into a terminal session on HP-UX
instance 1.
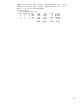
Cell 2 is unassigned, and once the cell reset operation triggered by the previous online deactivation
has completed, it can be assigned to partition 1 with the command
parmodify –p 1 -a 2:floating:y::100%
The attributes designate cell 2 as a floating cell with 100% of its memory used as cell local memory.
The result of the assignment is shown in the following diagram: