
Installation Guide, Third Edition - HP Integrity rx8640 SEU

System damage can occur through improper removal and re-installation of devices. This task
must be performed by trained personnel only. Instructions for removing and re-installing these
components can be found in the Removal & Replacement chapter of the Service Guide.
CAUTION: Observe all ESD safety precautions before attempting this procedure. Failure to
follow ESD safety precautions could result in damage to the server.
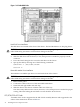
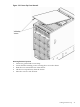
Any hp SEU installed into a rack is shipped with equipment slides. With every set of slides comes
an installation guide: installation guide, hp J1530B, rack integration kit (lower case intended). Follow
the steps in this installation guide to determine where and how to place the SEU into the rack
before proceeding with Step 1. The installation guide may also be found on the Web at
http://www.hp.com/racksolutions
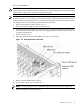
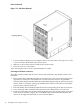
1. Reduce the weight by removing both bulk power supplies.
2. Locate the four positioning handles on the sides of the system. They are color coded blue
and are located close to each base corner of the unit.
3. Unfold the handles so they extend out from the unit. The unit is now ready for manual lifting
by two qualified HP Service technicians.
4. After the SEU is secured in the rack cabinet, re-install the previously removed bulk power
supplies.
Installing Accessories
Additional accessories can be installed in the SEU, such as PCI IO cards, hard disk drive storage,
and removable media device storage.
Installing Additional Components
This section provides installation instructions and dependencies for add-on products ordered
after installation.
Embedded Disks
When disks are installed, the top two hard disk drives are driven by cell 2, located in the server
connected to the SEU. The bottom two hard disk drives are driven by cell 3, located in the server
connected to the SEU.
A list of replacement drives for the SEU is located in Appendix A in the SEU Service Guide. The
list contains both removable media drives and hard disk drives.
Installing Accessories 31