
CPU Configuration Guidelines for vPars


13
count based semantics when migrating CPU’s. The following paragraph will explain how to create a
vPar with path based CPU assignments.
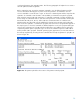
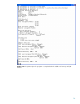
Before creating the vPar, execute the vparstatus command to view the defined partitions and the
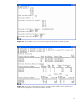
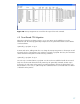
resources allocated to them (Figure 15). Now execute the vparstatus –A command to view the
resources available to create the vPar. Figure 16 shows the command syntax and the output from the
vparstatus –A command. Locate the CPU’s in the available pool that will be assigned to vpolyc01.
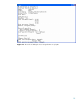
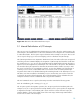
Next create the vPar vpolyc01 with a minimum of 1 CPU and a maximum of 6 CPU’s and have the
monitor assign 4 count based CPU’s to start with. Next replace the count based CPU’s with the path
based CPU’s: 0.120, 0.121, 0.122, and 2.120. Now set minimum CPU’s to 4 and leave the
maximum CPU’s at 6 (The CPU’s must be added to the vPar before the minimum can be adjusted).
Now execute the vparstatus –v command for vpolyc01 and see that 4 user assigned CPU’s appear in
the output. Figure 17 shows the commands to add and adjust the resources for vpolyc01 and Figure
18 shows the configuration of vpolyc01 after the modifications. Now add the memory and I/O to
complete the partition plan for vpolyc01. Figure 19 shows the command sequence to add 2 GB of
memory and the I/O to vpolyc01. Install the operating system, applications, boot the vPar and view
the interrupt assignment by executing the intctl command. The interrupt assignments for vpolyc01 are
shown in Figure 20.
Figure 15. The partition plan before the creation of the partition named vpolyc01.