HP Jetdirect pn1050 Network Projector Manager Administrator’s Guide
© Copyright 2005 Hewlett-Packard Development Company, L.P. Reproduction, adaptation, or translation without prior written permission is prohibited, except as allowed under the copyright laws. The information contained in this document is subject to change without notice. The only warranties for HP products and services are set forth in the express warranty statements accompanying such products and services. Nothing herein should be construed as constituting an additional warranty.
Table of Contents 1. Introducing the HP Jetdirect Network Projector Manager Introduction .......................................................................................... 5 Security Protocols ................................................................................ 5 Supplied Manuals................................................................................. 7 HP Support ........................................................................................... 7 Product Registration...
A. TCP/IP Overview Introduction ........................................................................................ 90 IP Address .......................................................................................... 91 Configuring IP Parameters................................................................. 93 Subnets ............................................................................................... 94 Gateways .........................................................................
1 Introducing the HP Jetdirect Network Projector Manager Introduction The HP Jetdirect network projector manager is a server that connects a projector directly to a network, so that you can manage it from anywhere on the network. Throughout this manual, this product is called a projector server. Security Protocols SNMP SNMP (Simple Network Management Protocol) is used by network management applications for device management.
Authentication EAP/802.1X Server-Based Authentication As a network client, the HP Jetdirect projector server support network access using the Extensible Authentication Protocol (EAP) on an IEEE 802.1X network. The IEEE 802.1X standard provides a port-based authentication protocol where a port can allow or block access depending on client authentication results. When using an 802.
Supplied Manuals The manuals listed below are supplied with your projector server on the Documentation CD. ● This Administrator’s Guide. ● The Setup Guide. HP Support HP Online Support Click your way to a quick solution! The HP Web site: http://www.hp.com/support is a great place to start for answers to questions about your HP Jetdirect projector server — 24 hours a day, 7 days a week.
● The embedded Web server resident on the projector server provides a firmware upgrade feature using your Web browser. For more information see Chapter 4. ● FTP (File Transfer Protocol) may be used to transfer a firmware upgrade image file to the projector server. To start an FTP session, use the device IP address or host name. If a password is set, it must be entered to log into the device.
2 HP Web Jetadmin Introduction HP Web Jetadmin is an enterprise management tool that allows you to remotely install, configure, and manage a wide variety of HP and non-HP network printers and HP projectors simply through a standard Web browser. HP Web Jetadmin can be used to proactively manage both individual or groups of devices. To use HP Web Jetadmin, see the online help and documentation supplied with the software.
Installing HP Web Jetadmin Before installing the HP Web Jetadmin software, you must have administrator or root privileges on the local system: 1. Download the installation files from HP online support at http://www.hp.com/go/webjetadmin. 2. Follow the instructions on the screen to install the HP Web Jetadmin software. Note Installation instructions are also contained in the HP Web Jetadmin install file.
Configuring and Modifying a Device Using your browser, navigate to HP Web Jetadmin’s URL. For example: http://systemname.domain:port/ Note. In place of systemname.domain, the IP address of the host computer on which HP Web Jetadmin is installed can be used. Follow the instructions on the appropriate home page to find and manage your printers and projectors.
3 TCP/IP Configuration Introduction To operate properly on a TCP/IP network, the HP Jetdirect projector server must be configured with valid TCP/IP network configuration parameters, such as an IP address that is valid for your network. For general information on TCP/IP networks, see Appendix A.
Default IP Address When in a factory-default state (for example, when shipped from the factory or after a cold-reset), the HP Jetdirect projector server has no IP address. A default IP address may or may not be assigned depending on the network environment. Default IP Address Will Not Be Assigned A default IP address will not be assigned if a server-based method (such as BOOTP or DHCP) is successful.
Link-local addresses will not route off the local link, and access to or from the Internet will not be available. The default gateway address will be the same as the link-local address. If a duplicate address is sensed, the HP Jetdirect server will automatically reassign its address, if necessary, in accordance with standard link-local addressing methods. ● On large or enterprise IP networks, a temporary address of 192.0.0.
DHCP Requests Enable/Disable When a default IP address is assigned, you can configure the projector server to send, or not send, periodic DHCP requests. DHCP requests are used to retrieve IP configuration settings from a DHCP server on the network. By default, this parameter is enabled, allowing DHCP requests to be transmitted. However, this parameter may be disabled through supported configuration tools such as a Web browser, and SNMP management applications.
Note Linux and UNIX systems: For more information, see the bootpd “man” page. On HP-UX systems, a sample DHCP configuration file (dhcptab) may be located in the /etc directory. Since HP-UX presently does not provide Dynamic Domain Name Services (DDNS) for its DHCP implementations, HP recommends that you set all projector server lease durations to infinite. This ensures that server IP addresses remain static until such time as Dynamic Domain Name Services are provided. ● RARP.
Using BOOTP/TFTP BOOTP (Bootstrap Protocol) and TFTP (Trivial File Transfer Protocol) provide a convenient way to automatically configure the HP Jetdirect projector server for TCP/IP network operation. When powered on, the Jetdirect server sends a BOOTP request message onto the network. A properly configured BOOTP server on the network will respond with a message that contains basic network configuration data for the Jetdirect server.
Note BOOTP operation is similar to DHCP, but the resulting IP parameters will be the same when powered off/on. In DHCP, IP configuration parameters are leased and may change over time. When in its factory-default state and powered on, the HP Jetdirect projector server will attempt to automatically configure itself using several dynamic methods, one of which is BOOTP.
The BOOTP reply may contain the name of a configuration file containing enhanced configuration parameters. If the HP Jetdirect projector server finds such a file, it will use TFTP to download the file and configure itself with these parameters. For a description of entries, see “TFTP Configuration File Entries.” Configuration parameters retrieved through TFTP are optional. Note HP recommends that the BOOTP server be located on the same subnet as the projectors it serves.
Table 3.1 Tags Supported in a BOOTP/DHCP Boot file (1 of 3) Item RFC 2132 Option Description nodename -- The name of the peripheral. This name identifies an entry point to a list of parameters for a specific peripheral. nodename must be the first field in an entry. (In the example above, nodename is “picasso”.) ht -- The hardware type tag. For the HP Jetdirect projector server, set this to ether (for Ethernet). This tag must precede the ha tag. vm -- The BOOTP report format tag (required).
Table 3.1 Tags Supported in a BOOTP/DHCP Boot file (2 of 3) Item RFC 2132 Option Description hn 12 The host name tag. This tag does not take a value but causes the BOOTP daemon to download the host name to the HP Jetdirect projector server. The host name will be returned on an SNMP sysName request by a network application. dn 15 Domain name tag. Specifies the domain name for the HP Jetdirect projector server (for example, support.hp.com).
Table 3.1 Tags Supported in a BOOTP/DHCP Boot file (3 of 3) Item RFC 2132 Option Description T146 -- Buffer Packing option. An HP-proprietary tag to set buffer packing for TCP/IP packets. 0 (default): Normal data buffers are packed before sending to the projector. 1: Disable buffer packing. Data is sent to the projector when received. T147 -- Write Mode option. An HP-proprietary tag that controls the TCP PSH flag setting for device-to-client data transfers.
A colon (:) indicates the end of a field, and a backslash (\) indicates that the entry is continued on the next line. Spaces are not allowed between the characters on a line. Names, such as host names, must begin with a letter and can contain only letters, numbers, periods (for domain names only), or hyphens. The underline character (_) is not allowed. Refer to your system documentation or online help for more information.
Table 3.2 lists supported TFTP commands. Table 3.3 describes the TFTP parameters. Table 3.
Table 3.3 TFTP Configuration File Parameters (1 of 7) General passwd: (passwd-admin:) A password (up to 16 alphanumeric characters) that allows administrators to control changes of HP Jetdirect projector server configuration parameters through HP Web Jetadmin or embedded Web server. The password may be cleared by a cold reset. sys-location: (host-location:, location:) Identifies the physical location of the projector (SNMP sysLocation object). Only printable ASCII characters are allowed.
Table 3.3 TFTP Configuration File Parameters (2 of 7) TCP/IP Main host-name: (sys-name:, name:) Specifies the node name. Default is NPIxxxxxx, where xxxxxx is the last six digits of the LAN hardware address. domain-name: The domain name for the device (for example, support.hp.com). It does not include the host name; it is not the Fully Qualified Domain Name (such as projector1.support.hp.com). pri-dns-svr: (dns-srv) The IP address of the DNS (Domain Name System) server.
Table 3.3 TFTP Configuration File Parameters (3 of 7) TCP/IP Other Settings syslog-config: Enables or disables syslog server operation on the projector server: 0 disables, 1 (default) enables. syslog-svr: (syslog-srv:) The syslog server’s IP address. It specifies the server that the HP Jetdirect projector server sends syslog messages to. For more information, see Appendix A.
Table 3.3 TFTP Configuration File Parameters (4 of 7) idle-timeout: The number of seconds that an idle data connection is allowed to remain open. The acceptable values range from 0 to 3600 (1 hour). If “0” is typed, the timeout mechanism is disabled. The default is 270 seconds. user-timeout: An integer (1..3600) that specifies the number of seconds that your FTP session can be idle before it will be automatically disconnected. The default is 900 seconds. 0 disables the timeout.
Table 3.3 TFTP Configuration File Parameters (5 of 7) default-ip: Specifies the IP address to use when the projector server is unable to obtain an IP address from the network during a forced TCP/IP reconfiguration (for example, when powered off/on or manually configured to use BOOTP/DHCP). DEFAULT_IP: sets the legacy default IP address 192.0.0.192. AUTO_IP: sets a link-local IP address 169.254.x.x. The initial setting is determined by the IP address obtained when first powered on.
Table 3.3 TFTP Configuration File Parameters (6 of 7) SNMP snmp-config: Enables or disables SNMP operation on the projector server. 0 disables, 1 (default) enables SNMP. CAUTION: Disabling SNMP will disable all SNMP agents (SNMP v1, v2, v3) as well as communications with HP Web Jetadmin. In addition, firmware upgrades through current HP downloading utilities will be disabled.
Table 3.3 TFTP Configuration File Parameters (7 of 7) Other Settings link-type: (10/100 Fast Ethernet) Sets the projector server’s link speed (10 or 100 Mbps) and communication mode (Full- or Half-Duplex). Selections are AUTO, 100FULL, 100HALF, 10FULL, 10HALF. For AUTO (default), the server uses autonegotiation to determine the link speed and mode. If autonegotiation fails, then 100HALF is set.
Using DHCP Dynamic Host Configuration Protocol (DHCP, RFC 2131/2132) is one of several auto configuration mechanisms that the HP Jetdirect projector server uses. If you have a DHCP server on your network, the HP Jetdirect projector server automatically obtains its IP address from that server and registers its name with any RFC 1001 and 1002-compliant dynamic name services as long as a WINS (Windows Internet Naming Service) server IP address has been specified.
UNIX Systems For more information on setting up DHCP on UNIX systems, see the bootpd man page. On HP-UX systems, a sample DHCP configuration file (dhcptab) may be located in the /etc directory. Since HP-UX presently does not provide Dynamic Domain Name Services (DDNS) for its DHCP implementations, HP recommends that you set all projector server lease durations to “infinite”. This ensures that server IP addresses remain static until dynamic domain name services are provided.
Windows NT 4.0 Server To set up a DHCP scope on a Windows NT 4.0 server, perform the following steps: 1. At the Windows NT server, open the Program Manager window and double-click the Network Administrator icon. 2. Double-click the DHCP Manager icon to open this window. 3. Select Server and select Server Add. 4. Type the server IP address, then click OK to return to the DHCP Manager window. 5. In the list of DHCP servers, click on the server you have just added, then select Scope and select Create. 6.
8. Skip this step if you have assigned unlimited leases in the previous step. Otherwise, select Scope and select Add Reservations to set up your projectors as reserved clients. For each projector, perform the following steps in the Add Reserved Clients window to set up a reservation for that projector: a. Type the selected IP address. b. Obtain the MAC address or hardware address from the label on the server, embedded web server, or on-screen Help menu, and type this address in the Unique Identifier box.
c. d. You must now provide the IP address of the WINS server by doing the following: ● Select Value, then Edit Array. ● From the IP Address Array Editor, select Remove to delete any undesired addresses previously set. Then type in the IP address of the WINS server and select Add. ● Once the address appears in the list of IP addresses, select OK. This returns you to the DHCP Options window.
6. Enter the range of IP addresses for this scope (beginning IP address and ending IP address). Also, enter the subnet mask. then click Next. Note If subnetting is used, the subnet mask defines which portion of an IP address specifies the subnet and which portion specifies the client device. For more information, see Appendix A. 7. If applicable, enter the range of IP addresses within the scope to be excluded by the server. Then click Next. 8. Set the IP address lease duration for your DHCP clients.
11. Configure your projector with a reserved IP address within the DHCP scope: a. In the DHCP tree, open the folder for your scope and select Reservations. b. Click the Action menu and select New Reservation. c. Enter the appropriate information in each field, including the reserved IP address for your projector. (Note: the MAC address for your HP Jetdirect-connected projector is available on the label on the server, embedded web server, or on-screen Help menu.) d.
If you change to Manual configuration, the DHCP-configured IP address is released and the user-specified IP parameters are used. Therefore, if you manually provide the IP address, you should also manually set all of the configuration parameters, such as subnet mask, default gateway, and idle timeout. Note ENWW If you choose to re-enable a DHCP configuration, the projector server will acquire its configuration information from a DHCP server.
Using RARP This section describes how to configure the projector server using the Reverse Address Resolution Protocol (RARP) on UNIX and Linux systems. This setup procedure enables the RARP daemon running on your system to respond to a RARP request from the HP Jetdirect projector server and to supply the IP address to the server. 1. Turn the projector off. 2. Log onto your UNIX or Linux system as a superuser. 3.
Note If your system uses Network Information Service (NIS), you need to incorporate changes to the NIS host and ethers databases. 8. Turn the projector on. 9. To verify that the card is configured with the correct IP address, use the ping utility. At the prompt, type: ping where is the assigned address from RARP. 10. If ping does not respond, see Chapter 6.
Using the arp and ping Commands You can configure an HP Jetdirect projector server with an IP address using an ARP (Address Resolution Protocol) command from a supported system. The protocol is not routable, that is, the workstation from which the configuration is made must be located on the same network segment as the HP Jetdirect projector server.
Depending on the system, the LAN hardware address may require a specific format. For example: ● For Windows NT 4.0, 2000, XP, Server 2003 arp -s 192.168.45.39 00-01-E6-a2-31-98 ping 192.168.45.39 ● For UNIX arp -s 192.168.45.39 00:01:E6:a2:31:98 ping 192.168.45.39 Note Once the IP address has been set on the projector server, additional arp and ping commands will be ignored. Once the IP address is configured, arp and ping cannot be used unless the server is reset to factory values (see Chapter 6).
Using the Embedded Web Server You can set IP parameters on HP Jetdirect projector servers that support the embedded Web server. For more information, refer to Chapter 4. Moving to Another Network When moving an HP Jetdirect projector server that is configured with an IP address to a new network, make sure that the IP address does not conflict with addresses on the new network.
4 Using the Embedded Web Server Introduction HP Jetdirect projector servers contain an embedded Web server that can be accessed from a compatible Web browser over an intranet. The embedded Web server provides access to configuration and management pages for the HP Jetdirect projector server and the attached projector. Tabs across the upper portion of your browser window provide access to device and networking pages.
Networking Tab Menu items in left margin Figure 4.2 HP Jetdirect Networking Tab For network parameter descriptions, see “Networking Tab”. Projector Tab Menu items in left margin Figure 4.
Requirements Compatible Web Browsers To access the embedded Web server, you must use a compatible Web browser. In general, the embedded Web server can be used with Web browsers that support HTML 4.01 and cascading style sheets. Hewlett-Packard tests a number of current and older browsers using a variety of systems. In general, we recommend using the following browsers: ● Microsoft Internet Explorer 5.0 or greater ● Netscape Navigator 6.
Viewing the Embedded Web Server Before you can use the embedded Web server, the HP Jetdirect projector server must be configured with an IP address. For a description of an IP address and an overview of TCP/IP networking, see Appendix A. There are many ways to configure an IP address on the server. For example, you can automatically configure IP parameters over the network using BOOTP (Bootstrap Protocol) or DHCP (Dynamic Host Configuration Protocol) each time the server is turned on.
3. If prompted with security alerts, click Yes to proceed. For initial access, the embedded Web server uses standard HTTP. However, it can be configured to appear as a secure site, using an X.509-compliant certificate installed on the projector server for identification. When properly configured, encrypted browser communications through HTTPS (secure HTTP) may be used for secure access.
HP Jetdirect Home Tab The HP Jetdirect projector server’s product model, firmware version, and network addresses are displayed along with any device information that can be retrieved. Table 4.1 provides a summary of the items displayed on the HP Jetdirect home page. Table 4.1 HP Jetdirect Home Page Items (1 of 2) Item Description Home tab Provides access to server/projector information and language selection for the embedded web server.
Table 4.1 HP Jetdirect Home Page Items (2 of 2) Item Description System Up Time The length of time since either the HP Jetdirect projector server or the network device was last powered off/on. System Contact A text string (stored on the HP Jetdirect projector server) for the name of a person to contact for this device. See TCP/IP on the Networking Tab. System Location A text string (stored on the HP Jetdirect projector server) that identifies the physical location of this device.
Networking Tab The Networking tab provides access to HP Jetdirect network configuration parameters and status. The menu items in the left margin provide access to configuration and status pages. Table 4.2 Networking Menu Items CONFIGURATION section ● Network Settings ● Privacy Settings ● Other Settings ● Select Language SECURITY section ● Settings ● Mgmt. Protocols ● Authorization ● 802.
Network Settings The Network Settings pages allow you to set or change configuration parameters for TCP/IP and SNMP protocols. To assign a parameter setting, enter the desired value and click Apply. TCP/IP The TCP/IP page provides configuration parameters summarized in Table 4.3. Table 4.3 TCP/IP Settings (1 of 3) Item Description IP Configuration Method Selects the method that the HP Jetdirect projector server will use for its IP configuration parameters: BOOTP (default), DHCP, Manual, or Auto IP.
Table 4.3 TCP/IP Settings (2 of 3) Item Description Default Gateway Identifies the IP address of a router or computer that is used to connect to other networks or subnetworks. Domain Name Specifies the name of the Domain Name System (DNS) domain that the HP Jetdirect projector server resides in (for example, support.hp.com). It does not include the host name; it is not the Fully Qualified Domain Name (such as projector1.support.hp.com).
Table 4.3 TCP/IP Settings (3 of 3) Item Description TTL/SLP Specifies the IP multicast Time To Live (TTL) discovery setting for Service Location Protocol (SLP) packets. The default value is 4 hops (the number of routers from the local network). The range is 1-15. If set to -1, multicast capability is disabled. For projector servers configured for Auto IP (link-local) addresses, this field will be ignored. TTL on outbound packets will always be set to 255 and limited to the link-local network.
SNMP You can specify or change the SNMP (Simple Network Management Protocol) parameters provided. See Table 4.4. CAUTION If you use HP Web Jetadmin to manage your devices, you should use HP Web Jetadmin to seamlessly configure SNMP v3 and other security settings on the projector server. Using the embedded Web server to create the SNMP v3 account will erase any existing SNMP v3 accounts. In addition, the SNMP v3 account information will need to be implemented on the SNMP management application.
Table 4.4 SNMP Settings (2 of 2) Item Description Disable SNMPv1/v2 This option disables the SNMP v1/v2c agents on the projector server, which is recommended for secure environments. If SNMP v1/v2c is disabled, some discovery utilities may not operate properly. Enable SNMPv3 This option enables (check) or disables (clear) the SNMP v3 agent on the projector server.
Misc. Settings The Miscellaneous Settings parameters allow you to set a variety of advanced protocols and features, as described below. See Table 4.5. Table 4.5 Miscellaneous Settings (1 of 2) Item Description SLP Config Enable or disable SLP (Service Location Protocol), used by selected client application software to automatically discover and identify the HP Jetdirect projector server.
Table 4.5 Miscellaneous Settings (2 of 2) Item Description Syslog Facility Specify the encoded source facility of a message (for example, to identify the source of selected messages during troubleshooting). By default, the HP Jetdirect projector server uses local user values of local0 through local7 to isolate individual or groups of projector servers. Firmware Upgrade This page allows you to upgrade the projector server with new features.
Privacy Settings On the Privacy Settings page, you can allow the embedded Web server to collect product identification and use information and then send the information to HP (Internet access is required). Product use information assists HP in improving product features and services. The default setting for this page will depend on the user’s selection on initial access to the Networking tab. To enable this feature, check the checkbox and click Apply.
Wizard Note If you use HP Web Jetadmin to manage your devices, you should not use this wizard. Instead, use HP Web Jetadmin to configure your network security settings to ensure they are properly set for your network. The Wizard page allows you to run the HP Jetdirect Security Configuration Wizard. This wizard will guide you through the projector server’s security configuration needed for your network. Click Start Wizard to run the wizard. This opens the Security Level page.
Table 4.6 Wizard Security Levels (1 of 2) Security Level Description Basic Security This option requires that you configure an administrator password for configuration management. The administrator password is shared with other management tools, such as SNMP applications. However, some management tools use plain-text communications and are not secure. The Administrator Account page is used to enter the administrator password.
Table 4.6 Wizard Security Levels (2 of 2) Security Level Description Custom Security This option proceeds through all available security settings supported by your projector server. For more information on specific parameters and selections, see the tabs on the 802.1x Authentication, Mgmt. Protocols, and Authorization menu pages under SECURITY. The Administrator Account page is used to enter the administrator password. The Web Mgmt.
Authorization The Authorization page provides tabs that allow you to control access to the device, as well as to device configuration and management features. In addition, you may configure certificates for client and server authentication. Admin. Account Use this page to set an administrator password for controlled access to Jetdirect configuration and status information. The administrator password is shared by Jetdirect configuration tools, such as the embedded Web server and HP Web Jetadmin.
Certificates This tab provides access to installation, configuration and management services for X.509 digital certificates. A digital certificate is an electronic message typically containing, among other things, a key (a short string used for encryption and decryption) and a digital signature. Certificates may be issued and signed by a trusted third party (commonly called a Certificate Authority, or CA), which may exist internal or external to the organization.
Click View to view the contents of an installed Jetdirect certificate, or click Configure to update or install a new one. See “Configuring Certificates.” A CA certificate is not saved when the projector server is reset to factory-default values. The maximum certificate size that can be installed on the HP Jetdirect projector server is 3072 bytes. Configuring Certificates When you click Configure, a certificate management wizard will help you update or install a certificate.
Table 4.7 Certificate Configuration Screens (2 of 4) Create Certificate Request. Using this option, you are prompted for specific device and organizational information in the following screen: ● Certificate Information This option may be used, for example, when an authentication protocol requires that a Jetdirect certificate issued by a trusted third party or Certificate Authority be installed. Install Certificate.
Table 4.7 Certificate Configuration Screens (3 of 4) Certificate Validity Use this screen to specify how long the Jetdirect self-signed certificate will be valid. This screen appears only when a self-signed certificate is preinstalled and you click Edit Settings to update the validity period. It specifies the current Coordinated Universal Time (UTC). UTC is a time scale maintained by the International Bureau of Weights and Measures. It adjusts for differences between Greenwich Mean Time and atomic time.
Table 4.7 Certificate Configuration Screens (4 of 4) Install Certificate, or Install CA Certificate Use the Install Certificate screen to install a Jetdirect certificate. Use the Install CA Certificate screen to install a trusted Certificate Authority (CA) certificate for use during EAP authentication. Install a PEM/Base64 (Privacy Enhanced Mail) encoded certificate. To install a certificate, specify the name and path of the file that contains the certificate.
Access Control Use this tab to display the Access Control List (ACL) on the HP Jetdirect projector server. An access control list (or host access list) specifies individual host systems, or networks of host systems, that will be allowed to access the server and the attached network device. Up to 10 entries can be included on the list. If the list is empty (no hosts are listed), any supported system can access the server. CAUTION Use caution when using this feature.
To add an entry into the access control list, use the IP Address and Mask fields to specify a host, and click (check) the Save checkbox for that entry. Then click Apply. To delete an entry from the list, clear the Save checkbox for that entry. Then click Apply. To clear the entire access control list, clear all Save checkboxes, and click Apply. Mgmt. Protocols This link provides access to management communications and other protocols that affect security. Web Mgmt.
Note Cipher suites support different levels of encryption strength. The cipher suites currently supported for encryption and decryption are DES (Data Encryption Standard, 56-bit), RC4 (40-bit or 128-bit), and 3DES (168-bit). SNMP Use this tab to enable or disable SNMP v1, v2c and v3 agents on the server. For a description of SNMP selections, see Table 4.4. SNMP v3. HP Jetdirect projector servers include an SNMP v3 (Simple Network Management Protocol, version 3) agent, for enhanced SNMP security.
CAUTION You should ensure secure embedded Web communications through HTTPS is enabled before creating the initial SNMP v3 account. This will help to prevent access or interception of account information over a connection that is not secure. SNMP v1 and v2c agents can coexist with the SNMP v3 agent. However, to fully secure SNMP access, you should disable SNMP v1 and v2c. Other Use this tab to enable or disable various protocols supported by the projector server for services and management. See Table 4.8.
802.1x Authentication This page allows you to configure 802.1X authentication settings on the Jetdirect projector server as required for client authentication on your network. In addition, you can reset the 802.1X authentication settings to factory-default values. CAUTION Use caution when changing the 802.1X authentication settings; you may lose your connection. If communication with the projector is lost, you may need to reset the projector server to a factory-default state and then reinstall the device.
Table 4.9 802.1X Configuration Settings (1 of 2) Item Description Enable Protocols Enable (check) the supported protocols used for 802.1X authentication on your network. ● PEAP: (Protected Extensible Authentication Protocol). PEAP uses digital certificates for network server authentication and passwords for client authentication. PEAP requires an EAP User Name, EAP Password, and CA Certificate. Dynamic encryption keys are also used. User Name Specify an EAP/802.
Table 4.9 802.1X Configuration Settings (2 of 2) Item Description Authentication Behavior: Reauthenticate on Apply Enable (check) or disable (clear) this checkbox to control authentication when you click Apply on this page, assuming valid configuration entries have been made. Note: This parameter does not apply to security or other configuration wizards. Changes to parameters through a wizard will always cause the server to reauthenticate.
Projector Tab The Projector tab provides control of projector power, selection of the input source, and setup of alerts for specific conditions. The menu items in the left margin provide access to configuration pages. Power On the Power page, Power Status displays the projector’s current power state. To turn the projector on or off, click the Power button. Input The Input page displays the current input source and provides controls for selecting a new input source and changing certain input settings.
Alerts The Alerts page specifies certain projector conditions that cause an email notification to be sent. These notifications allow recipients to take appropriate action to prevent or fix a projector problem. Table 4.11 Alerts Page Items Item Description Enable Enables (or disables) e-mail notifications set up on this menu. This provides a quick way to turn alerts on and off. Events Selects the events that trigger e-mail notifications.
Other Links Help The Help page in the Networking tab provides a quick summary of the HP Jetdirect embedded Web server features. This Administrator’s Guide contains detailed information about all features. Support The information displayed on the Support page depends on the values configured in the Support Info tab in the Other Settings menu. Support information may include the name and telephone number of a Support person, or Web links to Product and Technical Support pages.
5 Security Features Introduction Security features are provided that can help to minimize unauthorized access to network configuration parameters and other data stored on HP Jetdirect projector servers. The features may differ depending on the version of firmware resident on the server. CAUTION Although these features can help to minimize unauthorized access to stored data and configuration parameters on HP Jetdirect projector servers, the prevention of unauthorized access cannot be guaranteed.
Table 5.1 Summary of HP Jetdirect Security Features (1 of 2) Secure Embedded Web Server Management ● A preinstalled, self-signed digital certificate provides HTTPS (secure HTTP) access to the embedded Web server from your Web browser. HTTPS (secure HTTP) provides secure, encrypted communications with your browser. ● Digital certificates issued by a trusted third party can be installed on the projector server, allowing it to be configured as a trusted site.
Table 5.1 Summary of HP Jetdirect Security Features (2 of 2) Authentication and Encryption ● Certificate management for X.509 digital certificates is provided through the embedded Web server, for both client-based and server-based authentication. (Installed certificates are limited to 3KB. A single Certificate Authority (CA) certificate may be installed.
Using Security Features Access to HP Jetdirect configuration parameters can be controlled through combined use of the available security features. Table 5.2 provides examples of various settings and the associated level of access control. Table 5.2 Settings for Access Control Settings ● Accessible through HTTP (embedded Web server) or SNMP v1/v2c applications Level of Access Control Low Best suited for trusted environments.
6 Troubleshooting the HP Jetdirect Projector Server Introduction This chapter describes how to diagnose and correct problems associated with the HP Jetdirect projector server.
Resetting to Factory Defaults Parameters on the HP Jetdirect projector server (for example, the IP address) can be reset to factory default values using the following procedures: ● Reset the HP Jetdirect external projector server by holding down the Reset button on the server while connecting the power cord. After a cold reset, your network systems may lose their connection to the projector.
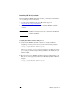
General Troubleshooting Troubleshooting Chart - Assessing the Problem Projector connected to power and operating properly? No • Check the power cord and power source. • See the projector’s user manual. Yes Projector server status light flickering and USB light steady? No See “Resolving Problems with the Indicator Lights,” below. Yes Projector server communicating with network? No See “Resolving Communication Problems with the Network,” below. Yes See your network documentation. Figure 6.
Resolving Problems with the Indicator Lights Check the following items to see whether the projector server is operating properly. 1. Power/status light: ◆ If the light is flickering green, network activity is normal. No problem indicated. ◆ If the light is off, power is not connected. Check the power module and power source. ◆ If the light is on steady, there is no network activity. Go to “Resolving Communication Problems with the Network,” below.
3. LAN 10/100 lights: ◆ If one light is on, a network connection is established at 10 Mbps or 100 Mbps. No problem indicated. ◆ If both lights are off, no network is detected. See “Resolving Communication Problems with the Network,” below. Resolving Communication Problems with the Network Check the following items to verify that the projector server is communicating with the network. 1.
5. Are other users able to access the projector embedded Web server? The problem may be workstation-specific. Check the workstation network drivers. 6. If other users can access the projector’s embedded Web server, are they using the same network operating system? Check your system for proper network operating system setup. 7. Is your protocol enabled on the HP Jetdirect projector server? Check the status of the network protocols on the Jetdirect server.
A TCP/IP Overview Introduction This appendix is intended to provide information to help you gain a basic understanding of TCP/IP. Similar to a common language that people use to communicate with each other, TCP/IP (Transmission Control Protocol/Internet Protocol) is a suite of protocols designed to define the way computers and other devices communicate with each other over a network. TCP/IP is rapidly becoming the most used set of protocols.
Transmission Control Protocol (TCP) TCP handles breaking the data into packets and recombining the packets on the receiving end by providing a connection-oriented, reliable, and guaranteed delivery service to another node on the network. When data packets are received at their destination, TCP calculates a checksum for each packet to verify the data is not corrupt. If the data in the packet has been corrupted during transmission, TCP discards the packet and requests that the packet be resent.
IP Address: (Host Portion) Host addresses numerically identify specific network interfaces on an IP network. Usually a host has only one network interface; thus, only one IP address. Because no two devices can share the same number at the same time, administrators typically maintain address tables to assure correct assignment of addresses in the host network.
Configuring IP Parameters TCP/IP configuration parameters (such as IP address, subnet mask, default gateway) can be configured on the HP Jetdirect projector server in a variety of ways. These values can be configured manually (for example, through the embedded Web server, the arp and ping commands, and HP management software), or they can be automatically downloaded using DHCP or BOOTP each time the server is turned on. For configuration methods, see Chapter 3.
Subnets When an IP network address for a particular network class is assigned to an organization, no provision is made for more than one network being present at that location. Local network administrators use subnets to partition a network into several different subnetworks. Splitting a network into subnets can result in better performance and improved use of limited network address space. Subnet Mask The subnet mask is a mechanism used to divide a single IP network into several different subnetworks.
Gateways Gateways (routers) are used to connect networks together. Gateways are devices that act as translators between systems that do not use the same communication protocols, data formatting, structures, languages, or architectures. Gateways repackage the data packets and change the syntax to match that of the destination system. When networks are divided into subnets, gateways are required to connect one subnet to another.
The syslog server may not receive all syslog events from the HP Jetdirect projector server: ● UDP does not guarantee delivery of messages. ● The HP Jetdirect projector server attempts to eliminate duplicate messages (to minimize unnecessary network traffic). ● The volume of messages sent by the HP Jetdirect projector server is configurable. Methods to configure HP Jetdirect syslog parameters include BOOTP, DHCP, the embedded Web server, and management software.
B OpenSSL Statements OpenSSL License Copyright © 1998-2004 The OpenSSL Project. All rights reserved. Redistribution and use in source and binary forms, with or without modification, are permitted provided that the following conditions are met: 1. Redistributions of source code must retain the above copyright notice, this list of conditions and the following disclaimer. 2.
Original SSLeay License Copyright © 1995-1998 Eric Young (eay@cryptsoft.com). All rights reserved. This package is an SSL implementation written by Eric Young (eay@cryptsoft.com). The implementation was written so as to conform with Netscape’s SSL. This library is free for commercial and non-commercial use as long as the following conditions are adhered to. The following conditions apply to all code found in this distribution, be it the RC4, RSA, lhash, DES, etc., code; not just the SSL code.
Index A Access List embedded Web server 70 security features 81 TFTP configuration file 26 Administrator Password embedded Web server 51, 64 Security features 81 TFTP configuration file 25 arp command 42 Authentication 74 802.
Index G gateway bootptab file 20 description 95 embedded Web server 54 H hardware address arp command 42 Bootptab file 20 embedded Web server 51 in default user name 75 RARP 40 Host Access List, See Access List HOST NAME BOOTP tag 21 embedded Web server 53 TFTP file 26 HP Jetdirect cold-reset 85 HP Support, Online 7 HP Web Jetadmin 9 installing 10 removing 11 HTTPS embedded Web server 49, 71 redirection from TFTP 25 I idle timeout embedded Web server 54 TFTP configuration file 28 IEEE 802.
Index reset security embedded Web server 61 TFTP 25 resetting to factory defaults 85 S Secure Web embedded Web server 71 TFTP configuration 25 security features 80 Service Location Protocol (SLP) embedded Web server 73 TFTP configuration 27 SNMP 5 embedded Web server 72 TFTP configuration 24, 30 version 3 72 SNMP get community name See also, Community name embedded Web server 56 TFTP configuration 30 SNMP set community name See also, Community name embedded Web server 56 security features 82 TFTP configura