LASERJET PRO M1530 MFP SERIES Quick Reference Guide
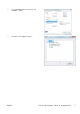
Print on special paper, labels, or transparencies 2 1. On the File menu in the software program, click Print. 2. Select the product, and then click the Properties or Preferences button. 3. Click the Paper/Quality tab.
4. From the Paper type drop-down list, click the More... option. 5. Expand the list of Type is options.
6. Expand the category of paper types that best describes your paper. NOTE: Labels and transparencies are in the list of Other options. 7. 4 Select the option for the type of paper you are using, and click the OK button.
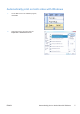
Automatically print on both sides with Windows 1. On the File menu in the software program, click Print. 2. Select the product, and then click the Properties or Preferences button.
3. Click the Finishing tab. 4. Select the Print on both sides check box. Click the OK button to print the job.
Set the copy quality according to the original document The following copy-quality settings are available: ● Auto: Use this setting when you are not concerned about the quality of the copy. This is the default setting. ● Mixed: Use this setting for documents that contain a mixture of text and graphics. ● Picture: Use this setting to copy non-photographic graphics. ● Film Photo: Use this setting to copy photographs. ● Text: Use this setting for documents that contain mostly text. button. 1.
Copy two-sided documents manually 1. On the product control panel, press the Copy Menu button. 2. Use the arrow buttons to select the MultiPage Copy item, and then press the OK button. 3. Use the arrow buttons to select the On option, and then press the OK button to save the selection. NOTE: The factory-set default for automatic copy collation is On. 8 4. Load the first page of the document on the flatbed scanner. 5. Press the Start Copy 6.
8. Press the OK button, and then repeat the process until all of the pages in the original have been copied. 9. When the copy job is completed, press the Start Copy button to return the product to Ready mode.
Check the scanner glass for dirt and smudges Over time, specks of debris might collect on the scanner glass and white plastic backing, which can affect performance. Use the following procedure to clean the scanner glass and white plastic backing. 1. Use the power switch to turn off the product, and then unplug the power cord from the electrical socket. 2. Open the scanner lid. 3.
Copy identification cards Use the ID Copy feature to copy both sides of identification cards, or other small-size documents, onto the same side of one sheet of paper. The product prompts you to copy the first side and then to place the second side on a different area of the scanner glass and copy again. The product prints both images on the same page. 1. Load the document onto the scanner glass. 2. Press the Copy Menu 3. Use the arrow buttons to select the ID Copy item, and then press the OK button.
Scan by using HP Scan software (Windows) 1. Double-click the HP Scan icon on the computer desktop. 2. Select a scanning shortcut, and adjust the settings if necessary. 3. Click Scan. NOTE: Click Advanced Settings to gain access to more options. Click Create New Shortcut to create a customized set of settings and save it in the list of shortcuts.
Create and edit speed dials Speed dials 1 through 12 are also associated with their corresponding one-touch keys on the control panel. The one-touch keys can be used for speed dials or group-dial entries. A maximum of 50 characters can be entered for a single fax number. NOTE: To gain access to all of the speed dials, you must use the Shift button. Speed dials 7 through 12 are all available by pressing Shift and the associated one-touch key on the control panel.
8. Use the alphanumeric buttons to enter a name for the fax number. To do so, repeatedly press the alphanumeric button for the letter that you need until the letter appears. NOTE: To insert punctuation, press the asterisk (*) button repeatedly until the character that you want appears, and then press the up arrow button to go to the next space. 9. Press the OK button to save the information. 10. If you have more speed dials to program, repeat steps 1 through 9.
Use the control panel to set the fax time, date, and header To use the control panel to set the date, time, and header, complete the following steps: 1. At the control panel, press the Setup button. 2. Use the arrow buttons to select the System Setup menu, and then press the OK button. 3. Use the arrow buttons to select the Time/ Date menu, and then press the OK button. 4. Use the arrow buttons to select the 12-hour clock or 24-hour clock, and then press the OK button. 5.
10. Use the arrow buttons to select the Fax Header menu, and then press the OK button. 11. Use the keypad to enter your fax number and your company name or header, and then press the OK button. NOTE: The maximum number of characters for the fax number is 20; use up to 25 characters for the company name.
Delete faxes from memory Use this procedure only if you are concerned that someone else has access to your product and might try to reprint faxes from the memory. CAUTION: In addition to clearing the reprint memory, this procedure clears any fax that is currently being sent, unsent faxes that are pending redial, faxes that are scheduled to be sent at a future time, and faxes that are not printed or forwarded. 1. On the control panel, press the Setup button. 2.
View or change network settings Use the embedded Web server to view or change IP configuration settings. 1. Print a configuration page, and locate the IP address. ● If you are using IPv4, the IP address contains only digits. It has this format: xxx.xxx.xxx.xxx ● If you are using IPv6, the IP address is a hexadecimal combination of characters and digits. It has a format similar to this: xxxx::xxxx:xxxx:xxxx:xxxx 2.
© 2010 Hewlett-Packard Development Company, L.P. www.hp.com Edition 1, 9/2010 Part number: CE538-90943 Windows ® is a U.S. registered trademark of Microsoft Corporation. Reproduction, adaptation or translation without prior written permission is prohibited, except as allowed under the copyright laws. The information contained herein is subject to change without notice. The only warranties for HP products and services are set forth in the express warranty statements accompanying such products and services.