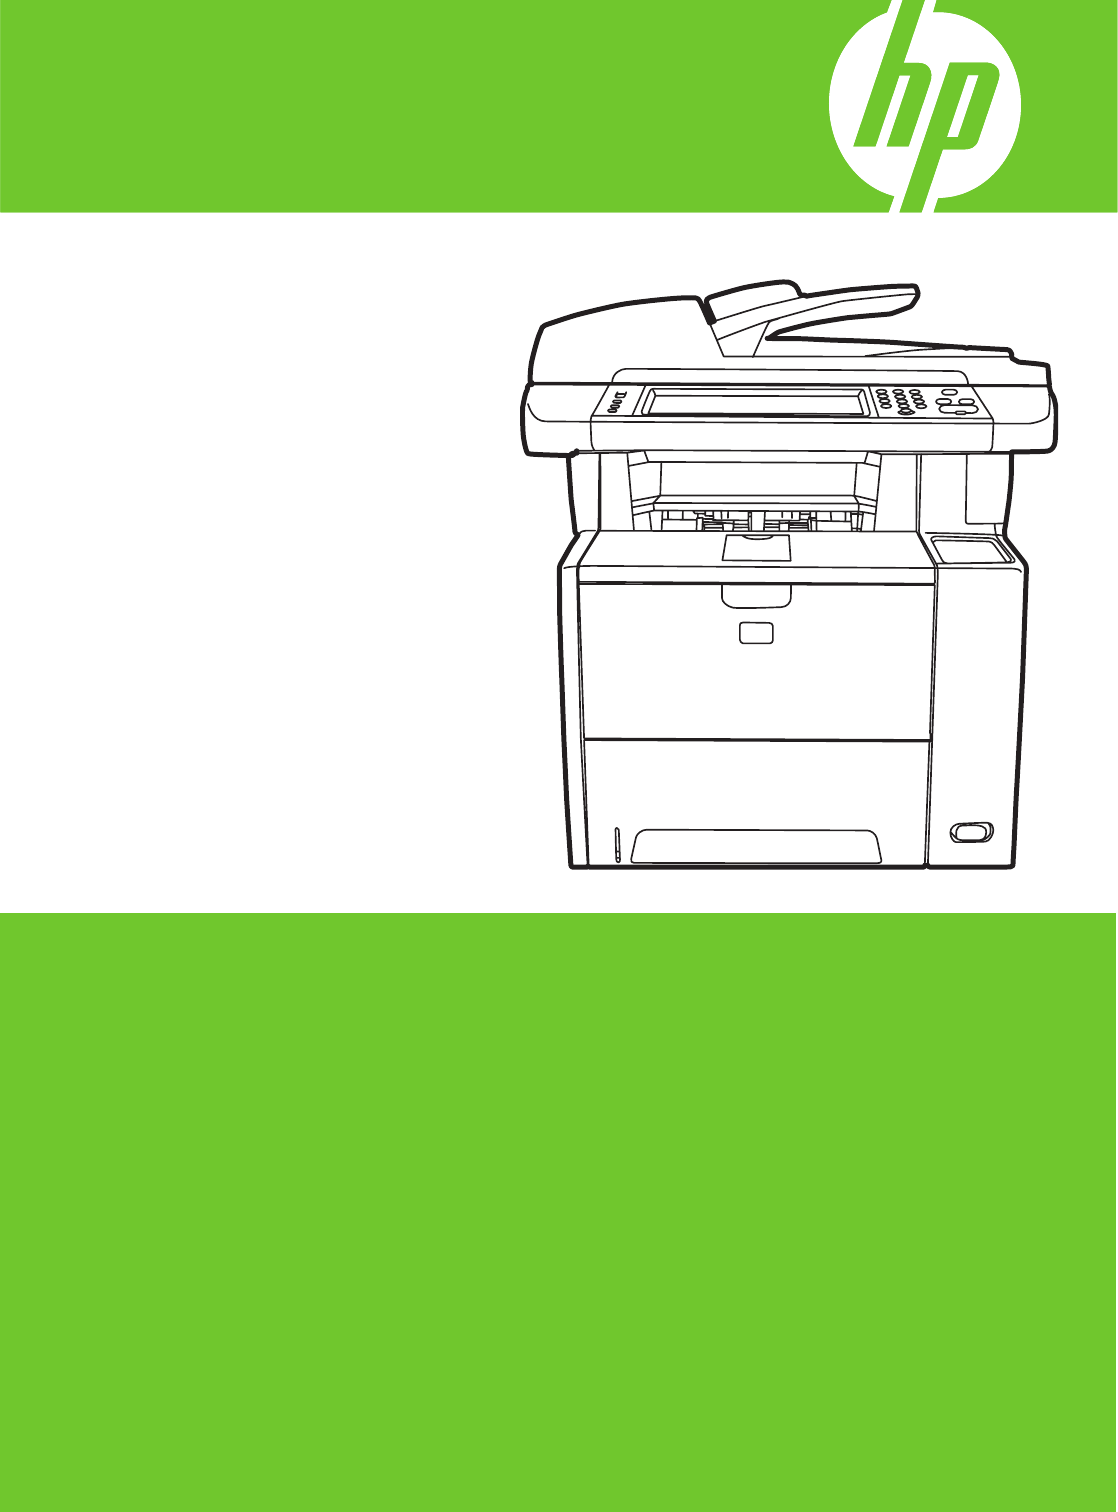
HP LaserJet M3027/M3035 MFP Getting Started Guide Guide de mise en route Guía de instalación inicial Guia de primeiros passos Lea esto primero
Copyright and License Copyright et licence © 2007 Copyright Hewlett-Packard Development Company, L.P. © 2007 Copyright Hewlett-Packard Development Company, L.P. Reproduction, adaptation or translation without prior written permission is prohibited, except as allowed under the copyright laws. Toute reproduction, adaptation ou traduction sans autorisation expresse par écrit est interdite, sauf dans les cas permis par les lois régissant les droits d’auteur.
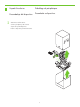
Overview Présentation Generalidades Visão geral Prepare the site. Préparation du site. Preparación de la ubicación. Prepare o local. Unpack the device. Déballage du périphérique. Desembalaje del dispositivo. Desembale o dispositivo. Prepare the hardware. Préparation du matériel. Preparación del hardware. Prepare o hardware. Set up the control panel. Configuration du panneau de commande. Configuración del panel de control. Configure o painel de controle. Install the software. Installation du logiciel.
1 Prepare the site. Préparation du site. Preparación de la ubicación. Prepare o local. Select a sturdy, well-ventilated, dust-free area to position the device. Choisissez une zone sûre, correctement ventilée et exempte de poussière pour installer le périphérique. Elija una zona estable, con buena ventilación y que no contenga polvo para colocar el dispositivo. Selecione uma área bem ventilada e sem poeira para posicionar o dispositivo. 17˚ - 25˚ C (62 .
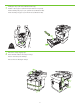
2 Unpack the device. Déballage du périphérique. Desembalaje del dispositivo. Desembale o dispositivo. Slide the box off the device. Sortez le périphérique de sa boîte. Separe la caja del dispositivo. Deslize o dispositivo para fora da caixa.
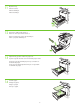
3 Install paper tray 3 (HP LaserJet M3035xs MFP only). Installez le bac à papier 3 (MFP HP LaserJet M3035xs uniquement). Instale la bandeja de papel 3 (sólo para HP LaserJet M3035xs MFP). Instale a bandeja de papel 3 (somente HP LaserJet M3035xs MFP). 26.3 Kg. 58 lbs. 4 Remove the orange shipping tape. Retirez la bande adhésive de transport orange. Retire la cinta naranja de embalaje. Remova a fita de embalagem laranja.
You are done unpacking the device. Now proceed to the next step: Preparing the hardware. Le déballage du périphérique est terminé. Passez maintenant à l’étape suivante : Préparation du matériel. Ya ha desembalado el dispositivo. Ahora, continúe en el paso siguiente: Preparación del hardware. Você acabou de desembalar o dispositivo. Agora vá para a próxima etapa: Preparar o hardware.
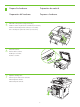
5 Prepare the hardware. Préparation du matériel. Preparación del hardware. Preparar o hardware. Attach the control panel overlay (if necessary). Installez le cache du panneau de commande (si nécessaire). Instale la cubierta del panel de control (si es necesario). Cole o decalque do painel de controle (se necessário). 6 Unlock the scanner. Déverrouillez le scanner. Desbloquee el escáner. Destrave o scanner. 7 Open the cartridge door. Ouvrez la porte d’accès à la cartouche. Abra la tapa del cartucho.
8 Remove the print cartridge packaging. Retirez l’emballage de la cartouche d’impression. Retire el envoltorio del cartucho de impresión. Remova a embalagem do cartucho de impressão. 9 Install the cartridge. Installez la cartouche. Instale el cartucho. Instale o cartucho. 10 Close the cartridge door. Fermez la porte d’accès à la cartouche. Cierre la tapa del cartucho. Feche a tampa do cartucho.
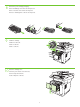
11 Open the trays. Ouvrez les bacs. Abra las bandejas. Abra as bandejas. 12 Remove the cardboard from Tray 2. Retirez le carton présent dans le bac 2. Retire la estructura de cartón de la bandeja 2. Retire o papelão da Bandeja 2. 13 Adjust the tray guides to match the paper size. Ajustez les guides des bacs selon le format de papier utilisé. Ajuste las guías de las bandejas para que coincidan con el tamaño del papel. Ajuste as guias da bandeja de forma que correspondam ao tamanho do papel.
15 Close the trays. Fermez les bacs. Cierre las bandejas. Feche as bandejas. 16 Connect the network cable. Branchez le câble réseau. Conecte el cable de red. Conecte o cabo de rede. Note: For a USB installation, do not connect the USB cable until prompted by the software. Remarque : Pour une installation USB, ne connectez pas le câble USB avant d’y avoir été invité par le logiciel. Nota: Para una instalación USB, no conecte el cable hasta que el software se lo indique.
18 Connect the power cord. Branchez le cordon d’alimentation. Conecte el cable de alimentación. Conecte o cabo de alimentação. 19 Turn on the device. The control panel lights will alternate before Ready appears on the display. Mettez le périphérique sous tension. Les voyants du panneau de commande clignotent les uns après les autres avant que le message Prêt ne s’affiche sur l’écran. Encienda el dispositivo.
Set up the control panel. Configuration du panneau de commande. Configuración del panel de control. Configurar o painel de controle. 20 Set language, date, time, and fax settings (if necessary). If prompted, select your language, the date, and the time. Follow the instructions on the control panel. Paramétrage de la langue, de la date, de l’heure et des paramètres de télécopie (si nécessaire). Si un message vous le demande, sélectionnez votre langue, la date et l’heure.
22 •Find the IP address. On the control panel, scroll to and touch Administration, touch Information, touch Configuration Page, and then touch Print to print the Jetdirect configuration page. The IP address is on the Jetdirect page, under “TCP/IP”. Note: You might need to assign an IP address depending on the type of network that is installed. See “Configure an IP address (if necessary)” on the next page, for more information. •Recherche de l’adresse IP.
23 Configure the IP address. On the control panel, scroll to and touch Administration. Scroll to and touch Initial Setup, and then Networking and I/O. Touch Embedded Jetdirect, TCP/IP, and IPV4 SETTINGS. Touch CONFIG METHOD, make sure it is set to MANUAL, and touch Save. Touch MANUAL SETTINGS, and then enter the IP ADDRESS, SUBNET MASK, and DEFAULT GATEWAY. Configurez l’adresse IP. Sur le panneau de commande, faites défiler l’écran et appuyez sur Administration.
Install the software. Installation du logiciel. Instalación del software. Instalar o software. Before installation, close all unnecessary software programs. Avant l’installation, fermez tous les logiciels non nécessaires. Antes de la instalación, cierre todos los programas de software que no sean necesarios. Antes da instalação, feche todos os programas de software desnecessários. For Windows® software installation instructions, go to step 24.
24 Install software. 1) Insert the CD that came with the printer. 2) On the welcome screen, click Install Printer. The Setup Wizard appears. 3) Follow the on screen instructions. Note: If the welcome screen does not appear, click Start and then click Run. Type X:SETUP, where X corresponds to the CD-ROM drive letter, and then click OK. Installation du logiciel. 1) Insérez le CD fourni avec l’imprimante. 2) Sur l’écran d’accueil, cliquez sur Installer une imprimante. L’assistant de configuration s’affiche.
26 1) Click Finish. If prompted, restart the computer. 2) Go to step 31. 1) Cliquez sur Terminer. Si vous y êtes invité, redémarrez l’ordinateur. 2) Passez à l’étape 31. 1) Haga clic en Finalizar. Si se le solicita, reinicie el equipo. 2) Vaya al paso 31. 1) Clique em Concluir. Se solicitado, reinicie o computador. 2) Vá para a etapa 31. 27 Place the CD in the CD-ROM drive and run the installer. Complete an easy install. Placez le CD dans le lecteur de CD-ROM et lancez le programme d’installation.
29 1) From Apple System Preferences (available on the Apple pull-down menu or in the dock), click the Print & Fax icon and then click the Printing tab at the top of the window. 2) To add your new printer, click the ‘+’ icon to launch the Printer Browser. By default, the Printer Browser shows printers that are connected through USB, Bonjour, or Appletalk networking.
30 1) From the Printer Browser window, select the HP printer. For Mac OS X V10.4: If HP software is installed, the printer software should be automatically configured. 2) Click Add to create a printer queue. You are prompted to configure the installable options manually. Note: Mac OS X V10.2 and V10.3 might require you to manually select the printer model from the Printer Model drop-down list. 3) Under Model Name, select your device and click Add.
31 Test the software installation. Print a page from any program to make sure that the software is correctly installed. Note: If the installation failed, reinstall the software or see Troubleshooting at the end of this guide. Test de l’installation du logiciel. Imprimez une page à partir de n’importe quel programme pour vous assurer que le logiciel est correctement installé. Remarque : Si l’installation a échoué, réinstallez le logiciel ou reportez-vous à la section Dépannage à la fin de ce guide.
Install the send fax driver. Installation du pilote d’envoi du télécopieur. Instalación del controlador para envío de faxes. Instale o driver de envio de fax. 32 Install send fax driver. If the fax driver was not installed previously, it can be installed now. 1) Insert the CD that came with the device. 2) On the welcome screen, click Install Printer. The setup wizard appears. 3) Choose the “custom” install option, and select the Send Fax Driver in the installation options.
Use the Scan Setup Wizard to set up Send to Folder. Utilisation de l’assistant de configuration de numérisation pour configurer le dossier cible. Utilización del asistente de configuración del escaneado para configurar Envío a carpeta. Use o Assistente de configuração de digitalização para configurar Enviar para pasta. 33 A) Open the Embedded Web Server by opening a Web browser and typing the product IP address or hostname in the URL window.
Set up the embedded digital send features. Configuration des fonctions d’envoi numérique. Configuración de las funciones de envío digital incorporadas. Configure os recursos de envio digital incorporado. 34 Before setting up the digital send features, you will need the following: • The host name or IP address of the simple mail transfer protocol (SMTP) e-mail server to use. Note: The above items are usually found in the Preferences or Tools tabs of the E-mail application.
35 Set up Send to Folder. A) To set up a Shared folder on your computer or network drive, right click on the folder you would like to share. Click Sharing and Security... and follow the instructions there. B) Open the Embedded Web server by opening a Web browser and typing the product IP address or hostname in the URL window. The IP address can be found on the Configuration Page you printed in Step 22. C) Click the Digital Sending tab. D) In the left column, click Send to Folder.
36 Set up E-mail Settings. A) Open the Embedded Web server by opening a Web browser and typing the product IP address or hostname in the URL window. The IP address can be found on the Configuration Page you printed in Step 22. B) Click the Digital Sending tab and complete the information under General Settings: name, E-mail address, phone number, and location. C) Click OK. D) On the left navigation menu, select Send to E-mail. E) To find the SMTP Gateway, click the Find Gateways button.
37 Congratulations! The device is ready to use. The user guide is located on the CD and in the HP Easy Printer Care Software. Note: Save the boxes and the packing material in case you need to transport the device. Félicitations ! Le périphérique est prêt à l’emploi. Le Guide de l’utilisateur se trouve sur le CD et dans le logiciel HP Easy Printer Care. Remarque : Conservez les cartons et le matériel d’emballage dans le cas où vous devriez transporter votre périphérique.
Troubleshooting Area Control-panel display Print Copy Symptom Cause/Remedy Blank 1. Make sure that the power cable is connected to a working power outlet. 2. Make sure that the device is turned on. See page 10 for more information. 3. If the status lights on the left side of the control panel are functioning, check the display contrast by using the brightness-adjustment wheel. Button on the touch screen appears gray with “!” markers 1. Make sure that the scanner lock is unlocked.
Troubleshooting Area Fax Email Other Symptom Cause/Remedy Fax icon appears gray Touch Administration, touch Initial Setup, and touch Fax Setup. Touch Required Settings and enter the location, date/time, and fax header information to make sure that the fax is configured correctly. No fax icon on the control-panel display Print a configuration page and check the modem status on the fax accessory page.
Dépannage Zone Ecran du panneau de commande Impression Copier Symptôme Cause/Solution Vide 1. Assurez-vous que le câble d’alimentation est connecté à une prise murale qui fonctionne. 2. Assurez-vous que le périphérique est sous tension. Reportezvous à la page 10 pour de plus amples informations. 3. Si les voyants d’état à gauche du panneau de commande fonctionnent, vérifiez le réglage du contraste de l’écran à l’aide de la molette de réglage de luminosité.
Dépannage Zone Télécopie Messagerie électronique Autre Symptôme Cause/Solution L’icône de télécopie s’affiche en gris Appuyez sur Administration, sur Configuration initiale, puis sur Configuration de la télécopie. Appuyez sur Paramètres obligatoires et saisissez l’emplacement, la date, l’heure et les informations d’en-tête de télécopie afin de vous assurer que le télécopieur est configuré correctement.
Solución de problemas Área Pantalla del panel de control Impresión Copia Síntoma Causa/solución En blanco 1. Compruebe que el cable de alimentación está conectado a una fuente de alimentación. 2. Compruebe que el dispositivo está encendido. Consulte la página 10 para obtener más información. 3. Si los indicadores de estado de la parte izquierda del panel de control se iluminan, compruebe el contraste de la pantalla con la rueda de ajuste del brillo.
Solución de problemas Área Fax Correo electrónico Otros Síntoma Causa/solución El icono de fax aparece en color gris. Toque Administración, a continuación, Configuración inicial y después Configuración de fax. Toque Parámetros obligatorios e introduzca la ubicación, fecha, hora e información de encabezado de fax para asegurarse de que el fax se ha configurado correctamente. En la pantalla del panel de control no aparece el icono de fax.
Solução de problemas Área Visor do painel de controle Impressão Cópia Sintoma Causa/Solução Em branco 1. Verifique se o cabo de alimentação está conectado a uma tomada que esteja funcionando. 2. Verifique se o dispositivo está ligado. Consulte a página 10 para obter mais informações. 3. Se os indicadores de status na lateral esquerda do painel de controle estiverem funcionando, verifique o contraste do visor utilizando o botão de ajuste de brilho.
Solução de problemas Área Fax E-mail Outras Sintoma Causa/Solução O ícone de fax aparece acinzentado Toque em Administração, Configuração inicial e em Configuração do fax. Toque em Configurações exigidas e insira o local, a data/hora e as informações do cabeçalho do fax para verificar se o fax está configurado corretamente. O ícone de fax não é exibido no visor do painel de controle Imprima uma página de configuração e verifique o status do modem na página de acessórios de fax.
© 2007 Hewlett-Packard Development Company, L.P. www.hp.