HP Imaging and Printing Security Best Practices Configuring Security for Multiple LaserJet MFPs and Color LaserJet MFPs Version 4.0 © Copyright 2005, 2007, 2009 Hewlett-Packard Development Company, L.P.
Table of Contents Chapter 1: Introduction.............................................................................................1 Cautions.......................................................................................................................... 2 Follow the Checklist in Order ......................................................................................... 2 Understand the Ramifications .........................................................................................
Security Page Options................................................................................................. 66 Final configurations..................................................................................................... 66 Chapter 5: Default Settings: ....................................................................................67 Chapter 6: Ramifications ........................................................................................70 Device Page Settings...........
Chapter 1: Introduction This document is a security checklist for the following HP MFP models: • HP LaserJet M3027 MFP • HP LaserJet M3035 MFP • HP LaserJet 4345 MFP • HP LaserJet M4345 MFP • HP LaserJet M5025 MFP • HP LaserJet M5035 MFP • HP LaserJet 9040 MFP • HP LaserJet 9050 MFP • HP Color LaserJet 4730 MFP • HP Color LaserJet CM4730 MFP • HP Color LaserJet 9500 MFP • HP Color LaserJet CM3530 MFP • HP Color LaserJet CM6030 MFP • HP Color LaserJet CM6040 MFP All of these model
• HP Web Jetadmin Version 8.1 installed on a Windows XP PC • One of each supported MFP with the latest updated firmware found at hp.com The process for configuring this checklist is developed using HP Web Jetadmin to manage all of the MFPs at the same time. This checklist covers only those parts of HP Web Jetadmin that pertain to appropriate security settings. See the user guides, admin guides, and help files for information on other configurations.
MFP Environment NIST defines several types of user environments, many of which are compatible with HP LaserJet and Color LaserJet MFPs. However, this checklist is written for MFPs in an enterprise environment or a small to medium business environment. These environments use most of the network features available with MFPs. This entire checklist can be configured using HP Web Jetadmin. You should configure as much of this checklist as possible while adapting the settings to your specific situation.
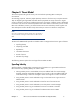
Solutions covered This checklist covers MFP security settings found in HP Web Jetadmin. This checklist covers no other solutions or applications. Organization This checklist includes the following chapters: • Chapter 2: Threat Model: The Threat Model chapter explains the security circumstances relating to MFPs. It follows the Microsoft® STRIDE model.
Chapter 2: Threat Model This section explains the types of security risks involved with operating MFPs in enterprise environments. As technology improves, malicious people (hackers) continue to find new ways to exploit networks. They are beginning to target MFPs and other network peripherals to misuse resources or to gain access to networks or the internet. Predicting the actions of a hacker is difficult, but HP is dedicated to research in this area.
You can minimize the risks from identity spoofing in the following ways: • Protect the from address field in the MFP Digital Sending and Fax configurations. • Protect MFP disk access. • Configure authentication. • Configure the administrator password. • Configure SNMPv3. Tampering with Data Tampering with data can include any method of changing, destroying, or adding to information that is flowing to or from an MFP or stored on it.
• Install Jetdirect 635n Print Servers or enable embedded IPSec to encrypt the data stream to include log data and file metadata (look for this product at hp.com or contact your hp product supplier). • Close unused ports and protocols. • Save copies of log data at a separate location • Add security solutions such as smartcard, swipe-card and thumbprint readers Information Disclosure Information disclosure is gathering information from an MFP and providing it to unauthorized users.
• Causing interference with network communication to the MFP • Changing the network location of the MFP • Causing an error state that interrupts service • Changing access configurations Here are some methods of minimizing opportunities for denial of service on an MFP: • Lock the control panel. • Lock EWS configuration settings. • Close unused ports and protocols. • Disable controls such as the Job Cancel button and the Go button.
Chapter 3: Security for Multiple MFPs This chapter explains how to configure security settings for one or more MFPs using HP Web Jetadmin. Overall Settings This checklist assumes that you have taken reasonable steps to secure the network environment in which your MFPs are operating. This includes configuring network firewalls and providing up-todate virus controls.
• HP Digital Sending Software is a management application available at hp.com. Among many other useful features, it provides encryption for the contents of digital send jobs. Digital send jobs can also be protected by requiring users to authenticate at the printer, or by encrypting the job itself using IPSec. Notes on the Process of Configuration This checklist covers all relevant security settings available for MFPs.
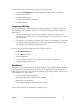
• Record the passwords in a safe but hidden place. The passwords are designed to restrict access to management options on the MFPs. Losing a password can eliminate your access to settings. This is most important for the Bootloader Password. The Bootloader Password is a permanent setting that can never be changed or reset without the correct password. Configuring MFP Security Settings This section provides instructions for configuring the MFPs for best-practice security.
Figure 1: Web Jetadmin showing the device list on the default view. 2. Check to see that the MFPs you wish to configure appear in the Device Model List. If they are not in the list, use the Discovery options to find the MFPs on your network. Note: This checklist does not include details on MFP discovery. See Web Jetadmin user guidance for more information. In most cases, the MFPs will already appear in the default view of Web Jetadmin.
Figure 2: The Device List showing devices selected and the Device Tools menu showing Configure selected. Note: Remember that the steps in this checklist are for the specified HP LaserJet and Color LaserJet MFPs. Other devices may appear in the Device Model list, and it may be possible to configure them using this process, but the results may vary. To select more than one MFP in the Device Model list, hold the CTRL key while clicking each MFP.
Figure 3: The Multiple Device Configuration Tool showing the Configure Devices tab outlined in green. The Configure Devices tab contains all of the settings recommended in this checklist. Tip: If you are having a problem configuring a setting, try configuring it using the individual device’s configuration page. You can also attempt to configure the setting using the EWS of the MFP. Sometimes Web Jetadmin can lose track of MFP credentials. If this happens, some settings might fail.
By default, the encrypted disk automatically locks itself to the MFP without user intervention. There are two ways to verify this pairing took place, and the data on the disk is protected by encryption: by using the embedded web server, or by using Web Jetadmin. Follow these Steps to use the MFP embedded web server to verify your HP Secure Hard Disk is configured and encrypting your data: 1. Open the embedded web for your MFP and click the Settings tab. Figure 4: The embedded web showing the settings tab.
Figure 6: Configuration button allowing you to configure or view HP Secure Hard Disk settings. 4. Ensure your encrypted hard drive is displayed, Drive Status is set to Enabled, and Encryption Status is set to Encrypted. Figure 7: Shows hard drive status as enabled and encrypted. Follow these steps to use Web Jetadmin to verify your HP Secure Hard Disk is installed and configured: Note: Secure Hard Disk is supported only in Web Jetadmin 10.1 and above.
1. Click All Devices or a configured Group to display the printer you are configuring (Figure 8). Figure 8: Shows where to use the devices or groups categories to select your printer. 2. In the listing of printers, check the Secure Disk and Secure Disk Status columns. The Secure Disk column should indicate “Installed”. The Secure Disk Status column should indicate ”Encrypted” (Figure 9). Figure 9: Shows the Secure Disk and Secure Disk Status columns as Installed and Encrypted.
Note: It is best to configure SNMPv3 by itself to ensure that the settings are saved properly. Follow these steps: 1. Click Security in the Configuration Categories menu. The Security menu will appear. Figure 10: The Security category 2. Scroll down to the SNMPv3 option, and select the SNMPv3 checkbox. Figure 11: The Security menu showing SNMPv3 selected.
3. Click to select Enabled below the SNMPv3 checkbox, and fill in the New User, the New Authentication Passphrase, and the New Privacy Passphrase fields. See below for details. Figure 12: The SNMPv3 settings enabled and the fields filled out. The New User Name field can be any name you choose. The New Authentication Passphrase field can be any word or phrase that is at least 8 characters. The New Privacy Passphrase field can be any word or phrase that is at least 8 characters.
Figure 13: The SNMP Version 3 Only setting. This setting limits all SNMP configuration communication to only version 3. The MFPs will ignore communications via other versions of SNMP. 5. Select the devices you wish to configure in the Device Model list. Figure 14: The Device Model list. 6. Click Configure Devices to execute the configuration.
Figure 15: The Configure Devices button. After you click Configure Devices, a View Log page will appear. Figure 16: The View Log page showing that SNMPv3 is executing. 7. Wait a few seconds (sometimes this can take a few minutes), and click Refresh to see the progress. The View Log page will reappear with the status. Once the configuration is complete, the View Log page will show success.
Figure 17: The View Log page showing successful configuration of SNMPv3. Now, whenever you click Apply to configure settings, the MFP will check for the SNMPv3 credentials. Note: For convenience, Web Jetadmin stores the credentials for each MFP in an encrypted format. However, Web Jetadmin may still prompt you for credentials on occasion so remember the passwords you set. Click Go Back to view Multiple Device Configuration Tool, and continue with this checklist.
Figure 18: The Bootloader Password option. 2. Click to select Bootloader Password. 3. Type a password of 9 to 16 numeric digits in the New Password field, and repeat it exactly in the Repeat Password field. 4. Select the MFPs you wish to configure in the device list. 5. Click Configure at the bottom of the page. The View Log page will appear showing progress. 6. Wait a few seconds, and click Refresh to update the progress. 7.
• HP LaserJet M9050 MFP • HP Color LaserJet CM3530 MFP • HP Color LaserJet CM6030 MFP • HP Color LaserJet CM6040 MFP HP Web Jetadmin may not provide options to configure the Jetdirect Firewall settings. Look for them in the MFP EWS. Note: Keep in mind that the ACL is not configured until at least one computer is in the list. When it is configured, no computer outside the list will have access to the MFP including printing. Follow these steps to configure the ACL: 1.
Figure 20: The Access Control List option. 3. Add an IP address or a subnet mask by filling in the fields. Figure 21: The ACL IP address field. CAUTION: Be sure to include the IP address of the computer that is running Web Jetadmin (it can be a computer other than the one you are using). Otherwise, the ACL will block your access, and you will not be able to continue. The Mask option requires an entry in the IP address field to determine the subnet for which to grant access.
To make sure all of the MFPs are configured with your new listings, click Clear all ACL Table entries (see above) the first time you add a listing. Note: To find out which IPs are configured in the ACL of a single MFP, open the device in Web Jetadmin and navigate to the ACL options (all of the MFPs should be the same if you are configuring them all at once). It will list the IP addresses or subnets that are already configured. 4.
Configurations on the Device Page The Device page includes settings that affect some of the normal use of the MFPs. It includes a few settings related to security: Click Device in the Configuration Categories menu, and scroll down to view the settings recommended below. Note: If you are configuring HP Color LaserJet MFPs, the Device page will display settings to restrict color printing for users and for applications.
3. Select the devices to configure in the Device List, and click Configure Devices at the bottom of the page. Figure 24: The Configure Devices button. Once you click Configure Devices, the View Log page will appear to show the progress. Click Refresh to update the page to see the results of the configurations. Click Go Back to continue. Configurations on the Fax Page The Fax Configuration Page provides options for the analog fax functions.
Figure 25: The Fax category. 2. Click to select Fax Printing. Figure 26: The Fax Printing options. 3. Enter a four-digit number in the PIN Number field, and repeat it in the Confirm PIN Number field. This setting requires users to provide the PIN number to print Fax jobs. Note: This setting also enables PIN printing. 4. Select Store all Received Faxes in the Enable Mode dropdown menu.
The View Log page will appear to show the status of the configurations. Click Refresh to update the status. Once the configurations are successful, click Go Back to continue. Additional Fax Configuration Some of the newer MFPs or recently upgraded MFPs may contain options for setting and locking down the Fax speed-dial feature. This Fax feature is not yet accessible via Web Jetadmin 8.1. To set your MFP speed-dial options follow the steps below. 1.
Figure 28: Fax Speed Dials selection and page. 3. Set any speed-dials you wish to have by selecting the speed-dial number and clicking the Edit Speed Dial button. Figure 29: The Fax Speed Dials configuration button.
4. To keep speed-dial entries from being added or edited via the control panel input the number of the specific speed-dials you wish to lock. We recommend locking all speed-dial entries from modification. To do this, enter 0-99 in the box and select Save ( ). Figure 30: The Fax Speed Dials lockdown box Configurations on the Digital Sending page The Digital Sending page includes options for email and for send to network folder. This includes settings for protecting the sender identification fields.
Figure 31: The Default From Address options. Note: HP recommends configuring the default from address to ensure that no one can send email using false or misleading identification; however, if you configure LDAP authentication (later in this chapter), the MFP will use the email address of the authenticated user as the From address, and it will not allow users to change it. 3. Click to select Prevent user from changing the Default 'From:' Address. 4.
Figure 32: The Accessing the LDAP Server options. These options enable the MFPs to provide the LDAP address book to users. They also include options for uploading the SSL certificates in order to secure communications between the MFPs and the LDAP server. Note: This LDAP access configuration is required for LDAP Authentication, which appears on the Security page (explained later). Be sure to configure these settings including the SSL certificate upload settings in order to enable LDAP Authentication.
8. Fill in the LDAP Credentials fields with the username and password of a valid network user, such as an administrator. You can also have the MFPs prompt for the credentials of the user as explained below. 9. Fill in the appropriate LDAP Server IP fields 10. Upload the certificate to the MFP, and fill in the Certificate Password field. 11.
MFP IP address into a web browser. This section covers settings that Web Jetadmin access through the EWS. Note: Later, at the end of this checklist, you will disable EWS Config, which disables all of the functions of EWS including those managed in Web Jetadmin. Now, however, you should configure the settings below for security while EWS Config is enabled. Follow these instructions: 1. Click Embedded Web Server in the Configuration Categories menu. Figure 34: The Embedded Web Server option. 2.
Figure 35: The Embedded Web Server Password options. 3. Type a password of 2 to 16 characters in the Embedded Web Server Password field (you should always type the maximum number of characters for best security). This setting requires users to log on for parts of the EWS that provide configuration options. 4. Repeat the password exactly in the Repeat Password field. Note: The Embedded Web Server Password is synchronized with the Device Password (appears later in this checklist).
Figure 36: The Embedded Web Server Configuration Options. 6. Click to enable Continue Button, and leave the remaining options blank. See below for more information: The Embedded Web Server Configuration Options are either enabled or disabled in this menu. They will be reconfigured regardless of their current state (which is not displayed). If you select an option, you are enabling it; if you leave an option blank, you are disabling it.
Cancel Job Button (disabled by default) Leave blank to disable Disabling Cancel Job Button prevents users from remotely cancelling the jobs of others. Go Button (enabled by default) Leave blank to disable Disabling Go Button prevents users from delaying or stopping the jobs of others. It is the Pause/Resume button in the MFP EWS. Command Invoke (enabled by default) Leave blank to disable Command Invoke does not apply to the MFPs. Disabling it is only a best practice.
Figure 37: The Filesystem option. The first option is Secure Storage Erase. Secure Storage Erase requires significant downtime, and it permanently deletes all user (non-system) data stored on the MFP. It is useful for cleaning out all traces of print jobs, fax jobs, copy jobs, digital send jobs, stored fonts, and even some stored settings from an MFP, but it should not be used regularly. CAUTION: Secure Storage Erase requires considerable downtime.
Figure 38: The Set Filesystem Password option. 3. Type a password of 1 to 8 characters in the File System Password field, and repeat it exactly in the Confirm File System Password field. With this configuration, the MFPs will require the password whenever anyone or any device requests access to the storage devices. Note: When Web Jetadmin is used to configure MFPs, it saves all of the passwords, including credentials for SNMPv3, in an encrypted device cache.
Figure 39: The Set Secure File Erase Mode setting. This setting determines the level of overwriting applied to delete files during routine functions. This includes removal of files for the Secure Storage Erase function (see the explanation earlier). Secure Fast Erase overwrites files using one pass. This takes some extra time, but it provides reasonable security. Secure Sanitizing Erase overwrites files with three passes. It noticeably slows the MFP, but it ensures that files are completely unrecoverable.
Figure 40: The File System External Access options. 6. Disable all options (see the table below).
Configurations on the Network Page The Network Configuration page provides options that relate to the Jetdirect Print Servers. Follow these instructions: 1. Click Network in the Configuration Categories menu. Figure 41: The Network option. 2. Click to select Job Timeout. Figure 42: The Job Timeout option. The Job Timeout option enables the MFPs to move on from jobs that lack proper end of job signals. The MFPs will be able to switch protocols to continue with other jobs.
The Job Timeout option might not appear for some models. 3. In the field next to Job Timeout, type a reasonable number of seconds for the MFPs to wait for an end of job before moving on. 4. Click Encryption Strength. Figure 43: The Encryption Strength option. 5. Click the Encryption Strength dropdown menu, and select the highest setting that your browser supports. Figure 44: The Encryption Strength dropdown menu.
6. Click Enable Features. Figure 45: The Enable Features option (scroll down to view more of the features). The following table lists and explains the recommended settings for the Enable Features: option: Feature Recommended Setting Explanation EWS Config Disabled*** Disabling EWS Config closes down the EWS and it eliminates the configuration settings that are controlled by the EWS. It also removes the affected settings from Web Jetadmin menus.
FTP Printing Disabled Disabling FTP Printing prevents access to configuration settings and other features through FTP. It also prevents printing through FTP. LPD Printing Disabled Disabling LPD Printing prevents access to configuration settings and other features through LPD. It also prevents printing through LPD. 9100 Printing Enabled 9100 Printing is the access point for normal printing through standard HP print drivers.
Figure 46: The Privacy Setting option. The Privacy Setting option is not considered a security-related setting. It is explained here to assure you that it does not compromise your network security. It allows HP to collect statistical data about the MFP. HP will not collect network-specific or personal data. For information on HP privacy policies, read the Hewlett-Packard Online Privacy Statement available by clicking privacy statement at http://www.hp.com.
Figure 47: The RCFG Setting option. This setting prevents access to configuration settings through Novell NetWare linkages; however, you should enable it if your network uses these linkages. Note: When you disable RCFG Setting, a warning message will appear explaining that you are disabling access for Novell. If you are not using Novell, click OK to continue. Note: The Access Control List options appear next on the Network page, but you should have already configured this.
Figure 48: The HTTPS Setting option. This setting requires web browsers to use HTTPS when contacting the MFPs. This ensures secure communications with the MFP EWS. This setting is related to the Encryption Strength setting covered earlier. 9. Click to select Protocol Stacks, and deselect all unused protocol stacks as applicable to your network. See the table below. Figure 49: The Protocol Stacks: options.
The following table lists each protocol with the recommended setting and an explanation: Protocol Stack Recommended Setting Explanation IPX/SPX Leave blank to disable This setting disables access for Novell servers. TCP/IP Select to enable This is the normal operating protocol for the MFPs. DLC/LLC Leave blank to disable This setting enables the MFP to communicate at basic levels on the network. It should be disabled if not in use.
Figure 50: The Security configuration category. 2. Click to select Authentication Manager. Figure 51: The Authentication Manager options. The Authentication Manager allows you to customize access to functions of the MFP. You can use these options to provide varying services to different groups of people.
Note: Be sure to select only the authentication features that you plan to configure in the subsequent steps on the Security page. LDAP, Kerberos, and Digital Send Service require additional solutions on the network for support.
3. Click the dropdown menu next to Log in at Walk Up, and select from the list. Figure 52: The drop down menu for Log in at Walk Up. Choosing an authentication method for Log in at Walk Up causes the MFP to require everyone to log in for access to the control panel menus. You can choose to require further authentication for specific functions of the MFP. 4. Choose an authentication method for each device function as desired.
Figure 53: The Accessing the LDAP Server options. These settings enable the MFPs to require a user's NT logon credentials for use of the MFPs. This is related to the LDAP access options on the Digital Sending page, which enable the MFP to use the LDAP address book; however, the SSL certificate options for both configurations appear on the Digital Sending page. Note: These instructions assume that the LDAP server is configured for SSL.
Figure 54: The PIN Authentication options. You can use PIN Authentication with other authentication features to restrict use of the MFPs further. For instance, you can require all users to login at walk up using the LDAP system and then require group 1 PIN for access to the copy function and group 2 PIN for access to the fax function. Click to select PIN Authentication, and enter PINs as desired. Be sure to repeat the PINs exactly in the Confirm PIN fields.
Figure 55: The Printer Firmware Update option. HP recommends updating firmware whenever new firmware is available, but you should keep Printer Firmware Update disabled until you plan to use it. Note: The SNMPv3 option appears next on the Security page, but you should have already configured it. The SNMPv3 instructions appear at the beginning of this checklist to help ensure security during the time you are configuring the MFPs. 13. The next option is Device Password.
Figure 56: The Device Password option. CAUTION: The Device Password option should already be configured. When you configured the EWS Password earlier in this process, each MFP should have automatically configured the device password to be the same as the EWS password. The Device password restricts access to the device settings of the MFP. It is the synchronized with the EWS password, but it functions in different situations.
Figure 57: The Control Panel Access option. Maximum Lock ensures that no one can access configuration settings in the control panel. Note: This setting prevents access to configuration settings in the control panel, including digital send and fax settings. If you wish to make changes to settings in the control panel, unlock access using Web Jetadmin, make the changes, and then lock access again. See the Ramifications chapter for more information. 15.
Digital Send Service is an HP solution for managing the digital sending functions of MFPs. It is useful and recommended for this purpose, but it is not addressed in this checklist. If you are using Digital Send Service, enable it here, and be sure to configure the security settings in Digital Send Service. 16. Click to select Allow Transfer to New Digital Send Service, and click Disabled. Figure 59: The Allow Transfer to New Digital Send Service option.
18. Type a password that is any number from 1 to 2147483647 that is at least nine digits in length, and repeat it in the Repeat PJL Password field. Note: If you have problems configuring this password try configuring it through the EWS. The PJL password protects the default features on the MFP. PJL commands are allowed only when the correct PJL password is included. Note: If you are configuring color MFPs, options for restricting the use of color will appear on the Security page.
2. Click to select the Disable Direct Ports option to the right. The Disable Direct Ports feature disables the USB and Parallel ports on the MFPs. It ensures that only network-connected computers can access the MFPs. In order to configure this feature, each MFP will turn off and turn on automatically. 3. Click Configure Devices at the bottom of the page. 4. Wait for a few minutes to allow all of the MFPs to restart. Do not continue until all of them are at the READY state. 5.
network. Thus, configuring security features and passwords and updating them regularly for Web Jetadmin and MFPs is important to network security. This involves several passwords that limit access to important areas of the MFP. When you attempt to make changes to configurations, the MFPs will require all applicable passwords. Web Jetadmin keeps an encrypted cache of all of these passwords for each MFP whenever they are configured or used. However, sometimes the cache can lose track of some credentials.
Chapter 4: Settings List This section is a complete list of the settings recommended in this checklist. This section does not include instructions or explanations. It is intended to be used as a check-off list of the recommended settings to help ensure that you complete the entire configuration. See the Network Security section (above) and the Ramifications section (below) for information on each setting.
Digital Sending Page Options Configure Default From Address. Select Prevent user from changing the Default From Address. Configure Accessing LDAP Server settings (if available on your network). Configure LDAP Server Bind Method to Simple over SSL (if possible). Upload SSL Certificate (if available). Configure Time-outs to Delay before resetting the default settings, and type a number of seconds to delay. Embedded Web Server Page Options Configure Embedded Web Server Password.
Disable Telnet Config. Disable SLP Config. Disable FTP Printing. Disable LPD Printing. Enable 9100 Printing. Disable IPP Printing. Disable MDNS Config. Disable IPV Multicast Config. Set the privacy setting as desired. Disable RCFG Setting. Enable HTTPS Setting to Encrypt all web communication. Configure Protocol Stacks. Disable IPX/SPX. Enable TCP/IP. Disable DLC/LLC. Disable AppleTalk.
Chapter 5: Default Settings: This chapter lists the default setting for each configuration in the checklist: Setting Default Setting Configure HP Secure Hard Disk Installed and Enabled Configure SNMPv3 (Security page). Not configured Configure Bootloader password. Not configured Configure ACL (Network page). Not configured Disable Allow Web Server (HTTP) Access. Enabled Enable Job Retention. Enabled Configure Job Hold Timeout. Never Delete Configure Fax Printing.
Disable Command Download. Enabled Disable Command Load and Execute. Enabled Enable Continue Button. Enabled Disable Print Service. Enabled Configure File System Password. Not Configured Configure Secure File Erase Mode to Secure Fast Erase or Secure Sanitize Erase. Non-Secure Fast Erase Configure File System External Access. (See below) Disable PJL. Enabled Disable PML. Enabled Disable NFS. Enabled Enable PostScript. Enabled Configure Job Timeout.
Configure authentication (LDAP, Kerberos, Device PIN, or User PIN). Not configured Configure Authentication Manager Choose (all options) Disable Printer Firmware Update. Enabled Configure the Device Password. Not configured Configure Control Panel Access to Maximum Lock. Unlock Disable Allow Use of Digital Send Service. Enabled Disable Allow Transfer to New Digital Send Service. Enabled Configure the PJL Password. Not configured Configure color restriction settings.
Chapter 6: Ramifications Raising the level of security on HP MFPs requires giving up some conveniences and usability. This section explains some of the compromises you can expect from configuring the settings recommended in this checklist. Keep in mind that this is not a comprehensive list. You should test each MFP in your network environment to understand the implications of these settings and configurations.
• Fill in the Access Control List. The Access Control List is a table that lists the IP addresses of PCs that are allowed to access the MFPs. This helps enable a secure configuration process because it ensures that only those using authorized computers will have network access to the MFPs. The ACL covers all access to the MFPs including printing. If you wish to provide access to groups of users, be sure to use the net mask feature so you do not have to enter a large number of IP addresses.
Job Hold Timeout requires that users are mindful of their print jobs. They will not be able to recover jobs that are deleted after the timeout period. Jobs are deleted securely according to the Secure File Erase setting (appears later in this checklist). NOTE: Stored faxes are not affected by the Job Hold Timeout. Fax Page Options • Configure the Fax PIN. With the fax PIN configured, the MFP will hold all fax jobs until someone provides the PIN at the control panel.
When Accessing LDAP Server settings are configured, the MFPs provide access to the LDAP address book using either the credentials of a valid network user, such as an administrator, or the credentials of the MFP user (depending on your preferences). The MFP will prompt for credentials as necessary. • Configure LDAP Server Bind Method to Simple over SSL (if possible). Normally the communications between the MFPs and the LDAP servers pass over network in clear text.
anonymously); however, users will be able to cancel their own jobs from the printer driver or from the control panel. • Disable Go Button. The Go button is the EWS Pause/Resume button, which enables users to pause operations, such as print jobs, indefinitely. Disabling the Go button removes it from the EWS preventing users from delaying jobs or even denying service to other users; however, users will be able to pause or resume their own jobs from the print driver or from the control panel.
ensures that the original data is destroyed. Secure Fast Erase mode overwrites files one time. It slows MFP performance a bit, but it provides reasonable security for most situations. Secure Sanitizing Erase overwrites files 3 times. It slows MFP performance considerably, but it provides even more assurance that the data is not recoverable. If your network is required to meet stringent security requirements such as DOD regulations, you should use Secure Sanitizing Erase.
• Disable NFS access. The NFS protocol is used by UNIX, and Linux, and Norton systems. Disabling it disables the entire protocol for the MFPs. With this setting, MFPs will ignore all NFS requests. If your network uses these protocols, you should enable NFS. Network Page Options • Configure Job Timeout. The Job Timeout option enables the MFPs to move on from jobs that lack proper end of job signals.
• • Enable 9100 Printing. 9100 Printing should always be enabled. It is the standard printing protocol used by MFP print drivers. Disabling 9100 Printing would disable all printing for most users. • Disable IPP Printing. IPP Printing is a protocol for printing over the internet or locally. Unless you have a requirement for IPP printing it should be disabled. With it disabled, the MFPs will deny access to direct printing from the Internet.
When you click Apply for this setting, a caution message will appear to alert you that you are disabling certain types of Novell access. Click OK to go ahead with disabling it. • Enable HTTPS, and configure the setting to Encrypt all web communication. This setting enables encryption for configuration data between the PC and the MFP EWS. It prevents sensitive data such as usernames and passwords from passing over the network in clear text.
With Printer Firmware Update disabled, the MFPs will deny access whenever anyone attempts to upgrade the firmware. • Set the Device Password. The Device Password helps prevent unauthorized users from changing configurations in the MFPs. The MFPs will deny access to configuration settings without the password. Web Jetadmin keeps MFP credentials in its encrypted device cache. It will not prompt for the device password of an MFP that it manages. The Device Password is synchronized with the EWS password.
• Configure color restriction settings. If your network includes Color LaserJet MFPs, you can configure settings to restrict the use of color printing by users and by applications. With color restriction settings configured, an MFP will print only in black and white for restricted users or applications. Final Configurations • Disable Direct Ports. This setting shuts down the MFP parallel ports and USB ports. It restricts access to only network connections.
• No way to cancel print jobs from the control panel: The MFPs will not allow a user to cancel the print jobs of other users. The user would have to go to the person who submitted the job and ask that person to cancel it. • No way to cancel a fax job: The maximum lock setting on the control panel includes removing the fax job cancelling options. Once a user selects Send, there is no way to stop an outgoing fax (other than disconnecting the phone line).
Chapter 7: Physical Security Many of the most notable features of a HP MFPs involve hard copy documents. MFPs can print them, scan them, send them to email, send them to network folders, send them to other printers, and fax them. Handling hardcopy documents can involve a variety of activities that can lead to compromise of data security: • Leaving documents in the printer output trays exposed to possible unauthorized viewers.
Chapter 8: Appendix 1: Glossary of Terms and Acronyms The following table lists terms and acronyms found in this checklist: Term Description ACL Access Control List. The ACL restricts network access to the MFP by allowing only those IP addresses or subnets that are listed in it. Analog fax Analog fax is fax functions via telephone lines. The fax module is available in most HP MFP bundles and it is covered in this checklist.
Term Description JDI Jetdirect Inside. Many of the MFPs include internal Jetdirect hardware as standard equipment. Other MFPs, such as HP Color LaserJet 9500 MFPs require EIO Jetdirect cards for network connectivity. Job Retention Job Retention is the MFP capability of storing print jobs or fax jobs for printing on demand at the control panel. PIN printing and PIN fax printing are functions of Job Retention.
Microsoft® is a U.S. registered trademark of Microsoft Corporation. Adobe and PostScript are trademarks of Adobe Systems Incorporated. © Copyright 2005, 2006, 2009 Hewlett-Packard Development Company, L.P.