HP Imaging and Printing Security Best Practices Configuring Security for Multiple LaserJet MFPs, Color LaserJet MFPs, and Color MFPs with Edgeline Technology Version 3.
Table of Contents Introduction......................................................................................................................................... 4 Cautions ............................................................................................................................................. 6 Follow the Checklist in Order............................................................................................................. 6 Configure One MFP Model at a Time ..............
File System Page Options ............................................................................................................ 76 Network Page Options................................................................................................................ 77 Security Page Options................................................................................................................. 80 Settings Only for Edgeline MFPs .....................................................................
Introduction HP MFPs are designed to provide the best quality, versatility, and convenience possible. They include a wide variety of features to improve your experience with data handling and printing. These features include security settings that help protect your valuable intellectual property and your network data. HP prepares MFPs to be easy to set up and use right out of the box; however, this means that many of the security features are not configured by default.
HP Web Jetadmin is the recommended management tool for all HP network printing and digital sending products. This checklist is developed only for HP Web Jetadmin Version 8.1 with Service Pack 4. Web Jetadmin Version 8.1 is available for download at the following location: http://www.hp.com/bizsupport/wja/live/manual/8.1/html/wjacomp_winnt.html You can also find HP Web Jetadmin by searching for it at hp.com.
Cautions HP is dedicated to providing the best and latest security information available for MFPs. This checklist is meant to help you to improve MFP security in your workplace. HP has tested this checklist to ensure that MFPs continue to provide the best possible performance while averting possible security threats; however, some of these settings can cause unexpected problems in your network environment.
• MFPs: This checklist covers security settings for specific HP MFPs. It is meant to help you configure multiple MFPs simultaneously using the HP Web Jetadmin Multiple Device Configuration Tool (explained later). It assumes that the MFPs are turned on, connected to the network, and in their factory default states. Most of the settings recommended in this checklist apply to other HP products; however, this checklist is tested and known to be successful only with the specified MFP models.
to research in this area. You should continue to be ware and always remain vigilant. Use other techniques with this checklist to help ensure that your network is resistant to compromise. Note: This is not a comprehensive treatment of these issues. This chapter is only an introduction to the types of threats that might possibly affect MFPs.
• Disable Cancel Job button. • Disable Go (Pause) button. • Configure SNMPv3. • Prevent unnecessary remote access: close down all unused ports and protocols. • Configure HTTPS for EWS access. Repudiation Repudiation is using an MFP without leaving usage information. This includes preventing the MFP from logging data or bypassing security checks such as user authentication.
• Pulling out the MFP formatter board • Disconnecting the MFP from the network • Causing interference with network communication to the MFP • Changing the network location of the MFP • Causing an error state that interrupts service • Changing access configurations You can address the risks of denial of service attacks in the following ways: • Lock the control panel. • Lock EWS configuration settings. • Close unused ports and protocols. • Disable controls such as the Job Cancel button and the Go button.
Note: Edgeline MFPs have IPsec and IPv6 capabilities, but they are not covered in this checklist. This is because HP Web Jetadmin does not provide support for them, and because they require advanced network configurations. Look for information on these settings in the Edgeline MFP user guides and at hp.com. Notes on the Process of Configuration This checklist covers every reasonable security setting for each model.
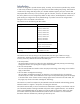
MFPs), which is a permanent setting that can never be changed or reset without the correct password. Configuring MFP Security Settings This section provides instructions for configuring the MFPs for best-practice security. Most all of these settings are found in HP Web Jetadmin Version 8.1. The exceptions are noted in the instructions below.
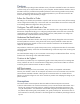
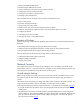
Figure 2: Web Jetadmin showing the device list in the default view. 2. Check to see that the MFPs you wish to configure appear in the Device Model List. If they are not in the list, use the Discovery options to find the MFPs on your network. Note: This checklist does not cover Device Discovery. See Web Jetadmin user guidance for more information. In most cases, the MFPs already appear in the default view.
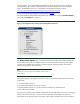
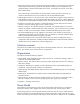
Figure 3: The Device List showing devices selected and the Device Tools menu showing Configure selected. Tip: To select more than one MFP in the Device Model list, hold CTRL while clicking each MFP. Note: This chapter covers settings for all MFP models. However, you should configure only one model at a time. Thus some settings in this checklist may not appear for the model you are configuring. This is because some settings may not apply to that specific model.
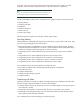
Figure 4: The Multiple Device Configuration Tool showing the Configure Devices tab outlined in green. The Configure Devices tab contains most all of the settings recommended in this checklist. Tip: Sometimes Web Jetadmin can lose track of MFP credentials. If this happens, some settings might fail. Clear the Web Jetadmin Device Cache (see Web Jetadmin Help) and re-enter the MFP credentials.
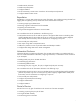
Configuring Initial Settings In order to ensure a successful and secure configuration, you should configure a few of the settings first. The following instructions explain how to configure these settings: Configuring SNMPv3 SNMPv3 provides encryption for communication between Web Jetadmin and the MFPs. It helps to ensure that only authorized and authenticated administrators have access to the configuration settings.
Figure 6: The Security menu showing SNMPv3 selected. 6. Click to select Enabled below the SNMPv3 checkbox, and fill in the New User, the New Authentication Passphrase, and the New Privacy Passphrase fields (Figure 7). See below for details. Figure 7: The SNMPv3 settings enabled and the fields filled out. The New User Name field can be any name you choose. The New Authentication Passphrase field can be any word or phrase that is at least 8 characters.
MFPs to factory default settings. These instructions are for the initial configuration of SNMPv3. Once you finish this configuration, the MFPs will require these credentials whenever anyone attempts to access settings over the network. Note: Web Jetadmin retains the SNMPv3 credentials for each MFP, and it will not prompt for them as long as the authorized administrator is logged onto Web Jetadmin and the credentials remain the same.
Figure 9: The Device Model list. Click Configure Devices (Figure 10) to execute the configuration. Figure 10: The Configure Devices button. After you click Configure Devices, a View Log page (Figure 11) will appear.
Figure 11: The View Log page showing that SNMPv3 is executing. 9. Wait a few seconds (sometimes this can take a few minutes), and click Refresh to see the progress. The View Log page will reappear with the status. Once the configuration is complete, the View Log page will show success (Figure 12). Figure 12: The View Log page showing successful configuration of SNMPv3. Now, whenever you click Apply to configure settings, the MFP will check for the SNMPv3 credentials.
Configuring the Device Password The Device password restricts access to many of the configuration settings. The MFPs require it to be configured before they allow configuration of some of the other settings. Follow these instructions: 1. Click the Security option in the Configuration Categories menu (Figure 13). Figure 13: The Security Configuration Category option. 2. Scroll down, and click to select Device Password (Figure 14). Figure 14: The Device Password Options. 3.
Configuring the Access Control List (ACL) The ACL limits network access to allow only to the IP addresses or subnets that you specify. This includes printing and all other access. Tip: You can ensure that no one but you has access to the MFPs while you are configuring this checklist: List only the computer you are using until you are finished with the checklist. The MFPs will accept IP addresses without masks to limit access to single computers.
Figure 16: The Access Control List option. 3. Add an IP address or a subnet mask by filling in the fields (Figure 17). Figure 17: The ACL IP address field. CAUTION: Be sure to include the IP address of the computer that Web Jetadmin is using to connect to the MFPs (it might be a computer other than the one you are using, such as a proxy server). Otherwise, the ACL will block your access, and you will not be able to continue.
Note: To find out which IP addresses are already configured in the ACL of a single MFP, open the device page in Web Jetadmin, and navigate to the ACL options (all of the MFPs should be the same if you are configuring them all at once). It will list the IP addresses or subnets that are already configured. You can also see the ACL list in each MFP EWS. 5. Click to deselect Allow Web Server (HTTP) access to ensure that the ACL restricts access to the MFP EWSs. 6.
Figure 19: The Fax Configuration Category. 2. Click to select Fax Send Setup (Figure 20). Figure 20: The Fax Send Setup option. 3. Click to select Enable Fax Send, and select Internal Modem in the Fax Send Method dropdown menu. Note: This checklist assumes you are using analog fax. If you wish to use another method, choose that method, and configure the appropriate settings later in the fax configuration section.
7. Once the View Log page shows results for all of the MFPs, click Go Back to continue. Configuring Email Send Setup, and Send to Folder Setup for Edgeline MFPs Edgeline MFPs also require Email Send Setup and Send to Folder Setup before they allow configurations for related settings. Follow these instructions: Tip: This setting applies only to Edgeline MFPs. To save time, you should apply this setting only to the Edgeline MFPs you are configuring. 1.
Figure 22: The Enable Send to Email option. 3. Click to select Enable Send to Email to the right. Note: You might have to configure the SMTP Gateways Settings as well. 4. Scroll down, and click to select Enable Send to Folder (CM8060) (Figure 23). Figure 23: The Enable Send to Folder options. Important: Be sure to select the Enable Send to Folder Setting that is labeled CM8060. 5. Click to select Enable Send to Folder (CM8060) to the right. 6. Click Configure at the bottom of the page.
7. Wait a few seconds, and click Refresh to update the progress. 8. Once the View Log page shows results for all of the MFPs, click Go Back to continue. Configuring the Bootloader Password or the Startup Administrator Password Each MFP has a startup process that includes settings for features such as the reset options. These features are not commonly known, but they can severely affect the MFPs if they are executed improperly.
Note: To reset (clear) this password, click to select Bootloader Password, type the correct current password, and leave the New Password and Repeat Password fields blank. Then click Configure, and the bootloader password will be cleared. Configuring the Startup Menu Administrator Password for Edgeline MFPs: Edgeline MFPs use a different process for start up, and the settings for it are available only on the control panel. Follow these instructions to configure the Startup Menu Administrator Password: 1.
• HP LaserJet M3027 MFP • HP LaserJet M3035 MFP • HP LaserJet M5025 MFP • HP LaserJet M5035 MFP • HP Color LaserJet M4730 MFP • HP CM8050 Color MFP with Edgeline • HP CM8060 Color MFP with Edgeline Hiding the IP address can be done only using the MFP Control panel. Follow these instructions: 1. Touch Administration on the home screen. The Administration menu will appear. 2. Touch Management. The Management menu will appear. 3. Touch Network Address Button.
Configurations for all MFPs (Including Edgeline MFPs) This section covers settings for all MFPs. This includes Edgeline MFPs, LaserJet-based MFPs, and Color LaserJet-based MFPs. It does not cover settings that are only for Edgeline MFPs. If you are configuring Edgeline MFPs, complete this section, and continue with Configurations for Edgeline MFPs. IMPORTANT: Remember to configure one model at a time. You can configure any number of individual MFPs of a given model.
3. Click to select Job Hold Timeout (Figure 25, above), and select a reasonable time for printing. This ensures that certain types of jobs stored on the MFPs are erased after a reasonable time. Be sure to allow time at least for a person to walk to the MFP, select printing options, and print a document. Note: Job Hold Timeout does not apply to fax jobs. 4. Select the devices to configure in the Device List, and click Configure Devices at the bottom of the page.
Figure 27: The Fax Printing options. 3. Enter a four-digit number in the PIN Number field, and repeat it in the Confirm PIN Number field. This setting requires users to provide the PIN number at the MFP control panel to print fax jobs. Note: This setting also enables PIN printing. Also note that this setting does not apply to Edgeline MFPs. 4. Select Store all Received Faxes in the Enable Mode dropdown menu.
Figure 28: The Email Message Text options. This setting provides a standard message for the MFPs to send with email attachments. It eliminates the possibility of users sending improper messages from the MFPs. 3. If you wish to use the default message, click to select Message Language, and choose a language. If you wish to use a custom message, click to select Use a Custom Message, and type a message. 4. Select No in the Editable by User drop down list (just below the Use a Custom Message field).
email address of the authenticated user as the from address, and it will not allow users to change it. 6. Click to select Prevent users from changing the Default 'From:' Address. 7. Fill in the Email Address field with any address that includes the at symbol (@). Tip: You might wish to use the email address of an administrator who can receive responses such as email send notices and failures. 8. Fill in the Display Name and the Default Subject fields as desired. 9.
11. Click to select either Use Device User's Credentials or Use Public Credentials under LDAP Credentials. If you choose Use Device User's Credentials, each MFP will prompt the user at the control panel for a valid username and password. If you choose Use Public Credentials, each MFP will use the username and password that you provide in the Username and Password fields below this option. Enter the credentials of a valid network user, such as an administrator. 12.
Follow these instructions: 1. Click Embedded Web Server in the Configuration Categories menu (Figure 32). Figure 32: The Embedded Web Server page. Note: The first option in the Embedded Web Server Configuration Categories page is Embedded Web Server Password. This setting should already be configured. The MFPs automatically configure this password to be the same as the Device Password, which you should have configured earlier. See the Initial Settings section earlier in this chapter.
Figure 33: The Embedded Web Server Configuration Options. 3. Click to enable Continue Button, and leave the remaining options blank. See below for more information: The Embedded Web Server Configuration Options are either enabled or disabled in this menu. They will be reconfigured regardless of their current state (which is not displayed). If you select an option, you are enabling it; if you leave an option blank, you are disabling it.
Command Load and Execute (enabled by default) Leave blank to disable Command Load and Execute enables the MFPs to install and run Chai services, such as workflow applications and job accounting solutions. You should disable it unless you are using installed applications on your MFPs. Continue Button (enabled by default) Select to enable Continue Button allows the MFPs to resume after they are set to pause.
needed to clean MFPs for resale, for reuse, or for conforming to high-level security requirements such as Department of Defense regulations. The instructions continue with the File System password: 2. Click to select Set Filesystem Password (Figure 35). Figure 35: The Set Filesystem Password option. 3. Type a password of 8 characters in the File System Password field, and repeat it exactly in the Confirm File System Password field.
Figure 36: The Secure File Erase Mode setting. This setting determines the level of overwriting applied to delete files during routine functions. This includes removal of files for the Secure Storage Erase function (see the explanation earlier). Secure Sanitizing Erase is recommended for this setting because it ensures that data is completely unrecoverable by overwriting files with three passes.
NFS Disabled Prevents access to the file system through this protocol NOTE: Disabling the NFS option disables the entire protocol for the MFPs. PostScript Enabled The PostScript protocol is not as sensitive, and it is more likely to be used for common types of print jobs. 8. Select the devices to configure in the Device List, and click Configure Devices. The View Log page will appear to show the status. Click Refresh to update the status.
Figure 39: The Upload Certificate Options. These certificate settings are to enable SSL, which is a secure protocol used for communicating with the LDAP server (You should have chosen to use this protocol if you configured LDAP access settings earlier in this chapter). SSL requires certificates to be exported either from the server to the MFPs or to the server from the MFPs depending on the configuration of your network. 3. Configure the certificate settings as applicable to your LDAP server requirements.
Figure 41: The Enable Features option. The following table lists and explains the recommended settings for the Enable Features: option: Feature EWS Config Recommended Setting Explanation Enabled Disabling EWS Config closes down the EWS and it eliminates the configuration settings that are controlled by the EWS. It also removes the affected settings from Web Jetadmin menus. This includes settings for email, send to folder, and fax.
IPv4 Multicast Config Disabled Disabling IPv4 Multicast Config prevents access to configuration settings and other features through IPv4 Multicast. Note: As a rule, you should close down all MFP access points when they are not in use. The Privacy Setting option appears later on the Network page (Figure 42). Figure 42: The Privacy Setting option. The Privacy Setting option is not considered security-related. It is explained here to assure you that it does not compromise your network security.
7. Click RCFG Setting (Figure 43), and leave RCFG Config blank to disable it. Figure 43: The RCFG Setting option. This setting prevents access to configuration settings through Novell NetWare linkages; however, you should enable it if your network uses these linkages. Note: When you disable RCFG Setting, a warning message will appear explaining that you are disabling this access. If you are not using it, click OK to continue. 8. Click HTTPS Setting (Figure 44), and select Encrypt all web communication.
Note: The Access Control List options appear next on the Network page, but you should have already configured this. The ACL instructions appear in the Initial Settings section of this chapter to help ensure security during the time you are configuring the MFPs. 9. Click to select Protocol Stacks (Figure 45), and deselect all unused protocol stacks as applicable to your network. See the table below. Figure 45: The Protocol Stacks option.
Note: If you are configuring color MFPs, options for restricting the use of color will appear on the Security page. You should configure these options if you wish to control the costs of color printing. These options are not covered in this checklist. Follow these instructions: 1. Click Security in the Configuration Categories menu. This opens the Security configuration page (Figure 46). Figure 46: The Security Configuration Category. 2. Click to select Authentication Manager (Figure 47).
Caution: Be sure to configure only settings that are supported and configured on your network. These settings can cause loss of access to the MFPs if they are not properly configured. The configurations for these authentication features appear later on the Security page. Be sure to select only the authentication features you plan to configure in the subsequent steps. Note: LDAP, Kerberos, and Digital Send Service require additional solutions on the network for support. 3.
Figure 49: The Accessing the LDAP Server options. These settings enable the MFPs to require a user's NT logon credentials for use of the MFPs. This is related to the LDAP access options in the Digital Sending page, which enable the MFP to use the LDAP address book. This setting is required if you chose it for any of the features in the Authentication Manager at the beginning of this section. 7. Select Simple SSL in the LDAP Server Bind Method dropdown menu.
Figure 50: The PIN Authentication options. You can use PIN Authentication with other authentication features to further restrict use of the MFPs. For instance, you can require all users to login at walk up using the LDAP system and then require Group 1 PIN for access to the copy function and Group 2 PIN for access to the fax function. Note: Configure NTLM if your network includes NTLM service. This option enables the MFP to authenticate to NTLM for the purposes of digital sending to network folders.
Figure 51: The Printer Firmware Update option. The Printer Firmware Update option disables the MFP function to install new versions of firmware. This feature should be disabled during normal use and enabled only when you are prepared to update firmware. Keep in mind that HP strongly recommends updating MFP firmware regularly. Note: The SNMPv3 option appears next on the Security page, but you should have already configured it.
Figure 52: The Control Panel Access option. Maximum Lock ensures that no one can access configuration settings in the control panel. Note: Control Panel Maximum Lock prevents everyone from accessing configuration settings in the control panel, including digital send and fax settings. If you wish to make changes to settings in the control panel, unlock access using Web Jetadmin, make the changes, and then lock access again. See the Ramifications chapter for more information. 13.
14. Click to select Allow Transfer to New Digital Send Service (Figure 54), and click Disabled. Figure 54: The Allow Transfer to New Digital Send Service option. Digital Send Service claims ownership of the MFPs it manages. Anyone with another installation of Digital Send Service can take over an MFP unless you disable this option. 15. Click to select PJL Password (Figure 55). Figure 55: The PJL Password option. 16.
Configuring Settings for Edgeline MFPs Edgeline MFPs have many unique security features that should be configured exclusive to LaserJet and Color LaserJet-based MFPs. This saves time, and it saves complications that can arise from configuring MFPs that reject these settings. Follow these instructions, but select only Edgeline MFPs in the devices list at the end of each configuration category: Tip: These settings apply only to Edgeline MFPs.
Figure 57: LDAP Server Settings. These settings enable the Edgeline MFPs to access the LDAP server to provide addresses and contacts. It is important to configure SSL to ensure that usernames and other information from the LDAP server are encrypted. 2. Configure the Enable Network Contacts setting as desired, and fill in the LDAP Server Address field according to your network configuration. 3.
8. Scroll down, and click to select Default Message Settings (Figure 59). Figure 59: The Default Message Settings options. These settings restrict users from changing the address fields in email jobs. 9. Click to select Restrict users from editing all address fields. 10. Type an email address that includes the at (@) symbol in the Default E-mail Address field. You may wish to use the address of an administrator who can receive responses or error reports for messages sent by the MFPs.
Figure 60: The Default Sign in Method option. The Default Sign in Method provides a standard method of restricting access to the MFP. The method you choose will be used whenever access restrictions are not configured. 3. Click to select Access Control Level for Device Functions (Figure 61). Figure 61: The Access Control Level options (Edgeline MFPs). This feature allows you to create roles for various types of users and to provide varying access to MFP functions and features for each role.
Figure 62: The Permission Set options under the Access Control Level options (Edgeline MFPs). d. After you have added a name, click Permission set. A list of Device Functions with Access Control (Figure 63) will appear. Figure 63: The Device Functions with Access Control list (Edgeline MFPs). e. Click to select the device functions for which to allow access for that role. f. Click Apply at the end of the list. g. Repeat Steps c-f for as many roles as you wish to create. 4.
Figure 64: The LDAP Sign in Setup options (Edgeline MFPs). This feature is for setting up LDAP sign in. It is required if you chose LDAP sign in for the Authentication Manager settings earlier in this section or for the Access Control Level settings above. 5. Configure the LDAP Sign in Setup options according to your network LDAP configuration. Be sure to use an SSL port to ensure secure communication. 6.
Figure 66: The NOVELL Sign in options. 9. Click to select LDAP Users and Groups (Figure 67). Figure 67: The LDAP Users and Groups options. These settings define the users or groups that are provided permissions via the LDAP system. If you chose LDAP for a log in method above, fill out the LDAP Users and Groups settings: a. Select a permission level in the Default Permission Set for LDAP Users drop down list. b.
Figure 68: The Windows Users and Groups options. These settings define the users or groups that are provided permissions via Windows. If you chose Windows for a log in method above, fill out the Windows Users and Groups settings: a. Select a permission level in the Default Permission Set for Windows Users drop down list. b. If you wish to add a user, type a name for the user in the User Name field, choose a Permission set in the dropdown list, and click Add New. c.
Figure 69: The Enable Features option. 2. Click to disable EWS Config. EWS Config was required for configuring this checklist, but it should be disabled during normal use of the MFPs. Note: This setting removes all configuration settings from the MFP EWSs. It also removes all EWS-related settings from Web Jetadmin (they will disappear from Web Jetadmin menus). With this setting configured, the only way to make changes to the EWS settings again is to re-enable them using Web Jetadmin.
Figure 70: The Disable Direct Ports option. 5. Click to select the Disable Direct Ports option to the right. The Disable Direct Ports feature shuts down the USB and Parallel ports on the MFPs. It ensures that only network-connected computers can access the MFPs. In order to configure this feature, each MFP will turn off and turn on automatically. 6. Click Configure Devices at the bottom of the page. 7. Wait for a few minutes to allow all of the MFPs to restart.
CAUTION: Losing passwords can eliminate access to an MFP. Be careful to record them in a safe place. It is most important to remember the Bootloader password. With it, it is possible to restore the MFPs to factory default settings. Without it, the only way to restore the MFPs is to involve an HPauthorized service technician to reset the entire MFP. You may wish to use a password vault program to organize and store the passwords.
Initial settings Configure SNMPv3 (Security page). Configure Device Password (Security page). Configure ACL (Network page). o Disable Allow Web Server (HTTP) Access . Configure Fax Setup (Fax page for Edgeline MFPs). o Select Internal Modem. Enable Send to Email (Digital Sending page for Edgeline MFPs). Enable Send to Folder (Digital Sending page for Edgeline MFPs).
o Disable Print Service. File System Page Options Configure File System Password (apply the File System Password setting before continuing). Configure Secure File Erase Mode to Secure Sanitize Erase. Configure File System External Access. o Disable PJL. o Disable PML. o Disable NFS. o Enable PostScript. Network Page Options Upload SSL Certificate (if available). o Configure certificate settings according to your network configuration.
o If you choose Use Fax Printing Schedule, fill out the table. Digital Sending Page Options Configure LDAP Server Settings. o Select Enable Network Contacts (as desired). o Fill out LDAP Server Address according to the configuration of your network. o Select Use a secure connection (SSL). o Configure Use Custom Port (as desired). Configure Server Connection Settings. o Select Windows Negotiated if your network has Kerberos capabilities.
Configure Fax Setup Not configured Select Internal Modem None selected Configure Send to Email Setup Not configured Configure Send to Folder Setup Not configured Configure Bootloader password or Startup Administrator Password Not configured Hide MFP IP Address. Hidden on some models; displayed on others Settings for all MFPs Enable Job Retention. Enabled Configure Job Hold Timeout. Never Delete Configure Fax Printing. Not configured Establish PIN Number.
Upload SSL Certificate. Not applicable Configure Encryption Strength to Medium. Low Configure Enable Features options (do not disable EWS Config at this point). (See below) Disable Telnet Config. Enabled Disable SLP Config. Enabled Disable FTP Printing. Enabled Disable LPD Printing. Enabled Enable 9100 Printing. Enabled Disable IPP Printing. Enabled Disable MDNS Config. Enabled Disable IPV Multicast Config. Enabled Set the privacy setting as desired. Configured Disable RCFG Setting.
Configure LDAP Users and Groups. None configured Configure Windows Users and Groups. None configured Disable EWS Config. Enabled Disable Direct Ports.
Ramifications Raising the level of security on any network product requires giving up some conveniences and usability. This section explains some of the compromises you can expect from configuring this checklist. Keep in mind that this is not a comprehensive list. You should test your system to know how it reacts to these settings and configurations. The following sections explain some of the known ramifications of each setting: Initial Settings • Enable SNMPv3.
CAUTION: If the Access Control List is filled out incorrectly, it can cause complete loss of communication with the MFPs. Be sure to use the correct information. The only way to restore communication is to reconfigure the MFPs to factory default settings. • Disable Allow Web Server (HTTP) access. The MFPs have Embedded Web Servers that provide many of the configuration capabilities that Web Jetadmin provides.
Settings for all MFPs (including Edgeline MFPs) Device Page Settings • Enable Job Retention. Job Retention saves fax or print jobs on the hard drive for printing when the user is present. The security implication is that a user can be sure others will not be able to see the printed documents as they exit the MFPs. For printing, a user sets the PIN at the time of sending the print job to the MFP. For fax printing, one PIN is configured for access to all incoming jobs.
• Configure Accessing LDAP Server settings (if available on your network). These LDAP settings enable the MFPs to provide the LDAP address books to users. Access to the address books is not necessarily related to security, but the accompanying security settings are important for its use. They are also required for LDAP authentication, which appears later in the checklist.
o Disable Command Invoke. Command Invoke is a legacy feature that does not apply to the MFPs. Disabling it is good security practice to ensure that all possible access to it is closed. o Disable Command Download. Command Download is a legacy feature that does not apply to the MFPs. Disabling it is good security practice to ensure that all possible access to it is closed. o Disable Command Load and Execute.
Secure Fast Erase mode overwrites files one time. It slows MFP performance a bit, but it provides reasonable security for most situations. Secure Sanitizing Erase mode overwrites files 3 times. It affects MFP performance, but not noticeably more than Secure Fast Erase mode does. It provides even more assurance that the data is not recoverable. If your network is required to meet stringent security requirements such as DOD regulations, you should use Secure Sanitizing Erase.
This setting is sometimes required for network SSL connections. However, even if it is not required, it improves security by providing better trust between the LDAP server and the MFP. You should configure this setting if possible. If an SSL certificate is not uploaded, the MFPs use a self-signed certificate that might be rejected in some network configurations. If SSL is not used, usernames and even passwords will be passed over network lines in clear text.
always be enabled. Disabling 9100 Printing would disable all printing for most users. o Disable IPP Printing. IPP Printing is a protocol for printing directly from the Internet. It is not secure, and it should not be used. With it disabled, the MFPs will deny access to direct printing from the Internet. This does not affect print jobs from web browsers if they are using installed print drivers. o Disable MDNS Config. MDNS Config resolves host names with IP addresses.
Note: This checklist recommends disabling EWS Config during normal MFP operations and enabling it temporarily for changes to configurations. This setting ensures that the network traffic is secure during those configurations. • Disable unused Protocol Stacks. These options provide for various types of network communication to the MFPs. Closing down unused protocol stacks is affective toward better network security. See the ramifications of each option below: o Disable IPX/SPX.
authentication methods that you select in the Authentication Manager. Otherwise, no one will be able to use the MFPs. • Disable Printer Firmware Update. Printer Firmware Update enables the MFPs to accept printer firmware updates from various sources. Disabling it ensures that no one can update the MFPs. With Printer Firmware Update disabled, the MFPs will deny access whenever anyone attempts to upgrade the firmware.
NOTE: Stored faxes are not affected by the Job Hold Timeout. Fax standards require that all incoming faxes are eventually printed or otherwise viewed. With the Fax Printing Schedule configured, incoming fax jobs will not print until an authorized person chooses to print them or until they are scheduled to print. Digital Sending Page Options • Configure LDAP Server Settings. This setting enables the MFPs to provide the LDAP address books to users.
If you choose Maximum for the Access Control Level, each MFP will require users to sign in for access to the control panel. Be sure to select only the authentication methods that are available on your network and that you wish to configure. If you choose Custom for the Access Control Level, each MFP will require users to sign in when they choose specific functions at the control panel. Once a user signs in, the MFP will provide all applicable access to that user. • Configure sign in methods.
Overall Limitations The overall configuration that you achieve by following this checklist provides a high level of network security for HP MFPs. At the same time, it causes some limitations. Here are some known affects of this overall configuration: • Extra steps to use MFPs: Users will be required to provide usernames and passwords at the control panels before they can use the MFPs. • No access to control panel configuration menus: The control panels block access to configuration settings for everyone.
You can also control access to the MFP internal hardware (hard drives, Compact Flash cards, and formatter boards) using hardware locks. Use a lock, such as a Kensington Lock, as recommended in the MFP User Guide. Appendix 1: Glossary of Terms and Acronyms The following table lists terms and acronyms found in this checklist: Term Description ACL Access Control List. The ACL restricts network access to the MFP by allowing only those IP addresses or subnets that are listed in it.
Term Description MFP Multi-Functional Peripheral – An MFP is a device that includes multiple capabilities such as print, copy, fax, and digital sending (email and send to network folder). PIN Personal Identification Number. A PIN in a numeric password. MFPs use PINs for authentication, secure printing and secure fax printing. Scanner , ADF, or flatbed scanner The top of the MFP is a scanner that converts paper documents into digital images for copying, fax, or digital sending.