LASERJET PRO MFP 2 M521 *A8P80-90975* *A8P80-90975* A8P80-90975 EN Installation Guide FR Guide d’installation ES Guía de instalación PT Guia de Instalação מדריך התקנה ES HE Lea esto primero A8P80-90975_C.
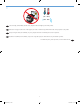
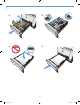
1 15° - 30°C (59° - 86°F) 10% - 80% 2 EN Select a sturdy, well-ventilated, dust-free area, away from direct sunlight to position the product. FR Choisissez un support solide et un endroit propre, bien aéré et à l'abri du rayonnement direct du soleil pour placer votre produit. ES Busque un lugar sólido, bien ventilado, sin polvo y alejado de la luz solar directa para colocar el producto.
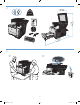
2 465 mm 18.3 in NJ OE 757 mm 29.8 in 2 2 mm 1030 in 40.5 3 1 2 2 2 A8P80-90975_C.
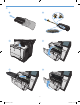
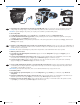
1 2 $ 3 +3 /DVHU-HW 3ULQW &DUWULGJH &( $ ZZZ KS FRP UHF\FOH 4 2 5 6 3 A8P80-90975_C.
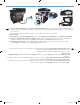
1 2 3 4 4 A8P80-90975_C.
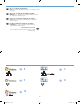
EN Connect the phone cord for fax. A country/region specific adapter for the RJ11 telephone cord may be required to connect to the telephone jack. FR Connectez le cordon de téléphone au télécopieur. Un adaptateur spécifique à votre pays/région pour le cordon de téléphone RJ11 peut être requis pour la connexion à la prise téléphonique. ES Conecte el cable de teléfono para fax. Puede que se requiera un adaptador específico de país/región para conectar el cable del teléfono RJ11 a la toma de teléfono.
4 3 1 5 2 2 EN 1. Connect the power cord between the product and a grounded AC outlet. Make sure your power source is adequate for the product voltage rating. The voltage rating is on the product label. The product uses either 100-127 Vac or 220-240 Vac and 50/60 Hz. CAUTION: To prevent damage to the product, use only the power cord that is provided with the product. 2. Turn on the product. 3.
4 3 1 5 2 2 PT 1. C onecte o cabo de alimentação entre o produto e a tomada CA aterrada. Verifique se sua fonte de alimentação é adequada para a classificação de tensão do produto. A classificação de tensão está na etiqueta do produto. O produto utiliza 100-127 Vca ou 220-240 Vca e 50/60 Hz. CUIDADO: Para evitar danos ao produto, use apenas o cabo de alimentação fornecido com o produto. 2. Ligue o produto. 3.
EN Choose a software install method. FR Choisissez une méthode d'installation logicielle. ES Seleccione un método de instalación de software. PT Escolha um método de instalação do software. NOTE: You must have administrator privileges on the computer to install the software. REMARQUE : Vous devez disposer des privilèges d'administrateur sur cet ordinateur pour installer le logiciel. NOTA: debe tener privilegios de administrador en el equipo para instalar el software.
8 EN Software installation for Windows wired networks: Connect the network cable to the product and the network. Insert the CD into the computer, and follow the on-screen instructions. Installation is complete. NOTE: If the installation program does not detect the product on the network, you might need to enter the IP address manually. To find the IP address, touch the Setup button, touch Reports, and then touch Configuration Report. The IP address is listed on the first page of the report.
9 2 EN Software installation for Windows wireless networks (wireless models only): 1. On the product control panel, touch the wireless instructions to complete the wireless setup. button. Touch Wireless Menu, and then touch Wireless Setup Wizard. Follow the 2. Insert the CD into the computer, and follow the on-screen instructions. Installation is complete. NOTE: If the installation program does not detect the product on the network, you might need to enter the IP address manually.
10 EN Software installation for Windows USB connections: HP Smart Install: The software installation files are in the product memory. The HP Smart Install program uses a USB cable to transfer the installation files from the product to your computer. Follow this procedure to use HP Smart Install: NOTE: To use HP Smart Install, you must have administrator privileges and AutoPlay must be enabled on the computer. 1. Connect an A-to-B type USB cable to the computer and the product. 2.
PT Instalação do software para conexões USB Windows: HP Smart Install: Os arquivos de instalação do software estão na memória do produto. O programa HP Smart Install usa um cabo USB para transferir os arquivos de instalação do produto para o computador. Siga este procedimento para usar o HP Smart Install: OBSERVAÇÃO: Para usar o HP Smart Install, você deve ter privilégios de administrador e o AutoPlay deve estar habilitado no computador. 1. Conecte o cabo USB do tipo A a B no computador e no produto. 2.
11 EN Software installation for Mac OS X: 1. If you are using a USB or a wired network connection, connect the cable now. 2. Insert the CD into the computer, and follow the on-screen instructions. Installation is complete. NOTE: For network connections, if the installation program does not detect the product on the network, you might need to enter the IP address manually. To find the IP address, touch the Setup button, touch Reports, and then touch Configuration Report.
12 EN Software installation for Mac wireless networks (wireless models only): 1. On the product control panel, touch the wireless instructions to complete the wireless setup. button. Touch Wireless Menu, and then touch Wireless Setup Wizard. Follow the 2. Insert the CD into the computer, and follow the on-screen instructions. Installation is complete. NOTE: If the installation program does not detect the product on the network, you might need to enter the IP address manually.
13 EN To set up the Scan to E-mail, Scan to Network Folder, and Fax features, open the HP program folder on your computer, select the folder for this product, and then select the appropriate setup wizard. Follow the on-screen instructions. Setup is complete. If you did not register your product during software installation go to www.register.hp.com to register now. The HP Help and Learn Center and other documentation are on the CD that came with the product or in the HP Program folder on your computer.
16 A8P80-90975_C.
17 A8P80-90975_C.
18 A8P80-90975_C.
www.hp.com Copyright and License Copyright et licence Reproduction, adaptation or translation without prior written permission is prohibited, except as allowed under the copyright laws. La reproduction, l'adaptation ou la traduction de ce document sans l'autorisation écrite préalable de Hewlett-Packard est interdite, sauf dans des conditions conformes aux lois relatives au copyright. © 2013 Copyright Hewlett-Packard Development Company, L.P.