LaserJet Pro M701/M706 User Guide LaserJ et Pro www.hp.com/support/ljM701 www.hp.
HP LaserJet Pro M701/M706 User Guide
Copyright and License Trademark Credits © 2014 Copyright Hewlett-Packard Development Company, L.P. Adobe®, Adobe Photoshop®, Acrobat®, and PostScript® are trademarks of Adobe Systems Incorporated. Reproduction, adaptation, or translation without prior written permission is prohibited, except as allowed under the copyright laws. The information contained herein is subject to change without notice.
Table of contents 1 Product introduction ..................................................................................................................................... 1 Product comparison .............................................................................................................................................. 2 Product views ........................................................................................................................................................
Additional print tasks ........................................................................................................................ 35 Print tasks (Mac OS X) .......................................................................................................................................... 36 How to print (Mac OS X) ..................................................................................................................... 36 Automatically print on both sides (Mac OS X) ..........
Order supplies ................................................................................................................................... 60 Product does not pick up paper or misfeeds ...................................................................................................... 61 The product does not pick up paper ................................................................................................. 61 The product picks up multiple sheets of paper ...............................
vi ENWW
1 Product introduction ● Product comparison ● Product views ● Product hardware setup and software installation For more information: In the US, go to www.hp.com/support/ljM701 or www.hp.com/support/ljM706. Outside the US, go to www.hp.com/support. Select your country/region. Click Troubleshooting. Enter the product name, and then select Search.
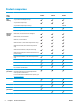
Product comparison Model name M701a M701n M706n Model number B6S00A B6S01A B6S02A Paper handling Tray 1 (100-sheet multipurpose tray) Tray 2 (250-sheet input tray) Tray 3 (500-sheet input tray accessory) Optional 250-sheet output bin Duplex printing accessory Supported operating systems Optional Windows XP, 32-bit (Service Pack 2 and higher) Windows Vista, 32-bit and 64-bit Windows 7, 32-bit and 64-bit Windows 8 and 8.
Model name M701a M701n M706n Model number B6S00A B6S01A B6S02A Print Prints 31 pages per minute (ppm) on A4-size paper, prints 30 ppm on Letter-size paper, and prints 15 ppm on A3size paper Prints 35 ppm on A4-size and Letter-size paper, prints 18.
Product views Product front view 8 7 1 2 6 3 4 5 1 Control panel 2 On/off button 3 Tray 1 (pull the handles on the sides to open) 4 Tray 2 5 Optional Tray 3 (M706n model only) 6 Latch to open the front door (access to the toner cartridge) NOTE: 4 The serial number and model number label is on the inside of the front door.
Product back view 1 4 2 3 ENWW 1 Rear door (provides access for clearing jams) 2 Duplex unit door 3 Power connection 4 Port cover Product views 5
Interface ports 1 2 6 1 Network port (M701n and M706n models only) 2 Hi-Speed USB 2.
Control panel layout 1 Control-panel display: The display provides information about the product. Use the menus on the display to establish product settings. 2 Attention light (amber): The Attention light blinks when the product requires user attention. 3 Ready light (green): The Ready light is on when the product is ready to print. It blinks when the product is receiving print data, or when the product is in sleep mode.
Product hardware setup and software installation For basic setup instructions, see the Hardware Installation Guide that came with the product. For additional instructions, go to HP support on the Web. In the US, go to www.hp.com/support/ljM701 or www.hp.com/support/ljM706 for HP's all-inclusive help for your product. Outside the US, follow these steps: 1. Go to www.hp.com/support. 2. Select your country/region. 3. Click Troubleshooting. 4.
2 Paper trays ● Load Tray 1 (multipurpose tray) ● Load Tray 2 ● Load Tray 3 (M706n model only) For more information: In the US, go to www.hp.com/support/ljM701 or www.hp.com/support/ljM706. Outside the US, go to www.hp.com/support. Select your country/region. Click Troubleshooting. Enter the product name, and then select Search.
Load Tray 1 (multipurpose tray) NOTE: Tray 1 holds up to 100 sheets of paper, up to 75 transparencies, up to 50 sheets of labels, or up to 10 envelopes. It supports cut sheet paper weight 60–199 g/m2 (16–53 lb); labels and transparencies 0.10 to 0.14 mm thick (4.7 to 5 mils thick); envelopes weight 60 to 90 g/m2 (16 to 24 lb); and postcards weight 135 to 176 g/m2 (36-47 lb). For information about the correct paper orientation for loading paper in this tray, see Tray 1 paper orientation on page 13. 10 1.
3. For long paper, fold out the tray extension to support the paper. 4. Adjust the paper guides.
5. Load the paper into the tray. Make sure that the paper fits under the tabs and below the maximum-height indicators. The way you should orient the paper in the tray varies depending on the paper size. For additional information, see Tray 1 paper orientation on page 13. 6. Adjust the paper guides so that they lightly touch the paper stack but do not bend the paper. NOTE: To avoid jams, do not add paper to Tray 1 while the product is printing. Do not close Tray 1 while the product is printing.
Tray 1 paper orientation Paper type Paper size How to load paper Cut sheet paper Letter, A4, A5, B5, Executive, 16K, and custom sizes Long edge leading into the product A3, B4, 11 x 17, Legal, Oficio 8.5 x 13, and custom sizes Short edge leading into the product Letter, A4, A5, B5, Executive, 16K, and custom sizes Face-up A3, B4, 11 x 17, Legal, Oficio 8.
Paper type Paper size How to load paper Labels Any compatible label size Face up Envelopes Any compatible envelope size Face-up Top edge toward the right of the tray, postage end entering the product last 14 Chapter 2 Paper trays ENWW
Load Tray 2 Tray 2 holds up to 250 sheets of 75 g/m2 (20 lb) paper. If the paper is heavier, the tray does not hold as many sheets. Do not overfill the tray. It supports cut sheet paper weight 60–120 g/m2 (16–32 lb). For information about the correct paper orientation for loading paper in this tray, see Tray 2 paper orientation on page 18. CAUTION: Do not print envelopes, labels, or unsupported sizes of paper from Tray 2. Print these types of paper only from Tray 1. 1.
3. If you are loading B4, A3, 11 x 17, Legal, or Oficio 8.5 x 13 size paper, unlock the rear tray guide using the slide lock at the back of the tray. 4. Adjust the tray length to the correct paper size. 5. Load paper into the tray. Check the paper to make sure the guides lightly touch the stack, but do not bend the paper. The way you should orient the paper in the tray varies depending on the paper size. For additional information, see Tray 2 paper orientation on page 18.
6. Slide the tray completely into the product. 7. On the product control panel, follow the onscreen message to configure the paper tray. If you miss the control panel message, complete the following steps to configure the tray. a. On the product control panel, press the OK button. b. Open the following menus: System Setup Paper Setup Tray 2 c. Open the Paper Size menu, select the correct size, and then press the OK button. d.
Tray 2 paper orientation Paper type Paper size How to load paper Cut sheet paper Letter, A4, A5, B5, Executive, 16K, and custom sizes Long edge along the front of the tray A3, B4, 11 x 17, Legal, Oficio 8.5 x 13, and custom sizes Long edge along the side of the tray Letter, A4, A5, B5, Executive, 16K, and custom sizes Face-down A3, B4, 11 x 17, Legal, Oficio 8.
Load Tray 3 (M706n model only) Optional Tray 3 holds up to 500 sheets of 75 g/m2 (20 lb) paper. If the paper is heavier, the tray does not hold as many sheets. Do not overfill the tray. It supports cut sheet paper weight 60–120 g/m2 (16–32 lb). For information about the correct paper orientation for loading paper in this tray, see Tray 3 paper orientation on page 22. NOTE: Do not print envelopes, labels, or unsupported sizes of paper from Tray 3. Print these types of paper only from Tray 1. 1.
3. Adjust the paper length to the correct paper size. 3 4. Load paper into the tray. Check the paper to make sure the guides lightly touch the stack, but do not bend the paper. The way you should orient the paper in the tray varies depending on the paper size. For additional information, see Tray 3 paper orientation on page 22. NOTE: To prevent jams, do not overfill the tray. Be sure the top of the stack is below the tray full indicator.
5. Slide the tray completely into the product. 3 6. On the product control panel, follow the onscreen message to configure the paper tray. If you miss the control panel message, complete the following steps to configure the tray. a. On the product control panel, press the OK button. b. Open the following menus: System Setup Paper Setup Tray 3 c. Open the Paper Size menu, select the correct size, and then press the OK button. d.
Tray 3 paper orientation Paper type Paper size How to load paper Cut sheet paper Letter, A4, A5, B5, Executive, 16K, and custom sizes Long edge along the front of the tray 3 A3, B4, 11 x 17, Legal, Oficio 8.5 x 13, and custom sizes Long edge along the side of the tray 3 Preprinted, prepunched, or letterhead Letter, A4, A5, B5, Executive, 16K, and custom sizes Face-down Top edge at the right of the tray 3 A3, B4, 11 x 17, Legal, Oficio 8.
3 Parts, supplies, and accessories ● Order parts, accessories, and supplies ● Replace the toner cartridge For more information: In the US, go to www.hp.com/support/ljM701 or www.hp.com/support/ljM706. Outside the US, go to www.hp.com/support. Select your country/region. Click Troubleshooting. Enter the product name, and then select Search.
Order parts, accessories, and supplies Ordering Order supplies and paper www.hp.com/go/suresupply Order genuine HP parts or accessories www.hp.com/buy/parts Order through service or support providers Contact an HP-authorized service or support provider. Order using the HP Embedded Web Server (EWS) To access, in a supported Web browser on your computer, enter the product IP address or host name in the address/URL field.
Replace the toner cartridge When a toner cartridge approaches the end of useful life, you are prompted to order a replacement. You can continue printing with the current cartridge until redistributing the toner no longer yields acceptable print quality. The following illustration shows the toner-cartridge components. 2 3 1 1. 1 Imaging drum (Be careful not to touch the imaging drum.) 2 Memory chip 3 Sealing tape Open the front door.
2. Remove the used toner cartridge. 3. Remove the new toner cartridge from the bag. Place the used toner cartridge in the bag for recycling. 4. Grasp both sides of the toner cartridge and distribute the toner by gently rocking the cartridge. CAUTION: Do not touch the imaging drum.
5. Remove the sealing tape. Bend the tab on the left side of the cartridge until the tab breaks loose. Pull the tab until all the tape is removed from the cartridge. Place the tab and tape in the tonercartridge box to return for recycling. 6. Align the toner cartridge with the tracks inside the product, insert the toner cartridge until it is firmly seated. 7. Close the front door.
28 Chapter 3 Parts, supplies, and accessories ENWW
4 Print ● Print tasks (Windows) ● Print tasks (Mac OS X) ● Mobile printing For more information: In the US, go to www.hp.com/support/ljM701 or www.hp.com/support/ljM706. Outside the US, go to www.hp.com/support. Select your country/region. Click Troubleshooting. Enter the product name, and then select Search.
Print tasks (Windows) ● How to print (Windows) ● Automatically print on both sides (Windows) ● Manually print on both sides (Windows) ● Print multiple pages per sheet (Windows) ● Select the paper type (Windows) ● Additional print tasks How to print (Windows) The following procedure describes the basic printing process for Windows. 1. From the software program, select the Print option. 2. Select the product from the list of printers.
ENWW 3. Click or tap the tabs in the print driver to configure the available options. For example, set the paper orientation on the Finishing tab, and set the paper source, paper type, paper size, and quality settings on the Paper/Quality tab. 4. Click or tap the OK button to return to the Print dialog box. Select the number of copies to print from this screen. 5. Click or tap the OK button to print the job.
Automatically print on both sides (Windows) Use this procedure for products that have an automatic duplexer installed. If the product does not have an automatic duplexer installed, or to print on paper types that the duplexer does not support, you can print on both sides manually. 1. From the software program, select the Print option. 2. Select the product from the list of printers, and then click or tap the Properties or Preferences button to open the print driver.
Manually print on both sides (Windows) Use this procedure for products that do not have an automatic duplexer installed or to print on paper that the duplexer does not support. 1. From the software program, select the Print option. 2. Select the product from the list of printers, and then click or tap the Properties or Preferences button to open the print driver. NOTE: The name of the button varies for different software programs. ENWW 3. Click or tap the Finishing tab. 4.
Print multiple pages per sheet (Windows) 1. From the software program, select the Print option. 2. Select the product from the list of printers, and then click or tap the Properties or Preferences button to open the print driver. NOTE: The name of the button varies for different software programs. 34 3. Click or tap the Finishing tab. 4. Select the number of pages per sheet from the Pages per sheet drop-down list. 5. Select the correct Print page borders, Page order, and Orientation options.
Select the paper type (Windows) 1. From the software program, select the Print option. 2. Select the product from the list of printers, and then click or tap the Properties or Preferences button to open the print driver. NOTE: The name of the button varies for different software programs. 3. Click or tap the Paper/Quality tab. 4. From the Paper type drop-down list, click the More... option. 5. Expand the list of Type is: options. 6.
Print tasks (Mac OS X) ● How to print (Mac OS X) ● Automatically print on both sides (Mac OS X) ● Manually print on both sides (Mac OS X) ● Print multiple pages per sheet (Mac OS X) ● Select the paper type (Mac OS X) ● Additional print tasks How to print (Mac OS X) The following procedure describes the basic printing process for Mac OS X. 1. Click the File menu, and then click the Print option. 2. In the Printer menu, select the product. 3.
7. Retrieve the printed stack from the output bin and place it with the printed-side facing down in the input tray. 8. If prompted, touch the appropriate control panel button to continue. Print multiple pages per sheet (Mac OS X) 1. Click the File menu, and then click the Print option. 2. In the Printer menu, select the product. 3. Open the menus drop-down list or click Show Details, and then click the Layout menu. 4.
Mobile printing HP offers multiple Mobile and ePrint solutions to enable wireless printing to an HP printer from a laptop, tablet, smartphone, or other mobile device. To determine the best choice, go to www.hp.com/go/ LaserJetMobilePrinting (English only). ● Wireless network printing ● HP ePrint via email ● HP ePrint software ● AirPrint Wireless network printing For information on printing wirelessly to products connected to the wireless network, go to HP support on the Web: ● In the US, go to www.
● Windows: After installing the software, open the Print option from within your application, and then select HP ePrint from the installed printers list. Click the Properties button to configure print options. ● Mac: After installing the software, select File, Print, and then select the arrow next to PDF (in the bottom left of the driver screen). Select HP ePrint.
40 Chapter 4 Print ENWW
5 Manage the product ● Change the product connection type (Windows) ● Configure IP network settings ● Advanced configuration with HP Embedded Web Server (EWS) and HP Device Toolbox (Windows) ● HP Utility for Mac OS X ● HP Web Jetadmin ● Product security features ● Economy settings ● Update the firmware For more information: In the US, go to www.hp.com/support/ljM701 or www.hp.com/support/ljM706. Outside the US, go to www.hp.com/support. Select your country/region. Click Troubleshooting.
Change the product connection type (Windows) If you are already using the product and you wish to change the way it is connected, use the Reconfigure your HP Device shortcut on your computer desktop to change the connection. For example, you can reconfigure the product to use a different wireless address, to connect to a wired or wireless network, or change from a network connection to a USB connection. You can change the configuration without inserting the product CD.
Configure IP network settings ● Printer sharing disclaimer ● View or change network settings ● Rename the product on a network ● Manually configure IPv4 TCP/IP parameters from the control panel Printer sharing disclaimer HP does not support peer-to-peer networking, as the feature is a function of Microsoft operating systems and not of the HP printer drivers. Go to Microsoft at www.microsoft.com.
4. On the Device Information page, the default product name is in the Device Status field. You can change this name to uniquely identify this product. NOTE: Completing the other fields on this page is optional. 5. Click the Apply button to save the changes. Manually configure IPv4 TCP/IP parameters from the control panel Use the control-panel menus to manually set an IPv4 address, subnet mask, and default gateway. 44 1. On the product control panel, press the OK button. 2.
Advanced configuration with HP Embedded Web Server (EWS) and HP Device Toolbox (Windows) Use the HP Embedded Web Server to manage printing functions from your computer instead of the product control panel.
Tab or section Description Home tab ● Provides product, status, and configuration information. Device Status: Shows the product status and shows the approximate percent life remaining of HP supplies. ● Supplies Status: Shows the approximate percent life remaining of HP supplies. Actual supply life remaining can vary. Consider having a replacement supply available to install when print quality is no longer acceptable.
Tab or section Description Scan tab Configure the Scan to Network Folder and Scan to E-mail features. (MFP products only) ● Network Folder Setup: Configure folders on the network to which the product can save a scanned file. ● Scan to E-mail Setup: Begin the process to set up the Scan to E-mail feature. ● Outgoing E-mail Profiles: Set an email address that will appear as the “from” address for all emails sent from the product. Configure the SMTP Server information.
HP Utility for Mac OS X Use the HP Utility for Mac OS X to check product status or to view or change product settings from your computer. You can use the HP Utility when the product is connected with a USB cable or is connected to a TCP/IP-based network. Open HP Utility 1. At the computer, open the Apple menu, click the System Preferences menu, and then click the Print & Fax icon or the Print & Scan icon. 2. Select the product in the left side of the window. 3. Click the Options & Supplies button. 4.
Menu Printer Settings Item Description HP Connected Access the HP Connected Web site. Upload Fonts Upload fonts from your computer to the product. Auto-off Configure the product to automatically turn off after a period of inactivity. You can adjust the number of minutes after which the product turns off. Network Settings Configure the network settings, such as the IPv4 settings, IPv6 settings, Bonjour settings, and other settings.
HP Web Jetadmin HP Web Jetadmin is an award-winning, industry-leading tool for efficiently managing a wide variety of networked HP products, including printers, multifunction products, and digital senders. This single solution allows you to remotely install, monitor, maintain, troubleshoot, and secure your printing and imaging environment — ultimately increasing business productivity by helping you save time, control costs, and protect your investment.
Product security features The product supports security standards and recommended protocols that help you keep the product secure, protect critical information on your network, and simplify the way you monitor and maintain the product. For in-depth information about HP's secure imaging and printing solutions, visit www.hp.com/go/ secureprinting. The site provides links to white papers and FAQ documents about security features.
Economy settings ● Print with EconoMode ● Set the Sleep Delay ● Set the Auto Power Down delay Print with EconoMode This product has an EconoMode option for printing drafts of documents. Using EconoMode can use less toner. However, using EconoMode can also reduce print quality. HP does not recommend the full-time use of EconoMode. If EconoMode is used full-time, the toner supply might outlast the mechanical parts in the toner cartridge.
3. ● Auto Power Down ● Power Down Delay Select the time for the power-down delay. NOTE: The default value is 30 Minutes. 4. The product automatically wakes from the auto power-down mode when it receives jobs or when you touch the screen on the product control panel. You can change which events cause the product to wake.
Update the firmware HP offers periodic product updates, new Web Services apps, and new features to existing Web Services apps. Follow these steps to update the product firmware for a single product. When you update the firmware, Web Service apps will update automatically. There are two supported methods to perform a firmware update on this product. Use only one of the following methods to update the product firmware.
3. Under the Firmware section, locate the Firmware Update Utility. 4. Click Download, click Run, and then click Run again. 5. When the utility launches, select the product from the drop-down list, and then click Send Firmware. NOTE: To print a configuration page to verify the installed firmware version before or after the update process, click Print Config. 6. ENWW Follow the on-screen instructions to complete the installation, and then click the Exit button to close the utility.
56 Chapter 5 Manage the product ENWW
6 Solve problems ● Customer support ● Restore the factory-set defaults ● A “Cartridge is low” or “Cartridge is very low” message displays on the product control panel ● Product does not pick up paper or misfeeds ● Clear jams ● Improve print quality ● Solve wired network problems For more information: In the US, go to www.hp.com/support/ljM701 or www.hp.com/support/ljM706. Outside the US, go to www.hp.com/support. Select your country/region. Click Troubleshooting.
Customer support Get telephone support for your country/region Have the product name, serial number, date of purchase, and problem description ready. 58 Country/region phone numbers are on the flyer that was in the box with your product or at www.hp.com/support/. Get 24-hour Internet support, and download software utilities, drivers, and electronic information www.hp.com/support/ljM701 or www.hp.com/support/ljM706 Order additional HP service or maintenance agreements www.hp.
Restore the factory-set defaults Restoring the factory-set defaults returns all of the product and network settings to the factory defaults. It will not reset the page count, tray size, or language. To restore the product to the factory-default settings, follow these steps. CAUTION: Restoring the factory-set defaults returns all of the settings to the factory defaults, and it also deletes any pages that are stored in the memory. The procedure then automatically restarts the product. 1.
A “Cartridge is low” or “Cartridge is very low” message displays on the product control panel Cartridge is low: The product indicates when a toner cartridge level is low. Actual toner cartridge life remaining may vary. Consider having a replacement available to install when print quality is no longer acceptable. The toner cartridge does not need to be replaced now. Cartridge is very low: The product indicates when the toner cartridge level is very low. Actual toner cartridge life remaining may vary.
Product does not pick up paper or misfeeds ● The product does not pick up paper ● The product picks up multiple sheets of paper The product does not pick up paper If the product does not pick up paper from the tray, try these solutions. 1. Open the product and remove any jammed sheets of paper. 2. Load the tray with the correct size of paper for your job. 3. Make sure the paper size and type are set correctly on the product control panel. 4.
Clear jams Jam locations Jams can occur in these locations: 1 2 6 3 7 4 5 3 1 Output bin 2 Print cartridge area 3 Tray 1 4 Tray 2 5 Optional Tray 3 (M706n model only) 6 Rear door 7 Duplex unit area (M706n model only) Loose toner might remain in the product after a jam. This problem typically resolves itself after a few sheets have been printed. Experiencing frequent or recurring paper jams? To reduce the number of paper jams, try these solutions. 62 1.
7. If you are printing on heavy, embossed, or perforated paper, use the manual feed feature and feed sheets one at a time. 8. Verify that the tray is configured correctly for the paper type and size. a. On the product control panel, press the OK button. b. Open the following menus: c. 9. ● System Setup ● Paper Setup Verify the tray is configured for the paper type and size. Make sure the printing environment is within recommended specifications. Clear jams in Tray 1 1.
64 3. Remove the toner cartridge. 4. Lift the jam-plate and carefully remove any jammed paper. Use both hands to remove jammed paper to avoid tearing the paper.
5. Reinsert the toner cartridge. 6. Close the front door. Clear jams in Tray 2 1. Remove the tray from the product.
66 2. Remove the paper from the tray, and discard any damaged paper. 3. Make sure the paper guides are adjusted for the correct paper size. If necessary, unlock the tray using the slide lock at the rear of the tray, and then adjust to the correct paper size. 4. Load the paper into the tray. Make sure that the stack is flat at all four corners and that the top of the stack is below the maximum-height indicators.
5. Reinsert and close the tray. 6. Open the front door. 7. Remove the toner cartridge.
8. Lift the jam-plate and carefully remove any jammed paper. Use both hands to remove jammed paper to avoid tearing the paper. 9. Reinsert the toner cartridge. 10. Close the front door.
Clear jams in Tray 3 (M706n model only) 1. Remove the tray from the product. 3 2. Remove the paper from the tray, and discard any damaged paper. 3 3. Make sure the paper guides are adjusted for the correct paper size.
4. Load the paper into the tray. Make sure that the stack is flat at all four corners and that the top of the stack is below the maximum-height indicators. 3 5. Reinsert and close the tray. 3 6. 70 Open the front door.
7. Remove the toner cartridge. 8. Lift the jam-plate and carefully remove any jammed paper. Use both hands to remove jammed paper to avoid tearing the paper.
9. Reinsert the toner cartridge. 10. Close the front door. Clear jams in the toner-cartridge area 1. 72 Open the front door.
2. Remove the toner cartridge. 3. Lift the jam-plate and carefully remove any jammed paper. Use both hands to remove jammed paper to avoid tearing.
4. Reinsert the toner cartridge. 5. Close the front door. Clear jams in the rear door and fuser area 1. 74 Open the front door.
2. Open the rear door to check for jammed paper. 3. Remove any jammed paper. Use both hands to pull out the paper to avoid tearing.
4. Close the rear door. 5. Close the front door. Clear jams in the output bin 1. 76 If paper is visible in the output bin, grasp the leading edge with both hands and slowly remove it.
2. Open the rear door to check for jammed paper. 3. Remove any jammed paper. Use both hands to pull out the paper to avoid tearing. 4. Close the rear door.
Clear jams in the optional duplexer (M706n model only) 78 1. Remove the duplexer. 2. Remove any paper from the duplexer. 3. Reinstall the duplexer.
Improve print quality If the product is having print-quality problems, try the following solutions in the order presented to resolve the issue.
4. Select a type from the Media Type drop-down list. 5. Click the Print button. Check the toner-cartridge status Check the supplies status page for the following information: ● Estimated percentage of cartridge life remaining ● Approximate pages remaining ● Part numbers for HP toner cartridges ● Number of pages printed Use the following procedure to print the supplies status page: 1. On the product control panel, press the OK button. 2. Scroll to the Reports menu, and press the OK button. 3.
1. On the product control panel, press the OK button. 2. Scroll to the Service menu, and press the OK button. 3. Scroll to the Cleaning Page option, and press the OK button. A Cleaning message displays on the product control panel. The cleaning process takes a few minutes to complete. Do not turn the product off until the cleaning process has finished. When it is finished, discard the printed page. Visually inspect the toner cartridge for damage 1.
● Remove anything that is blocking the vents on the product. The product requires good air flow on all sides, including the top. ● Protect the product from airborne debris, dust, steam, grease, or other elements that can leave residue inside the product. Check other print job settings When printing from a software program, follow these steps to try to resolve the issue by adjusting other print-driver settings. Check the EconoMode settings HP does not recommend the full-time use of EconoMode.
HP PCL 6 driver HP UPD PS driver HP UPD PCL 5 HP UPD PCL 6 ENWW ● Provided as the default driver on the product CD. This driver is automatically installed unless a different one is selected.
Solve wired network problems Check the following items to verify that the product is communicating with the network. Before beginning, print a configuration page from the product control panel and locate the product IP address that is listed on this page.
a. Open a command-line prompt on your computer. For Windows, click Start, click Run, type cmd, and then press Enter. b. Type ping followed by the IP address for your product. For Mac OS X, open the Network Utility, and then supply the IP address in the correct field in the Ping pane. c. 2. If the window displays round-trip times, the network is working.
86 Chapter 6 Solve problems ENWW
Index A accessories ordering 24 part numbers 24 AirPrint 39 B bins, output locating 4 browser requirements HP embedded Web Server 45 C cartridge replacing 25 cleaning paper path 80 control panel locating 4 covers, locating 4 customer support online 58 D defaults, restoring 59 double-sided printing Mac 36 Windows 33 duplex printing Mac 36 duplex printing (double-sided) settings (Windows) 32 Windows 33 duplexing manually (Mac) 36 manually (Windows) 33 E EconoMode setting ENWW economy settings 52 Embedded W
O on/off button, locating 4 online support 58 ordering supplies and accessories 24 output bin locating 4 P pages per minute 2 pages per sheet selecting (Mac) 37 selecting (Windows) paper jams 62 ordering 24 selecting 81 paper jams locating 62 paper pickup problems solving 61 paper type selecting (Windows) paper types selecting (Mac) 37 ports locating 6 power connection locating 5, 6 power switch, locating power-down delay setting 52 print on both sides Mac 36 manually, Windows Windows 33 printing on both si
© 2014 Hewlett-Packard Development Company, L.P. www.hp.