
9.0 HP StorageWorks P4000 VSA Installation and Configuration Guide


Powering on the VSA and setting IP address and hostname
1. In the inventory panel, select the new VSA and power it on.
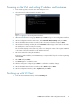
2. Select the Console tab and wait for the VSA to boot.
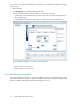
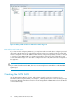
Figure 1 Logging in to the Configuration Interface
.
3. When the VSA finishes booting, type Start and press Enter to log in to the Configuration Interface.
4. On the Configuration Interface main menu, tab to Network TCP/IP Settings and press Enter.
5. On the Available Network Devices window, tab to the network interface and press Enter.
6. On the Network Settings window, tab to the Hostname field and type a host name for the VSA.
Use backspace to erase an entry if necessary.
This host name displays in the CMC only. It does not change the name of the original .VMX file
or the name of the virtual machine in the VMware interface.
7. Tab to the method for setting the IP address.
If typing in a static IP address, note that Gateway is a required field. If you do not have a gateway,
enter 0.0.0.0.
8. Tab to OK and press Enter.
9. Press Enter again to confirm the action.
10. After the settings are configured, press Enter to confirm the IP address change.
11. On the Available Network Devices window, tab to Back and press Enter.
12. On the Configuration Interface, tab to Log Out and press Enter.
Finishing up with VI Client
1. In the VI Client Information Panel, click the Summary tab.
P4000 VSA Installation and Configuration Guide 11