
9.0 HP StorageWorks P4000 VSA Installation and Configuration Guide


Installing the VSA
When you start the VSA for the first time with a VMware console, you will:
• Unzip to the prepared directory and start the virtual machine.
• Direct the Ethernet port to NAT (default), Host-only, or bridged.
• Set the IP address and host name of the VSA.
You only need to configure each virtual machine once.
1. Copy or download the VSA zip file.
2. Copy or unzip the VSA files to the virtual machine directory.
Configuring the VSA with VMware Player, VMware Server, or VMware
Workstation
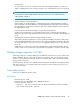
1. Open the VMware console.
2. Click File > Open to open the VSA.vmx file.
3. Navigate to the location of the unzipped VSA files.
4. Select the VSA.vmx file and click Open.
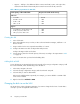
5. Edit the VSA settings as required by the VMware console you are using. Select the appropriate
network mode:
• Bridged
• NAT
• Host-only
NOTE:
All VSAs on the same platform should use the same networking mode. When running
multiple VSAs on a single host, use NAT or Host-only networking mode, and use DHCP to
assign IP addresses to the VSAs.
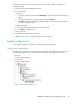
6. Power on the VSA.
7. Use the Configuration Interface to set the IP address and host name as described in “Powering
on the VSA and setting IP address and hostname” on page 11.
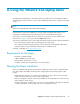
Using the VMware VSA laptop demo34