
9.5 HP P4000 SAN Solution Software Release Notes (AX696-96235, September 2012)

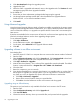
Table Of Contents
- HP P4000 SAN Solution Software Release Notes
- Updated software components in this release
- Supported upgrade paths
- Description
- Platforms supported for this release
- Languages
- Announcing Microsoft Windows Server 2012 support with HP LeftHand SAN/iQ software version 10.0 (releasing in late Fall 2012)
- Enhancements
- Fixes
- Prerequisites
- Version requirements
- Upgrading the SAN
- Upgrade planning
- Performing the upgrade
- Using Advanced upgrades
- Upgrading software in an offline environment
- Upgrading using an offline directory
- Upgrading when using the HP P4000 Application Integration Solution Pack
- HP P4000 Application Integration Solution Pack compatibility with SAN/iQ software
- Upgrading the HP P4000 Application Integration Solution Pack
- Upgrading the HP P4000 DSM for MPIO
- Upgrading the Application Aware Snapshot Manager (was VSS Provider)
- Online Upgrades troubleshooting
- Best practices
- Upgrading management groups with Remote Copy associations
- Increase the size of the OS disk on both VSAs (ESX) and Failover Managers (ESX) if upgrading from pre-8.5 version
- Verify management group version
- How to verify management group version
- To install the SNMP MIBs
- Retaining snapshot if an SRA operation takes longer than 30 minutes
- Configuring SRM and vCenter servers for the VmImageConsistency feature
- When using the P4000 SRA for SRM, configure the server IQN even when using CHAP authentication
- Compatibility/interoperability
- Mixed SAN/iQ software versions in management groups
- Workarounds
- While cross–version Remote Copy is occurring from 9.x to 8.5 management groups, if the copying halts because of Cluster full, the CMC shows the Error Message - "See Alarms Window," although the 8.5 management group does not have Alarms
- IQN names and uppercase letters
- CMC on Windows 2008 is unable to auto discover storage systems if firewall is on
- Application-managed snapshots will not work if the Windows server running VirtualCenter Server is not in the domain
- 9.5 Online Help is missing translated graphics in Spanish
- To ensure desired system settings are retained after the 9.5 upgrade, use Copy Configuration before upgrading
- Blank windows when installing CMC on HPUX11
- CMC install and uninstall wizards contain special characters such as question marks
- SNMP clients and multi-byte characters
- CHAP name in multi-byte characters requires server to be configured with the IQN name
- Safe to Remove status shows Yes to all drives when two drives need to be rebuilt in Raid 6
- In rare situations, creating a bond may result in an event notice
- An error occurs when an application-managed snapshot is created during NIC failover on an application server
- Intermediate VMware snapshots are not deleted when a timeout error occurs
- HP Technical Support
3. Click Start Download to begin the upgrade process.
4. Upgrade the CMC.
5. When the CMC is upgraded and restarted, return to the Upgrades tab. Click Continue for each
management group that shows Upgrades Available.
For the P4000 CLI:
1. Ensure that you have Administrator privileges before beginning the upgrade.
2. Use the appropriate package installer that is downloaded from the Upgrades feature.
Double-click the .exe to start the installation wizard.
3. Click Install.
Using Advanced upgrades
Using the Normal Upgrade Selection Mode, all patches available are applied to the storage system.
Using the Advanced Upgrade Selection Mode allows you to apply individual patches to the current
version of SAN/iQ software, or to upgrade to a specific software version that is not necessarily the
latest version.
If patches are available for the current version of SAN/iQ, and have not been applied, they will be
listed in the Package Selection window when upgrading storage systems.
To use Advanced upgrades
1. Click Help→Preferences.
2. On the Preferences window, select Upgrades.
3. On the pane, select Advanced for the Upgrade Selection Mode.
4. Click OK.
Upgrading software in an offline environment
Downloading files
1. Install the Version 9.5 CMC on a computer that can connect to the Internet outside of a firewall.
2. Start the CMC.
3. Select Configuration Summary and click the Upgrades tab. Click Start Download to download
all the upgrade and patch files to the computer where the CMC is installed.
4. Click Help→Preferences→Upgrades.
5. Note the download directory. This is where all the upgrade files were downloaded. The default
location in Microsoft Windows is Program Files→HP→P4000→UI→downloads.
6. Close the CMC.
7. Return the computer to your own network.
8. Copy the downloaded files to a network share location or to portable media, or use the CMC on
that computer to upgrade your storage systems. If you do copy the files to a network location,
any CMC you use to do upgrades must point to that network location to see the files.
a. Click Help→Preferences→Upgrades.
b. Browse to the network location where you copied the files.
c. Click OK to close the Preferences window and continue with the upgrade.
Upgrading using an offline directory
The option to use local media is only available if the CMC can’t connect to the FTP server.
1. Start the CMC.
2. Select Configuration Summary and click the Upgrades tab.
3. Click Use Local Media.
4. Choose the network directory where you stored the files, and proceed with the upgrades.
10 Upgrading the SAN