HP Open Source Middleware Stacks Blueprint: Directory Services on HP ProLiant Servers with SUSE Linux Enterprise Server 10 HP Part Number: 5991-7504 Published: July 2007 Edition: 2.
© Copyright 2007 Hewlett-Packard Development Company, L.P. Legal Notice Confidential computer software. Valid license from HP required for possession, use or copying. Consistent with FAR 12.211 and 12.212, Commercial Computer Software, Computer Software Documentation, and Technical Data for Commercial Items are licensed to the U.S. Government under vendor's standard commercial license. The information contained herein is subject to change without notice.
Table of Contents Introduction............................................................................................................................................5 Executive Summary...........................................................................................................................5 Intended Audience............................................................................................................................5 Scope and Purpose......................................
Introduction Executive Summary The HP Open Source Integrated Portfolio (HP OSIP) comprises a range of products and services designed to ensure that customers can successfully realize the cost and feature benefits of adopting open source software in their IT environments. HP Open Source Foundation components include the base components of an open source-based ecosystem: HP servers and storage are validated to run the Linux operating system together with commercial Linux distributions from Novell.
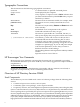
Typographic Conventions This document uses the following typographical conventions. Command ComputerOut Ctrl-x ENVIRONVAR [ERRORNAME] Key Term UserInput VARIABLE \ (continuation character) ... | A command name or qualified command phrase. Text displayed by the computer. A key sequence. A sequence such as Ctrl-x indicates that you must hold down the key labeled Ctrl while you press another key or button. The name of an environment variable, for example, PATH.
(Berkely DB) package. CDS also includes a comprehensive set of modules which implement enterprise features, such as password policy management, referential integrity, and attribute uniqueness. HP Directory Services OSMS stack includes the Symas CDS Gold Edition bundled components, a commercial open source software. Depending on the architecture used in the stack, Symas CDS uses different versions of the various packages, as displayed in Table 1.
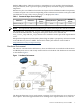
mod_ldap and mod_authnz_ldap modules enabled, are routed through a load balancer to a replica. During a read operation, the replica returns the requested information. During a write operation, the replica returns a reference to the master server. Replicas are kept up to date with the master content using the LDAP Content Synchronization protocol through the syncrepl directive in the replica’s configuration.
Configuring the CDS Server 1. 2. 3. Change the working directory to /opt/symas/etc/openldap. Copy the file slapd.conf.default to slapd.conf in the CDS configuration directory (the default directory is /opt/symas/etc/openldap). Edit the slapd.conf file by replacing the section Sample bdb database definitions with the following lines: database bdb suffix "dc=example,dc=com" rootdn "cn=Manager,dc=example,dc=com" rootpw secret The values of rootdn and rootpw can be used in simple authentication.
9. To verify the LDAP server is configured properly and prepare test data for upcoming examples, add initial entries to the directory by performing the following substeps. a. Stop the LDAP server by entering the following command: # /etc/init.d/cdsserver stop b. Modify the /opt/symas/etc/openldap/slapd.conf file by uncommenting the following lines: include /opt/symas/etc/openldap/schema/ppolicy.schema include /opt/symas/etc/openldap/schema/cosine.
# /opt/symas/bin/slapcat Configuring the CDS Client 1. 2. Copy the ldap.conf.default file to ldap.conf in the /opt/symas/etc/openldap directory. Edit the ldap.conf file by changing the following parameters: BASE URI 3. dc=example,dc=com ldap://Your_LDAP_Server_IP_Address Restart the CDS server by entering the following command: # /etc/init.d/cdsserver restart 4.
Debugging the CDS Server To print the log of the CDS server to a single file, use the following steps: 1. Edit the file /etc/syslog-ng/syslog-ng.conf by changing the following line: filter f_local { facility(local0, local1, local2, local3,local4, local5, local6, local7); }; to: filter f_local { facility(local0, local1, local2, local3,local5, local6, local7); }; Next, add the following new lines to the file: filter f_ldap { facility(local4); }; destination ldap { file("/var/log/ldap.
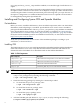
dn: dc=example,dc=com objectClass: dcObject objectClass: organization dc: example o: example dn: dc=osm,dc=example,dc=com objectClass: dcObject objectClass: organizationalUnit dc: osm ou: osm dn: uid=tomy,dc=osm,dc=example,dc=com objectClass: inetOrgPerson uid: tomy sn: tom cn: tom yan mail: tom.yan@example.com carLicense: sea4321 userPassword: tom NOTE: 2. If there are any trailing spaces in the LDIF file, the ldapadd command fails.
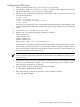
Figure 3 Searching for an Entry Modifying an Entry in the Directory 1. Use a text editor to create an LDIF file, saved as /tmp/modify.ldif, with the following content: dn: uid=tomy,dc=osm,dc=example,dc=com changetype: modify replace: mail mail: newmail@example.com add: title title: added title delete: carLicense 2. Enter the following command: # /opt/symas/bin/ldapmodify -x -D "cn=Manager,dc=example,dc=com" \ -W -f /tmp/modify.ldif Figure 4 Modifying an Entry 3.
-W "uid=tomy,dc=osm,dc=example,dc=com" 2. To verify the deletion, enter the following command: # /opt/symas/bin/ldapsearch -x -D "cn=Manager,dc=example,dc=com" \ -W "uid=tomy" Modifying the Relative Distinguished Name for an Entry in the Directory 1.
6. Before you reload the data from the LDIF file, shut down the CDS server by entering the following command: # /etc/init.d/cdsserver stop 7. Reload data from the LDIF file using the slapadd utility by entering the following command: # /opt/symas/bin/slapadd -l backup.ldif 8. Restart the CDS server and check the restored data by entering the following commands: # /etc/init.
8. To place the data files and log files in a consistent state, run the following command: # /opt/symas/bin/db_recover –c –h /var/symas/openldap-data/example/ 9. Start the CDS server and verify the recover results by entering the following commands: # /etc/init.d/cdsserver start # /opt/symas/bin/slapcat Obtaining Statistics for the Berkeley DB Use the db_stat utility, contained in the CDS distribution, to obtain statistics and state information for the Berkeley DB environment.
refreshAndPersist mode is used, the engine is always ready to handle persistent synchronization messages from the master server. Setting Up the Replication The syncrepl method uses a slave-side replication engine. To set up a syncrepl replication in refreshOnly mode, enable the syncrepl engine on the CDS slave server. Additionally, enable the syncprov overlay feature on the CDS master server.
syncrepl_entry: 'dn_of_the_last_entry' syncrepl_entry: be_add(0) NOTE: For a list of the different levels of debugging messages, see “Debugging the CDS Server” (page 12).
/usr/lib64/apache2/mod_ldap.so # rpm -qil apache2 | grep mod_authnz_ldap The following value is returned: /usr/lib64/apache2/mod_authnz_ldap.so 3. Edit the file /etc/sysconfig/apache2 by adding mod_ldap and mod_authnz_ldap to the value of APACHE_MODULES.
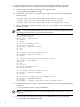
Figure 6 Log In Prompt If the log in fails, the following message is displayed: Authorization Required If the log in succeeds, the following message is displayed: The LDAP support worked! Testing the Secure SSL-Enabled LDAP Connections For this example, assume you need to restrict access to the directory /srv/www/htdocs/ldapssltest and grant access to the directory for the user tomy with the password tom. 1. Create an HTML file named /srv/www/htdocs/ldapssltest/index.
5. Launch a browser window and navigate to: http://Your_Web_Server_IP/ldapssltest/ 6. At the prompt, log in with the user name tomy and password tom. If the log in fails, the following message is displayed: Authorization Required If the log in succeeds, the following message is displayed: The LDAP SSL support worked! Setting up Security for the CDS Server CDS runs in different computing environments from tightly controlled local networks to the global Internet.
This section provides the steps for configuring SASL with the DIGEST-MD5 and EXTERNAL mechanism. Configuring SASL with DIGEST-MD5 In the DIGEST-MD5 security mechanism, when authentication begins, the server generates a secure message and the client sends a response proving it knows the secure message. Because the secure message is not sent over the wire, this mechanism is more secure than Simple Authentication. 1. 2.
uid=, cn=, cn=auth The ldapwhoami command can be used to check the identity for a user. The following steps describe how to map the SASL user, osmsusr@master, to a DN in the LDAP namespace that is in the form: uid=osmsusr,ou=people,dc=osm,dc=example,dc=com 1.
Using TLS TLS is almost identical to SSL. It provides lower network security services and integrity and confidentiality protections for directory servers. Combined with the EXTERNAL mechanism of SASL, TLS can offer strong authentication. TLS uses the X.509 certificates to carry client and server identities. All servers must have valid certificates, but client certificates are optional. If SASL EXTERNAL is used for authentication, clients must own valid certificates as well.
11. Copy the newreq.pem file created in step 9 and the newcert.pem file in step 10 to the CDS server, and put them in the /opt/symas/ssl/ directory. On the CDS server, rename the file newreq.pem to serverkey.pem and rename the file newcert.pem to servercert.pem 12. Add the paths of the server certificate file and key file to the slapd.conf file by setting the values as follows: TLSCertificateFile /opt/symas/ssl/servercert.pem TLSCertificateKeyFile /opt/symas/ssl/serverkey.pem 13.
3. 4. Copy the files newreq.pem and newcert.pem, which were created in step 2, to the CDS client and move them to the /opt/symas/ssl/ directory. Rename the file newreq.pem to clientkey.pem and the file newcert.pem to clientcert.pem. Set the environment variables by running the following commands: # export LDAPCONF=home_directory # export LDAPRC=ldap.rc The ldap.rc file should be created in the home_directory.
following the steps in “Mapping SASL Users to Distinguish Names” (page 23). The only difference is that the directive in slapd.conf is sasl-regexp instead of authz-regexp. Directory Security Access to the slapd entries and attributes stored in the CDS server is controlled by the Access Control Lists (ACLs) which are configured by access directives in the file slapd.conf.
objectClass: organizationalUnit dc: dn1 ou: dn1 dn: dc=dn2,dc=example,dc=com objectClass: dcObject objectClass: organizationalUnit dc: dn2 ou: dn2 dn: dc=dn3,dc=example,dc=com objectClass: dcObject objectClass: organizationalUnit dc: dn3 ou: dn3 dn: dc=dn4,dc=example,dc=com objectClass: dcObject objectClass: organizationalUnit dc: dn4 ou: dn4 dn: dc=dn5,dc=example,dc=com objectClass: dcObject objectClass: organizationalUnit dc: dn5 ou: dn5 3.
The following output displays: Compare Result: Insufficient access (50) UNDEFINED 7.
objectClass: organizationalUnit dc: osm ou: osm userPassword:: e1NTSEF9ajJBQjhFUmNvZitTV0V5Rkp3ZGtjWE5va0J6ODFYa0g= Because the user dc=dn4,dc=example,dc=com is granted the read privilege, the ou and userPassword attributes are displayed in the results. 11. Create a modify.ldif file, to verify that the user dc=dn4,dc=example,dc=com cannot modify the ou attribute of dc=osm,dc=example,dc=com, using the following content: dn: dc=osm,dc=example,dc=com changetype: modify replace: ou ou: osm.
HP OpenView Operations (OVO) is a distributed, client/server software solution designed to provide service-driven event and performance management of business-critical enterprise systems, applications, and services. The SPI for CDS is a value-add software component for HP OVO. This software is provided free to all customers of HP OVO for use under the terms and conditions documented on the download Web page.
Table 4 OVOW Software Patches (continued) Patch Name Version Patch Dependencies OVO Message Agent and Action Management patch A.07.32 OVOW_00213 OVOW_00166; OVOW_00068 OVO Message Agent and Action Management patch A.07.33 OVOW_00234 None The patches listed in Table 4 can be found on the HP OpenView support website located at: http://support.openview.hp.com/patches/patch_index.
• • Unbind Write Waits For the OpenLDAP-SPI monitor tools to work properly, you must configure the monitor database of the respective LDAP server (OpenLDAP or CDS). For example, add the following lines to the slapd.conf file: # --- monitor backend database monitor access to dn.subtree="cn=Monitor" by dn.