
Migrating vPar Systems to Integrity VM

12 of 13
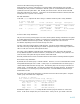
7. Activate the root volume group
# vgchange -a y /dev/vg00
Activated volume group
Volume group "/dev/vg00" has been successfully changed.
8. Manually cleanup and prepare the LVM logical volumes
# lvrmboot -r /dev/vg00
lvrmboot: Unable to Remove Swap Logical Volume
Volume Group configuration for /dev/vg00 has been saved in
/etc/lvmconf/vg00.conf
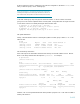
# lvlnboot -b /dev/vg00/lvol1
Volume Group configuration for /dev/vg00 has been saved in
/etc/lvmconf/vg00.conf
# lvlnboot -r /dev/vg00/lvol3
Volume Group configuration for /dev/vg00 has been saved in
/etc/lvmconf/vg00.conf
# lvlnboot -s /dev/vg00/lvol2
Volume Group configuration for /dev/vg00 has been saved in
/etc/lvmconf/vg00.conf
# lvlnboot -d /dev/vg00/lvol2
Volume Group configuration for /dev/vg00 has been saved in
/etc/lvmconf/vg00.conf
# mount
/ on /dev/root ioerror=nodisable,log,dev=1f050004 on Fri Jan 20
19:20:13 2006
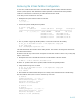
9. Verify the hardware path for boot device matches the primary boot path
# lvlnboot -v /dev/vg00
Boot Definitions for Volume Group /dev/vg00:
Physical Volumes belonging in Root Volume Group:
/dev/dsk/c5t0d0s2 (0/0/0/0.0.0) -- Boot Disk
Boot: lvol1 on: /dev/dsk/c5t0d0s2
Root: lvol3 on: /dev/dsk/c5t0d0s2
Swap: lvol2 on: /dev/dsk/c5t0d0s2
Dump: lvol2 on: /dev/dsk/c5t0d0s2, 0
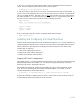
10. Manually recover the volume group
# lvlnboot -R /dev/vg00
Volume Group configuration for /dev/vg00 has been saved in
/etc/lvmconf/vg00.conf
11. Reboot the VM in multi-user mode
# reboot
Note that whenever the system reboots you may need to use the EFI Boot Manager to manually create
a boot option for the LIF file system (in our example, this is fs0).
Recover Storage Configuration
Once the system boots in multi-user mode, you can recover the storage configuration for the system.
In particular, follow the steps for volumes created with LVM or VxVM as outlined in the references
mentioned above in the section “General Volume Group Information.”