
HP mc-Series 5042 Rack Options Installation Guide

Automatic Door Release Kit 11
• M5 socket screwdriver
• Allen wrench (included in the kit contents)
• Measuring tape
A T screwdriver is optional to ease installation.
Installing the front automatic door release kit
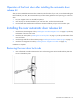
1. Using a T-30 Torx screwdriver, remove the existing front door lock catches by removing the screw from
each of the two front door lock catches.
2. Install the front electromagnetic lock ("Installing the front electromagnetic lock" on page 11).
3. Install the front strike plate ("Installing the front strike plate" on page 13).
4. Install the front door release spring ("Installing the front door release spring" on page 15).
5. Install the front magnetic lock cable ("Installing the front magnetic lock cable" on page 17).
Installation is complete.
CAUTION:
HP recommends keeping your latch handle locked and using the fixed door handles
above and below the latch to open your rack front door.
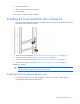
Installing the front electromagnetic lock
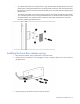
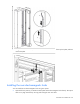
1. On the front rack frame, count up from the bottom to locate the 40
th
and 42
nd
holes. Align the
electromagnetic lock bracket with these holes (1).