
Replacement Instructions for the AC Tranfer Switch HP Modular Cooling System


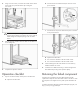

Powering down the MCS unit
1. Open the front MCS door.
2. Turn off the AC1 and AC2 breakers on the AC transfer switch.
3. Open the rear MCS door.
WARNING: To reduce the risk of electric shock or
damage to the equipment:
• Do not disable the power cord grounding plug. The
grounding plug is an important safety feature.
• Plug the power cord into a grounded (earthed)
electrical outlet that is easily accessible at all times.
• Unplug the power cord from the power supply to
disconnect power to the equipment.
• Do not route the power cord where it can be walked
on or pinched by items placed against it. Pay
particular attention to the plug, electrical outlet, and
the point where the cord extends from the storage
system.
4. Disconnect the two AC power cables from the power
connectors, labeled Primary and Secondary, on the power inlet
box.
5. Disconnect the network cable from the RJ-45 connector on the
power inlet box.
Required tools
To complete the following steps, you will need:
• T-25 Torx driver
• Flat-head screwdriver
Removing the AC transfer
switch
1. Power down the MCS unit ("Powering down the MCS unit" on
page 2).
2. Open the front MCS door.
3. Slide the metal AC transfer switch box out toward you on the
sliding rails.
4. Using a T-25 Torx driver, remove the four Torx screws securing
the AC transfer switch chassis to the water group controller
chassis. The transfer switch chassis cannot be completely
removed yet because the cables are still connected.
5. Disconnect the green and yellow ground bonding wires from
the water group controller.