
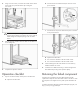
Replacement Instructions for the AC Tranfer Switch HP Modular Cooling System


6. Disconnect the electrical power cables from the rear of the AC
transfer switch.
a. Disconnect the three large cables, starting from the left and
moving to the right, by inserting a small flathead
screwdriver in between the cable connection and the latch,
and pulling the cable out from the connector.
b. Disconnect the three small cables, starting from the left and
moving to the right, by pressing the small tab on the bottom
of each small cable and pulling it out from the connector.
After you have disconnected all of the cables, the transfer switch
chassis is free from restraint and can be removed from the water
group controller chassis.
To replace this component, see "Replacing the AC transfer switch (on
page 3)."
Replacing the AC transfer
switch
1. Connect the green and yellow ground bonding wires to the
water group controller.
2. Connect the electrical power cables from the MCS unit to the
AC transfer switch.
a. Connect the three small cables, starting from the right and
moving to the left, by pressing the tab on the bottom of
each cable and pushing it into the connector.
b. Connect the three large cables, starting from the right and
moving to the left, by pushing the cable into the connector.