
Replacement Instructions for the Automatic Door Release HP Modular Cooling System

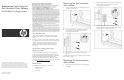


Removing the rear automatic
door release
1. Unplug the top and bottom electromagnetic lock cables
from the extension lock cable.
NOTE: Be sure to note the location of the
electromagnetic brackets prior to removal.
2. Using a T-25 Torx driver, remove the four screws
securing the upper and lower electromagnetic lock
brackets to the rack chassis.
3. Using an Allen wrench, remove the two black cap
screws securing each electromagnetic lock to its
electromagnetic lock bracket.
4. Remove the electromagnetic locks and cables from
the rack.
To replace this component, see "Replacing the rear automatic
door release (on page 2)."
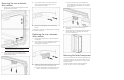
Replacing the rear automatic
door release
1. Align the electromagnetic locks to the electromagnetic
lock brackets.
2. Using an Allen wrench, insert and tighten two black cap
screws to secure each electromagnetic lock to its
electromagnetic lock bracket.
3. Install the top electromagnetic lock bracket to the rack
chassis in the location you noted during removal.
a. Align the electromagnetic lock assembly to the rack
chassis in the location you noted during removal.
b. Using a T-25 Torx driver, insert and tighten two
M5.5 self-tapping screws into the inner row of rack
holes to secure the electromagnetic lock assembly to
the rack chassis.
4. Repeat step 3 for the bottom electromagnetic
lock bracket.
5. Route the magnetic lock cable through the rear extension
channel, across the rack, and plug it into the panel
connector on the MCS unit.
Returning the failed component
Instructions are provided on the return label supplied with the
replacement component. The return label is either in the box
in which the component was shipped or in the plastic pouch
attached to the box.
For further information about the Customer Self Repair
program, see http://www.hp.com/go/selfrepair.