
Replacement Instructions for the Heat Exchanger Unit HP Modular Cooling System
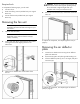
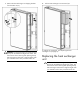
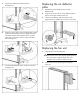

Removing the heat exchanger
unit
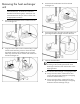
NOTE: The heat exchanger units are deep-seated
within the MCS unit. To access the connections
described in the following steps, extend your arm
inside the MCS unit until you come in contact with
the appropriate connectors.
1. Disconnect the temperature sensor connector from the
heat exchanger unit.
2. Using the counter hold wrench to hold the fitting in place
and the water hose fitting wrench to loosen the water
hose (both wrenches are included with your original
MCS unit), disconnect the In and Out water hoses from
the heat exchanger unit.
3. Disconnect the condensation hose from the heat
exchanger unit.
4. Disconnect the green and yellow ground bonding wire
grounding the heat exchanger unit to the MCS unit.
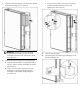
5. Open the front MCS door.
IMPORTANT: Keep the Torx screws separated
according to their thread type and note which
thread type came from which hole location on the
shipping bracket.
6. Remove the two heat exchanger unit shipping brackets.
a. Using a T-25 Torx driver, remove the four Torx
screws securing the heat exchanger unit shipping
brackets to the MCS frame (1).
b. Using a T-25 Torx driver, remove the four Torx
screws securing the heat exchanger unit shipping
brackets to the heat exchanger unit (2).