
Replacement Instructions for the Water Group Controller HP Modular Cooling System


Replacing the AC transfer
switch
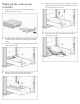
1. Connect the green and yellow ground bonding wires to
the water group controller.
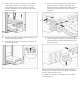
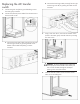
2. Connect the electrical power cables from the MCS unit to
the AC transfer switch.
a. Connect the three small cables, starting from the right
and moving to the left, by pressing the tab on the
bottom of each cable and pushing it into the
connector.
b. Connect the three large cables, starting from the right
and moving to the left, by pushing the cable into the
connector.
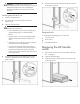
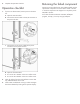
3. Using a T-25 Torx driver, secure the AC transfer switch
chassis to the water group controller chassis by inserting
four Torx screws.
CAUTION: To prevent damage to the cables and
ensure proper fit of the transfer switch chassis, be
sure to route all cables through the U-shaped
opening in the rear of the chassis.
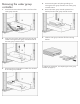
4. Slide the metal AC transfer switch box back into the
MCS unit on the sliding rails.