
MSA 2040 SMU Reference Guide


58 Configuring the system
Configuring drive spin down for a vdisk
The drive spin down (DSD) feature monitors disk activity within system enclosures and spins down inactive disks to
conserve energy. For a specific vdisk, you can enable or disable DSD and set the period of inactivity after which the
vdisk’s disks and dedicated spares automatically spin down.
To configure a time period to suspend and resume DSD for all vdisks, see "Scheduling drive spin down for all disks"
(page 50). To configure DSD for available disks and global spares, see "Configuring drive spin down for available
disks and global spares" (page 49).
DSD affects disk operations as follows:
• Spun-down disks are not polled for SMART events.
• Operations requiring access to disks may be delayed while the disks are spinning back up.
• If a suspend period is configured and it starts while a vdisk has started spinning down, the vdisk spins up again.
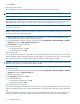
To configure DSD for a vdisk
1. In the Configuration View panel, right-click a vdisk and select Configuration > Configure Vdisk Drive Spin Down.
2. Set the options:
• Either select (enable) or clear (disable) the Enable Drive Spin Down option.
• Set the Drive Spin Down Delay (minutes) option, which is the period of inactivity after which the vdisk’s disks
and dedicated spares automatically spin down, from 1–360 minutes.
3. Click Apply. When processing is complete a success dialog appears.
4. Click OK.
Configuring a volume
Changing a volume’s name
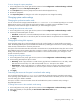
To change a volume’s name
1. In the Configuration View panel, right-click a volume and select Configuration > Modify Volume Name.
2. Enter a new name. A volume name is case sensitive; cannot already exist in a vdisk; cannot include a comma,
double quote, angle bracket or backslash; and can have a maximum of 32 bytes.
3. Click Modify Name. The new name appears in the Configuration View panel.
Changing a volume’s cache settings
For explanations of volume cache options, see "About volume cache options" (page 21).
CAUTION:
• Only disable write-back caching if you fully understand how the host operating system, application, and adapter
move data. If used incorrectly, you might hinder system performance.
• Only change read-ahead cache settings if you fully understand how the host operating system, application, and
adapter move data so that you can adjust the settings accordingly.
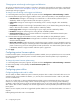
To change a volume’s cache settings
1. In the Configuration View panel, right-click a volume and select Configuration > Modify Volume Cache Settings.
2. In the main panel, set the read-ahead cache options:
• Write Policy. Select Write-back or Write-through. The default is Write-back.
• Write Optimization. Select Standard or No-mirror. Atomic write is not supported in this release.
• Write Optimization. Select Standard or No-mirror. The default is Standard.
• Read Ahead Size. Select Disabled, Adaptive, Stripe, or a specific size (512KB, 1MB, 2MB, 4MB, 8MB, 16MB,
or 32MB).
3. Click Modify Cache Settings.