
HP StorageWorks MSL8096 Tape Library getting started guide (AH218-96002, March 2007)
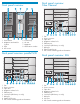
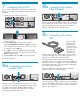
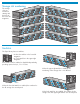

Determining your rack type
1
Securing the rails to the rack
2
You will need a #2 and #3 Phillips screwdriver, the two
rack rails, and the packet of M6 screws and clip nuts
appropriate for your rack.
• The HP System/E rack has 7.1 mm round holes in
the rack column. Choose the packet labeled HP Rack
System/E.
• The HP 5000 and 10000 racks have 9.5 mm square
holes in the rack column. Choose the packet labeled
HP Rack 5000, 10000.
Using the screws for your rack type and a #3 Phillips
screwdriver, secure the front and back of each rail to
the rack. The front of each rail is straight and the back
is angled, as shown.
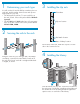
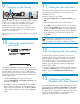
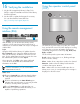
Installing the clip nuts
3
On the front of the rack, install two clip nuts on each
side in the locations shown.
Clip nut location
1U markers
Rail attach location
Base of Library location
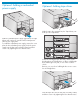
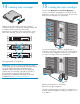
Installing the Library
4
Slide the Library onto the rails. Secure the front bezel to
the rack using a #2 Phillips screwdriver placed through
the small holes in the mounting bracket to tighten the
captive screws on each side of the Library.
1
2