
HP StorageWorks MSL8096 Tape Library getting started guide (AH218-96002, March 2007)

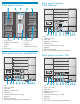
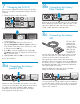


Attach the Ethernet cable to the Library and to the LAN.
Plug the power cable into the Library and into a power
outlet. If you installed the redundant power supply,
attach a power cable to its power connector.
Power on the Library using the power button on the
front panel. Check the LCD screen to make sure the
Library is receiving power.
Power on the host server and any devices you powered
off earlier.
Powering on the Library
9
Setting the date and time
11
This option sets the date and time used by the Library to
record events and should be set during the initial
installation process.
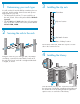
Using the operator control panel:
1. Highlight Configuration > Set Date and Time, press
OK.
2. Enter the administrator password if prompted.
3. Press OK to select the first block that can be edited.
Use the Left and Right arrows to move between the
digits in the Date and Time fields. Use the Up and
Down arrows to change the value of the highlighted
digit. When the screen shows the desired value,
press OK.
Configuring the networking
12
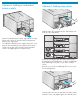
Configuring the networking enables you to monitor,
configure, and control most Library functions from the
RMI. By default, the Library will obtain an IP address
from a DHCP server. You can configure the Library to
use a static IP address. Once the Library has an IP
address, you can change the network configuration
from the OCP or RMI.
To see the IP address obtained from a DHCP server, go
to the Info > Network option. To configure a static IP
address, go to the Configuration > Network option.
HP recommends leaving the Fibre Channel ports at the
default settings of Port Speed: Automatic and Port Type:
Auto Detect. With these settings the drive will choose
the appropriate configuration. See the User and Service
Guide on the documentation CD for instructions on
changing the Fibre Channel configuration.
NOTE: When setting the hours, the time is based
on a 24-hour clock. There is no am or pm
designation. For example, 1:00 pm is 13:00.
Setting an administrator password provides access to
the administrator functions with the remote management
interface (RMI), and restricts access to administrator
functions from people who do not know the password.
Passwords must be exactly eight digits consisting of the
numbers 0 through 9.
1. Use the control keys below the LCD screen to
highlight Configuration > Set Admin Password, and
then press the OK key.
2. Press OK to select the editable block. The Left and
Right control keys allow you to move between the
digits in the password field. Use the Up and Down
control keys to change the value of the highlighted
digit.
Setting the administrator
password
10
Configuring the Fiber
Channel ports: Fibre Channel
13