
HP MSR1000 Router Series Installation Guide
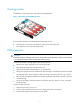
Table Of Contents
- Title Page
- Contents
- Preparing for installation
- Installing the router
- Replacement procedure
- Troubleshooting
- Appendix A Chassis views and technical specifications
- Appendix B LEDs
- Appendix C Slot arrangement
- Support and other resources
- Index
3
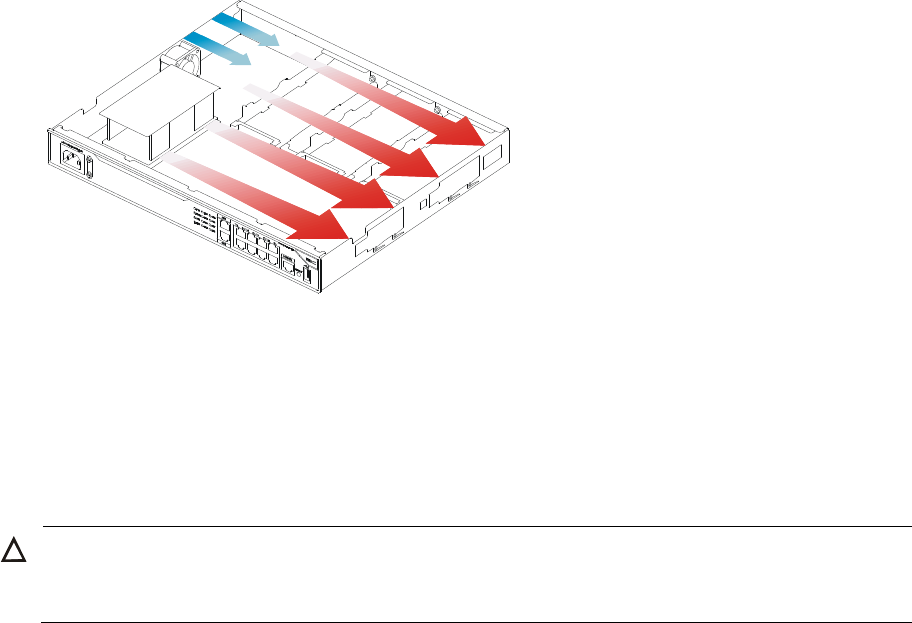
Cooling system
The MSR1000 router adopts left to right airflow for heat dissipation.
Figure 1 Airflow through the MSR1000 chassis
To ensure good ventilation, the following requirements must be met:
• Leave at least 10 cm (3.94 in) of clearance at the air inlet and outlet vents.
• The installation site has a good cooling system.
ESD prevention
CAUTION:
Check the resistance of the ESD wrist strap for safety. Make sure the resistance reading is in the ran
g
e of
1 to 10 megohm (Mohm) between human body and the ground.
To prevent electrostatic discharge (ESD), follow these guidelines:
• Make sure the router and the floor are correctly grounded.
• Take dust-proof measures for the equipment room.
• Maintain the humidity and temperature at a compliant level.
• Always wear an ESD wrist strap and ESD cloth when touching a circuit board or transceiver module.
An MSR1000 router does not supply an ESD wrist wrap. Prepare an ESD wrist wrap yourself.
• Place the removed interface module on an antistatic workbench, with the face upward, or put it into
an antistatic bag.
• Touch only the edges, instead of electronic components when you observe or move a removed
interface module.
To attach an ESD wrist strap:
1. Wear the wrist strap on your wrist.
2. Lock the wrist strap tight around your wrist to keep good contact with the skin.
3. Insert the ESD plug into the ESD socket on the chassis.