
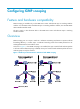
HP MSR2000/3000/4000 Router Series IP Multicast Configuration Guide


21
Ste
p
Command
Remarks
2. Enter IGMP-snooping view.
igmp-snooping N/A
3. Set the maximum response
time for IGMP general
queries.
max-response-time interval The default setting is 10 seconds.
4. Set the IGMP last-member
query interval.
last-member-query-interval
interval
The default setting is 1 second.
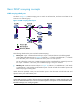
Configuring parameters for IGMP queries and responses in a VLAN
Ste
p
Command
Remarks
1. Enter system view.
system-view N/A
2. Enter VLAN view.
vlan vlan-id N/A
3. Set the maximum response
time for IGMP general queries
in the VLAN.
igmp-snooping
max-response-time interval
The default setting is 10 seconds.
4. Set the IGMP last-member
query interval.
igmp-snooping
last-member-query-interval
interval
The default setting is 1 second.
Configuring IGMP snooping port functions
Before you configure IGMP snooping port functions, complete the following tasks:
• Enable IGMP snooping for the VLAN.
• Determine the aging timer for dynamic router ports.
• Determine the aging timer for dynamic member ports.
• Determine the addresses of the multicast group and multicast source.
Setting aging timers for dynamic ports
When you set aging timers for dynamic ports, follow these guidelines:
• If the memberships of multicast groups frequently change, you can set a relatively small value for the
aging timer of the dynamic member ports. If the memberships of multicast groups rarely change,
you can set a relatively large value.
• If a dynamic router port receives a PIMv2 hello message, the aging timer for the port is the timer in
the hello message rather than the timer configured by using the router-aging-time command or the
igmp-snooping router-aging-time command.
• You can set the aging timers for dynamic ports either for the current VLAN in VLAN view or globally
for all VLANs in IGMP-snooping view. If the configurations are made in both VLAN view and
IGMP-snooping view, the configuration made in VLAN view takes priority.
Setting the aging timers for dynamic ports globally
Ste
p
Command
Remarks
1. Enter system view.
system-view N/A