
HP MSR2000/3000/4000 Router Series MPLS Configuration Guide


140
Ste
p
Command
Remarks
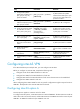
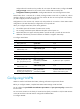
1. Enter system view.
system-view N/A
2. Enter BGP view.
bgp as-number N/A
3. Specify a BGP peer or peer
group.
peer { group-name |
peer-address } as-number
as-number
By default, no BGP peer is
specified.
4. Enter BGP-VPN VPNv4
address family view.
address-family vpnv4 N/A
5. Enable BGP-VPNv4 route
exchange with the peer or
peer group.
peer { group-name | ip-address }
enable
By default, BGP does not exchange
VPNv4 routes with any peer.
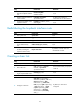
6. Specify the BGP peer or peer
group as a UPE.
peer { group-name | ip-address }
upe
By default, no peer is a UPE.
7. Advertise routes to the UPE.
• Advertise a default VPN route
to the UPE:
peer { group-name |
ip-address }
default-route-advertise
vpn-instance
vpn-instance-name
• Advertise routes permitted by a
routing policy to the UPE:
peer { group-name |
ip-address } upe route-policy
route-policy-name export
Use either command.
By default, no route is advertised to
the UPE.
Do not configure both commands.
The peer default-route-advertise
vpn-instance command advertises
a default route using the local
address as the next hop to the UPE,
regardless of whether the default
route is present in the local routing
table. However, if the specified
peer is not a UPE, the command
does not advertise a default route.
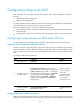
Configuring an OSPF sham link
When a backdoor link exists between the two sites of a VPN, you can create a sham link between PEs
to forward VPN traffic through the sham link on the backbone rather than the backdoor link. A sham link
is considered an OSPF intra-area route.
The source and destination addresses of the sham link must be loopback interface addresses with 32-bit
masks. The loopback interfaces must be bound to VPN instances, and their addresses are advertised
through BGP.
Before you configure an OSPF sham link, complete the following tasks:
• Configure basic MPLS L3VPN (OSPF is used between PE and CE).
• Configure OSPF in the LAN where customer CEs reside.
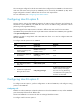
Configuring a loopback interface
Ste
p
Command
Remarks
1. Enter system view.
system-view N/A