
HP MSR3000 Router Series Installation Guide


15
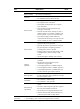
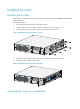
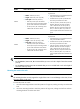
Model Router dimensions
Rack clearance re
q
uirements
3044
• Width—440 mm (17.32 in)
• Height—88.2 mm (3.47 in) (2 RU)
• Total depth—600 mm (23.62 in)
{ 480 mm (18.90 in) for the chassis
{ 60 mm (2.36 in) for connecting an RPS
power cord at the front of the chassis
{ 60 mm (2.36 in) for connecting an E1
cable at the rear of the chassis
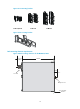
The rack must meet all the following
requirements:
• At least 80 mm (3.15 in) between the front
rack post and the front door.
• At least 550 mm (21.65 in) between the
front rack post and the rear door.
• 310 mm (12.20 in) to 440 mm (17.32 in)
between the front and rear rack posts,
with a clearance of 160 mm (6.30 in)
between the rear rack post and the rear
door, or 465 mm (18.31 in) to 595 mm
(23.43 in) between the front and rear rack
posts.
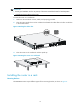
3064
•
Width—440 mm (17.32 in)
• Height—130.5 mm (5.14 in) (3 RU)
• Total depth—600 mm (23.62 in)
{ 480 mm (18.90 in) for the chassis
{ 60 mm (2.36 in) for connecting an RPS
power cord at the front of the chassis
{ 60 mm (2.36 in) for connecting an E1
cable at the rear of the chassis
The rack must meet all the following
requirements:
• At least 80 mm (3.15 in) between the front
rack post and the front door.
• At least 550 mm (21.65 in) between the
front rack post and the rear door.
• 310 mm (12.20 in) to 440 mm (17.32 in)
between the front and rear rack posts,
with a clearance of 160 mm (6.30 in)
between the rear rack post and the rear
door, or 465 mm (18.31 in) to 595 mm
(23.43 in) between the front and rear rack
posts.
IMPORTANT:
• For the MSR3012/3024 router, HP recommends that you use a rack with a depth of more than 0.68 m
(2.23 ft).
• For the MSR3044/3064 router, HP recommends that you use a rack shelf and a rack with a depth of
more than 0.68 m (2.23 ft).
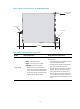
Mounting the router to the rack
W
ARNING!
The mountin
g
brackets can only support the wei
g
ht of the router. To avoid dama
g
e to the router, do not
place any objects on the router.
To mount the router to a rack:
1. Use a front mounting bracket to mark the positions of cage nuts, making sure they are at the same
level.
2. Use a rear mounting bracket to mark the positions of cage nuts, making sure the front and rear
mounting brackets are at the same level.