
HP MSR3000 Router Series Installation Guide


41
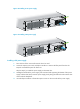
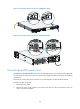
Figure 53 Removing the sticky label and protective cover
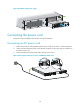
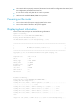
3. Insert one end of the RPS power cord to the RPS receptacle on the router and fasten the screws on
the RPS power cord plug.
4. Make sure the RPS power is OFF and connect the other end of the power cord to the RPS power
source.
Figure 54 Connecting the RPS power cord
Verifying the installation
After you complete the installation, verify that:
• There is enough space for heat dissipation around the router, and the rack or workbench is stable.
• USB devices and interface modules are properly installed.
• The router, rack, and power cords are properly grounded.
• The correct power source is used.
Powering on the router
Verifying before power-on
Before powering on the router, verify the following items:
• The power supplies are correctly installed.
• The power cord and grounding cable are properly connected.
• The power source voltage meets the requirement of the router.