
R0106-HP MSR Router Series MPLS Configuration Guide(V7)


321
Ste
p
Command
Remarks
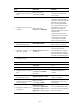
8. Redistribute remote site
routes advertised by the PE
into BGP.
import-route protocol
[ { process-id | all-processes }
[ allow-direct | med med-value |
route-policy route-policy-name ]
* ]
By default, no routes are
redistributed into BGP.
9. (Optional.) Configure
filtering of advertised routes.
filter-policy { acl6-number |
prefix-list ipv6-prefix-name }
export [ protocol process-id ]
By default, BGP does not filter
advertised routes.
10. (Optional.) Configure
filtering of received routes.
filter-policy { acl6-number |
prefix-list ipv6-prefix-name }
import
By default, BGP does not filter
received routes.
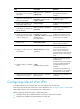
2. Configure a VPN site:
Ste
p
Command
Remarks
1. Enter system view.
system-view N/A
2. Enter BGP view.
bgp as-number N/A
3. Configure the MCE as an
IBGP peer.
peer { group-name |
ipv6-address } as-number
as-number
N/A
4. Enter BGP-VPN IPv6 unicast
address family view.
address-family ipv6 [ unicast ] N/A
5. Enable BGP to exchange
IPv6 unicast routes with the
peer.
peer { group-name |
ipv6-address } enable
By default, BGP does not
exchange IPv6 unicast routes
with any peer.
6. Redistribute the IGP routes of
the VPN into BGP.
import-route protocol
[ { process-id | all-processes }
[ allow-direct | med med-value |
route-policy route-policy-name ]
* ]
By default, no routes are
redistributed into BGP.
A VPN site must advertise VPN
network addresses to the
connected MCE.
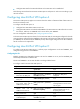
Configuring routing between an MCE and a PE
MCE-PE routing configuration includes these tasks:
• Binding the MCE-PE interfaces to IPv6 VPN instances.
• Performing routing configurations.
• Redistributing IPv6 VPN routes into the routing protocol running between the MCE and the PE.
Perform the following configuration tasks on the MCE. Configurations on the PE are similar to those on the
PE in common IPv6 MPLS L3VPN networks. For more information, see "Configuring routing between a PE
and a CE."
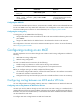
Configuring IPv6 static routing between an MCE and a PE
Ste
p
Command
Remarks
1. Enter system view.
system-view N/A