
R0106-HP MSR Router Series Security Configuration Guide(V7)


465
Configuring HTTP client verification
Configure HTTP client verification on the interface that connects to the external network. The HTTP client
verification protects internal HTTP servers against HTTP flood attacks.
IP addresses protected by HTTP client verification can be manually added or automatically learned:
• You can manually add protected IP addresses. The device performs client verification when it
receives the first HTTP Get packet destined for a protected IP address.
• The HTTP client verification can automatically add victims' IP addresses to the protected IP list when
collaborating with HTTP flood attack detection. Make sure client-verify is specified as the HTTP
flood attack prevention action. For more information, see "Configuring an HTTP flood attack
de
fense policy."
If an HTTP client is verified legitimate, the device adds the client's IP address to the trusted IP list. The
device directly forwards HTTP packets from trusted IP addresses.
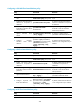
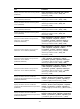
To configure HTTP client verification:
Step Command Remarks
1. Enter system view.
system-view N/A
2. (Optional.) Specify an IP
address to be protected by the
HTTP client verification
function.
client-verify http protected { ip
destination-ip-address | ipv6
destination-ipv6-address }
[ vpn-instance vpn-instance-name ]
[ port port-number ]
By default, the HTTP client
verification function does not
protect any IP address.
3. Enter Layer 3 interface view.
interface interface-type
interface-number
N/A
4. Enable HTTP client verification
on the interface.
client-verify http enable
By default, HTTP client verification
is disabled on the interface.
Configuring the blacklist function
The blacklist function filters packets sourced from IP addresses in blacklist entries.
Blacklist entries can be manually added or dynamically learned:
• You can manually add a blacklist entry by using the blacklist ip or blacklist ipv6 command. These
entries do not age out by default. You can configure an aging time for each entry.
• The device can automatically add blacklist entries when collaborating with the scanning attack
detection function. Each dynamically learned blacklist entry has an aging time. The aging timer is
user configurable. Make sure the block-source keyword is specified as the scanning attack
prevention action for collaboration. For more information about the scanning attack detection and
prevention function, see "Configuring a scanning attack defense policy."
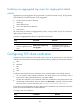
To configure the blacklist function:
Step Command Remarks
1. Enter system view.
system-view N/A