
HP B-series 16Gb FC Switches Quick Start Instructiions


4. Assemble the outer rails as follows:
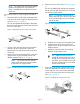
NOTE: For switches with Port Side Air
Intake, attach Left outer rail to the right side
of the rack and Right outer rail to the left
side of the rack.
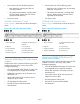
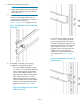
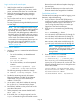
a. Attach the left outer rail and right outer rail
to the rear mounting brackets using two
1/4-20 hex with captive star lock washers
attached loosely as shown in
Figure 11 (page 7). Do not tighten the nuts.
Figure 11 Installing the outer rails (HP 10000
Series Rack)
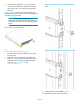
b. Depending on the rack you are using,
complete one of the following tasks:
• For an HP 10000 Series Rack, install
two #10-32 x 1/2-inch Phillips panhead
screws with captive star lock washers
and two #10 adapter washers in the
upper and lower holes on the right rail.
Then install two #10-32 x 1/2-inch
Phillips panhead screws with captive
star lock washers and two #10 adapter
washers in the upper and lower holes
on the left rail (see Figure 12 (page
7)).
Figure 12 Assembling the outer rails (HP
10000 Series Rack)
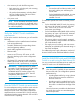
• For an HP System/e Rack, install two
#10-32 x 1/2-inch Phillips panhead
screws with captive star lock washers
and two #10 alignment washers in the
upper and lower holes on the right rail.
Then install two #10-32 x 1/2-inch
panhead screws with captive star lock
washers and two #10 alignment
washers in the upper and lower holes
on the left rail (see Figure 13 (page
7)).
Figure 13 Assembling the outer rails (HP
System/e Rack)
Page 7