
HP StorageWorks SAN Director Installation Guide (A7393-90009, May 2007)


SAN Director installation guide 105
CAUTION: Do not power cycle or reboot the Director or replace the CP cards or port cards until
the WWN card is verified as functional or a replacement WWN is installed. If any of these events
happen while the WWN card is failed or removed, the configuration information is lost, and it will
be necessary to reconfigure the Director after installing the new WWN card.
Disassembling any part of the WWN card voids the part warranty and regulatory certifications.
The WWN contains no serviceable parts.
2. Verify that you are logged into the active CP. Run the haShow command to determine the active
CP.
3. Type fruReplace wwn from the active CP card and wait for the message Do you wish to
continue [y/n]? to display; then enter y.
4. Wait until the WWN card data is backed up. Do not type continue until the mechanical
replacement is complete (see ”Installing a WWN card” on page 108).
5. Wait until all the LEDs on the WWN bezel turn off.
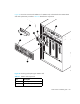
6. Unscrew both captive screws on the WWN bezel (see Figure 29); then, pull the bezel away
from chassis and set it aside. The WWN card is visible.
CAUTION: To protect the WWN card components, wear an ESD grounding strap and prepare
an antistatic bag or grounding pad on which to place the WWN card. Do not place anything on
top of the card.
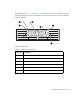
switch:admin> frureplace wwn
This is the WWN card hot swap interface.
Continuing from this point will require
the whole process to be completed.
If this process is not complete due to a
power cycle, or CP failover, please follow
the recovery procedure in
Core Switch WWN Card Removal and
Replacement document.
Do you wish to continue [y/n]?
Backing up WWN card data, please wait about 25 seconds for further instruction.
Please install the new FRU now.
If this session lost for any reason, please re-enter the frureplace command and
follow the instructions to complete the operation.
Please enter the word `continue' after the new WWN card has been installed: