
HP StorageWorks SAN Director Installation Guide (A7393-90009, May 2007)


SAN Director installation guide 45
NOTE: You can install up to two HP StorageWorks Director class switches in the HP 10,000 series
or HP System/e racks.
1. If you have not already done so, remove the chassis door. See ”Removing the chassis door” on
page 40.
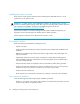
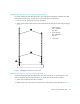
2. Locate the left and right rack mount shelf brackets. Refer to Figure 4 and Table 5 to identify the
hardware.
3. Loosen the adjusting screws on the left and right rack mount shelf brackets, and adjust the length
of the brackets according to the depth of the rack. See Figure 6.
4. Locate the small, round marker holes on the rack rails. Each marker hole delineates the
beginning of one rail unit, or U. Leave 1U of space free at the bottom of the rack.
5. Count up five square holes from the 1U location. Align the left rack mount shelf brackets with the
fifth square hole.
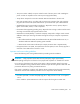
6. Attach the rack mount shelf brackets:
a. For rails with round holes, position the left and right rack mount shelf brackets with notched
portion toward exhaust aisle (see Figure 6) and attach to rack rails, using six 1/4-20 x
0.500-inch (1.27 cm) screws with lock washers per bracket (two on the notched end and four
on the other end).
b. For rails with square holes, attach the left rack mount shelf bracket to the rack rails using six
1/4-20 x 0.500-inch screws and six square washers. See Figure 6.
CAUTION: All 14U Rack Mount Kit hardware and screws are supplied with the switch. Use the
exact screws specified in the procedure. Using longer screws may damage the chassis.