
HP StorageWorks SAN Director Installation Guide (A7393-90009, May 2007)


SAN Director installation guide 49
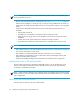
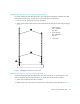
Figure 8 Attaching the left and right flat upper rack mount brackets
4. Tighten the screws and torque to 32 inch-pounds.
5. Attach the two L-shaped brackets to the rack rails farthest from the service aisle. See Figure 9.
• For rails with square holes:
Attach the two L-shaped brackets to the rack rails with two of the #1/4-20 x 1/2 inch Phillips
panhead screws and two square washers per bracket. Tighten the screws to a torque of 80
inch-pounds.
• For rails with round holes:
Attach the two L-shaped brackets to the rack rails using two of the #1/4-20 x 1/2 inch
Phillips panhead screws per bracket. Tighten the screws to a torque of 80 inch-pounds.
6. Route any cables or cords through the rack or along any other route that will be difficult to reach
after the chassis is installed. Leave enough cable allowance to plug and unplug cables from
switch.
1 Left flat upper rack mount bracket
2 #10-32 x 5/16 inch screws (4)
3 Detached L-shaped brackets (1 of 2)
4 Right flat upper rack mount bracket
SHR-2511
A
1
2
3
4