
Brocade Web Tools Administrator's Guide - Supporting Fabric OS v7.0.0 (53-1002152-01, March 2012)


132 Web Tools Adminstrator’s Guide
53-1002152-01
Zone configuration and zoning database management
9
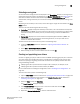
To enable the zone configuration, perform the following steps.
1. Open the Zone Admin window as described in “Opening the Zone Admin window” on page 118.
2. Select Zoning Actions > Enable Config.
3. On Enable Config, select the configuration to be enabled from the menu.
4. Click OK to save and enable the selected configuration.
Disabling zone configurations
When you disable the active configuration, the Advanced Zoning feature is disabled on the fabric,
and all devices within the fabric can communicate with all other devices. This does not mean that
the zoning database is deleted, however, only that there is no configuration active on the fabric.
When you disable a zone configuration from Web Tools, keep in mind that the entire zoning
database is automatically saved, and then the selected zone configuration is disabled.
NOTE
When you disable the active configuration, Advanced Zoning is disabled on the fabric, and according
to the default zone set, devices within the fabric can or cannot communicate with other devices.
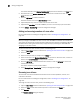
To disable a zone configuration, perform the following steps.
1. Open the Zone Admin window as described in “Opening the Zone Admin window” on page 118.
2. Select Zoning Actions > Disable Zoning.
The Disable Config warning message displays.
3. Click Yes to save and disable the current configuration.
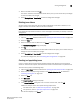
Displaying enabled zone configurations
The enabled zone configuration screen displays the actual content of the single zone configuration
that is currently enabled on the fabric, whether it matches the configuration that was enabled
when the current Zone Admin session was launched or last refreshed. The zones are displayed,
and their contents (ports, WWNs) are displayed next to them. Aliases are not displayed in the
enabled zone configuration. If there is no active zone configuration enabled on the switch, a
message displays to that effect.
NOTE
The enabled configuration is listed in the lower-right corner of the Zone Admin window.
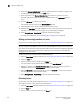
Viewing the enabled zone configuration name without
opening the Zone Admin window
To view the enabled zone configuration name, perform the following steps.
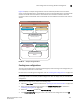
1. Select a logical switch using the drop-down list under Fabric Tree section in the Switch Explorer
window.
The selected switch displays in the Switch View.